Pfaff creative vision Owner's Manual - Page 28
Inserting the bobbin - bobbin case
 |
View all Pfaff creative vision manuals
Add to My Manuals
Save this manual to your list of manuals |
Page 28 highlights
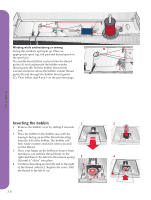
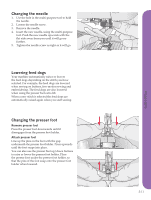
Winding while embroidering or sewing Swing the auxiliary spool pin up. Place an appropriate spool cap, felt pad and thread spool on the spool pin. The needle thread (blue) is placed into the thread guide (A) and underneath the bobbin winder thread guide (B). Pull the bobbin thread (red) counter-clockwise above the bobbin winder thread guide (B) and through the bobbin thread guides (C). Then follow step 4 and 5 on the previous page. B C A Preparations Inserting the bobbin 1 2 1. Remove the bobbin cover by sliding it towards you. 2. Place the bobbin in the bobbin case with the logotype facing up and the thread unreeling from the left of the bobbin. The bobbin will then rotate counter-clockwise when you pull out the thread. 3. Place your finger on the bobbin to keep it from turning as you pull the thread firmly to the right and then to the left into the tension spring 3 4 (A) until it "clicks" into place. 4. Continue threading around (B) and to the right B of the thread cutter (C). Replace the cover. Pull the thread to the left to cut. A C 2:8
-
 1
1 -
2
-
3
-
4
-
5
-
6
-
7
-
8
-
9
-
10
-
11
-
12
-
13
-
14
-
15
-
16
-
17
-
18
-
19
-
20
-
21
-
22
-
 23
23 -
 24
24 -
 25
25 -
 26
26 -
 27
27 -
 28
28 -
 29
29 -
 30
30 -
 31
31 -
 32
32 -
 33
33 -
34
-
35
-
36
-
37
-
38
-
39
-
40
-
41
-
42
-
43
-
44
-
45
-
46
-
47
-
48
-
49
-
50
-
51
-
52
-
53
-
54
-
55
-
56
-
57
-
58
-
59
-
60
-
61
-
62
-
63
-
64
-
65
-
66
-
67
-
68
-
69
-
70
-
71
-
72
-
73
-
74
-
75
-
76
-
77
-
78
-
79
-
80
-
81
-
82
-
83
-
84
-
85
-
86
-
87
-
88
-
89
-
90
-
91
-
92
-
93
-
94
-
95
-
96
-
97
-
98
-
99
-
100
-
101
-
102
-
103
-
104
-
105
-
106
-
107
-
108
-
109
-
110
-
111
-
112
-
113
-
114
-
115
-
116
-
117
-
118
-
119
-
120
-
121
-
122
-
123
-
124
-
125
-
126
-
127
-
128
-
129
-
130
-
131
-
132
-
133
-
134
-
135
-
136
-
137
-
138
-
139
-
140
-
141
-
142
 |
 |
