Pfaff creative vision Owner's Manual - Page 98
nition of a control point, Select control points D, Select spacing E
 |
View all Pfaff creative vision manuals
Add to My Manuals
Save this manual to your list of manuals |
Page 98 highlights
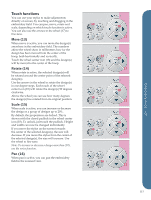
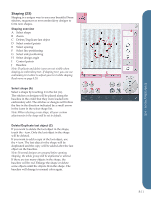
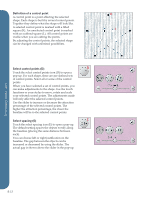
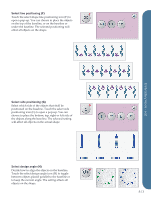
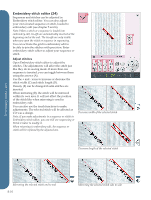
Definition of a control point A control point is a point affecting the selected shape. Each shape is built by several control points. Together they define what the shape will look like. A selected control point is marked with a filled square (K). An unselected control point is marked with an outlined square (L). All control points are visible when you are editing the points. By adjusting the control points, the selected shape can be changed with unlimited possibilites. K L Select control points (D) D Touch the select control points icon (D) to open a pop-up. For each shape, there are pre-defined sets of control points. Select all or some of the control points. When you have selected a set of control points, you can make adjustments to the shape. Use the touch functions or your stylus to move, rotate and scale your selected control points. The adjustments made will only affect the selected control points. Use the slider to increase or decrease the attraction percentage of the selected control points. The higher the attraction percentage, the closer the baseline will be to the selected control points. Select spacing (E) E Touch the select spacing icon (E) to open a pop-up. The default setting spaces the objects evenly along the baseline (placing the same distance between each). You can choose left or right justification on the baseline. The gap between the objects can be increased or decreased by using the slider. The actual gap is shown above the slider in the pop-up. Embroidery mode - edit 8:12
-
 1
1 -
2
-
3
-
4
-
5
-
6
-
7
-
8
-
9
-
10
-
11
-
12
-
13
-
14
-
15
-
16
-
17
-
18
-
19
-
20
-
21
-
22
-
23
-
24
-
25
-
26
-
27
-
28
-
29
-
30
-
31
-
32
-
33
-
34
-
35
-
36
-
37
-
38
-
39
-
40
-
41
-
42
-
43
-
44
-
45
-
46
-
47
-
48
-
49
-
50
-
51
-
52
-
53
-
54
-
55
-
56
-
57
-
58
-
59
-
60
-
61
-
62
-
63
-
64
-
65
-
66
-
67
-
68
-
69
-
70
-
71
-
72
-
73
-
74
-
75
-
76
-
77
-
78
-
79
-
80
-
81
-
82
-
83
-
84
-
85
-
86
-
87
-
88
-
89
-
90
-
91
-
92
-
 93
93 -
 94
94 -
 95
95 -
 96
96 -
 97
97 -
 98
98 -
 99
99 -
 100
100 -
 101
101 -
 102
102 -
 103
103 -
104
-
105
-
106
-
107
-
108
-
109
-
110
-
111
-
112
-
113
-
114
-
115
-
116
-
117
-
118
-
119
-
120
-
121
-
122
-
123
-
124
-
125
-
126
-
127
-
128
-
129
-
130
-
131
-
132
-
133
-
134
-
135
-
136
-
137
-
138
-
139
-
140
-
141
-
142
 |
 |
