Pfaff creative vision Owner's Manual - Page 31
Changing the needle, Lowering, feed dogs, Changing the presser foot
 |
View all Pfaff creative vision manuals
Add to My Manuals
Save this manual to your list of manuals |
Page 31 highlights
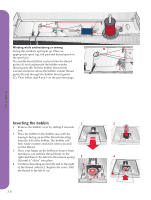
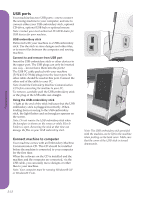
Preparations Changing the needle 1. Use the hole in the multi-purpose tool to hold the needle. 2. Loosen the needle screw. 3. Remove the needle. 4. Insert the new needle, using the multi-purpose tool. Push the new needle upwards with the flat side away from you until it will go no further. 5. Tighten the needle screw as tight as it will go. Lowering feed dogs Your machine automatically raises or lowers the feed dogs depending on the stitch you have selected. For example, the feed dogs are lowered when sewing on buttons, free-motion sewing and embroidering. The feed dogs are also lowered when using the presser foot extra lift. When a new stitch is selected the feed dogs are automatically raised again when you start sewing. Changing the presser foot Remove presser foot Press the presser foot downwards until it disengages from the presser foot holder. Attach presser foot Line up the pins on the foot with the gap underneath the presser foot holder. Press upwards until the foot snaps into place. You can also use the presser foot up/down buttons to raise or lower the presser foot holder. Place the presser foot under the presser foot holder, so that the pins of the foot snap onto the presser foot holder when lowered. 2:11
-
 1
1 -
2
-
3
-
4
-
5
-
6
-
7
-
8
-
9
-
10
-
11
-
12
-
13
-
14
-
15
-
16
-
17
-
18
-
19
-
20
-
21
-
22
-
23
-
24
-
25
-
 26
26 -
 27
27 -
 28
28 -
 29
29 -
 30
30 -
 31
31 -
 32
32 -
 33
33 -
 34
34 -
 35
35 -
 36
36 -
37
-
38
-
39
-
40
-
41
-
42
-
43
-
44
-
45
-
46
-
47
-
48
-
49
-
50
-
51
-
52
-
53
-
54
-
55
-
56
-
57
-
58
-
59
-
60
-
61
-
62
-
63
-
64
-
65
-
66
-
67
-
68
-
69
-
70
-
71
-
72
-
73
-
74
-
75
-
76
-
77
-
78
-
79
-
80
-
81
-
82
-
83
-
84
-
85
-
86
-
87
-
88
-
89
-
90
-
91
-
92
-
93
-
94
-
95
-
96
-
97
-
98
-
99
-
100
-
101
-
102
-
103
-
104
-
105
-
106
-
107
-
108
-
109
-
110
-
111
-
112
-
113
-
114
-
115
-
116
-
117
-
118
-
119
-
120
-
121
-
122
-
123
-
124
-
125
-
126
-
127
-
128
-
129
-
130
-
131
-
132
-
133
-
134
-
135
-
136
-
137
-
138
-
139
-
140
-
141
-
142
 |
 |
