Pfaff creative vision Owner's Manual - Page 4

Table of contents - 5 0 knee lift

Page 4 highlights

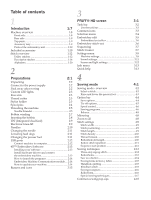
Table of contents 1 Introduction 1:7 Machine overview 1:8 Front side 1:8 Rear side 1:9 Top parts 1:9 Accessory tray 1:9 Parts of the embroidery unit 1:10 Included accessories 1:10 Stitch overview 1:12 Utility stitches 1:12 Decorative stitches 1:16 Alphabets 1:20 2 Preparations 2:1 Unpacking 2:2 Connect to the power supply 2:2 Pack away after sewing 2:2 Custom LED lights 2:3 Free arm 2:3 Thread cutter 2:3 Stylus holder 2:3 Spool pins 2:4 Threading the machine 2:5 Needle threader 2:5 Bobbin winding 2:7 Inserting the bobbin 2:8 IDT (Integrated dual feed) 2:9 Electronic knee-lift 2:9 Needles 2:10 Changing the needle 2:11 Lowering feed dogs 2:11 Changing the presser foot 2:11 USB ports 2:12 Connect machine to computer 2:12 4D™ Embroidery Software 2:13 Installing your software 2:13 Install hardware drivers and connect the embroidery machine 2:13 How to launch the programs 2:14 Embroidery Machine Communication module.... 2:14 How to update your machine 2:14 Buttons and icons 2:15 3 PFAFF® HD screen 3:1 Task bar 3:2 Use the task bar 3:3 Common icons 3:3 Selection menu 3:4 Embroidery edit 3:5 Embroidery text editor 3:6 Embroidery stitch-out 3:6 Sequencing 3:7 Stitch Creator 3:7 Settings menu 3:8 Machine settings 3:8 Sound settings 3:11 Screen and light settings 3:12 Info menu 3:13 Quick help 3:13 4 Sewing mode 4:1 Sewing mode - overview 4:2 Select a stitch 4:3 Raise and lower the presser foot 4:3 Option bar 4:4 Save options 4:4 Tie-off options 4:5 Speed control 4:6 Sewing programs 4:6 Balance 4:8 Mirroring 4:8 Zoom to all 4:8 Stitch settings 4:9 Stitch width 4:9 Stitch positioning 4:9 Stitch length 4:9 Stitch density 4:10 Thread tension 4:10 Buttonhole slit length 4:10 Button stitch repetition 4:11 Sequence start position 4:11 Sewing techniques 4:12 Three-step zigzag stitch 4:12 Buttonholes 4:12 Sew on a button 4:14 Sewing hems in heavy fabric 4:15 Handlook quilting 4:15 Blindhem stitch 4:15 Sewing in zippers 4:16 Rolled hem 4:16 Special sewing techniques 4:17 Common sewing pop-ups 4:18

  • 1
  • 2
  • 3
  • 4
  • 5
  • 6
  • 7
  • 8
  • 9
  • 10
  • 11
  • 12
  • 13
  • 14
  • 15
  • 16
  • 17
  • 18
  • 19
  • 20
  • 21
  • 22
  • 23
  • 24
  • 25
  • 26
  • 27
  • 28
  • 29
  • 30
  • 31
  • 32
  • 33
  • 34
  • 35
  • 36
  • 37
  • 38
  • 39
  • 40
  • 41
  • 42
  • 43
  • 44
  • 45
  • 46
  • 47
  • 48
  • 49
  • 50
  • 51
  • 52
  • 53
  • 54
  • 55
  • 56
  • 57
  • 58
  • 59
  • 60
  • 61
  • 62
  • 63
  • 64
  • 65
  • 66
  • 67
  • 68
  • 69
  • 70
  • 71
  • 72
  • 73
  • 74
  • 75
  • 76
  • 77
  • 78
  • 79
  • 80
  • 81
  • 82
  • 83
  • 84
  • 85
  • 86
  • 87
  • 88
  • 89
  • 90
  • 91
  • 92
  • 93
  • 94
  • 95
  • 96
  • 97
  • 98
  • 99
  • 100
  • 101
  • 102
  • 103
  • 104
  • 105
  • 106
  • 107
  • 108
  • 109
  • 110
  • 111
  • 112
  • 113
  • 114
  • 115
  • 116
  • 117
  • 118
  • 119
  • 120
  • 121
  • 122
  • 123
  • 124
  • 125
  • 126
  • 127
  • 128
  • 129
  • 130
  • 131
  • 132
  • 133
  • 134
  • 135
  • 136
  • 137
  • 138
  • 139
  • 140
  • 141
  • 142

Table of contents
1
Introduction
1:7
Machine overview
1:8
Front side
......................................................................
1:8
Rear side
.......................................................................
1:9
Top parts
.......................................................................
1:9
Accessory tray
..............................................................
1:9
Parts of the embroidery unit
....................................
1:10
Included accessories
1:10
Stitch overview
1:12
Utility stitches
............................................................
1:12
Decorative stitches
....................................................
1:16
Alphabets
....................................................................
1:20
2
Preparations
2:1
Unpacking
2:2
Connect to the power supply
2:2
Pack away after sewing
2:2
Custom LED lights
2:3
Free arm
2:3
Thread cutter
2:3
Stylus holder
2:3
Spool pins
2:4
Threading the machine
2:5
Needle threader
...........................................................
2:5
Bobbin winding
2:7
Inserting the bobbin
2:8
IDT (Integrated dual feed)
2:9
Electronic knee-lift
2:9
Needles
2:10
Changing the needle
2:11
Lowering feed dogs
2:11
Changing the presser foot
2:11
USB ports
2:12
Connect machine to computer
.................................
2:12
4D™ Embroidery Software
2:13
Installing your software
...........................................
2:13
Install hardware drivers and connect
the embroidery machine
...........................................
2:13
How to launch the programs
..................................
2:14
Embroidery Machine Communication module
....
2:14
How to update your machine
..................................
2:14
Buttons and icons
2:15
3
PFAFF® HD screen
3:1
Task bar
3:2
Use the task bar
............................................................
3:3
Common icons
3:3
Selection menu
3:4
Embroidery edit
3:5
Embroidery text editor
...............................................
3:6
Embroidery stitch-out
3:6
Sequencing
3:7
Stitch Creator
3:7
Settings menu
3:8
Machine settings
..........................................................
3:8
Sound settings
............................................................
3:11
Screen and light settings
...........................................
3:12
Info menu
3:13
Quick help
3:13
4
Sewing mode
4:1
Sewing mode - overview
4:2
Select a stitch
................................................................
4:3
Raise and lower the presser foot
...............................
4:3
Option bar
4:4
Save options
.................................................................
4:4
Tie-off options
..............................................................
4:5
Speed control
................................................................
4:6
Sewing programs
.........................................................
4:6
Balance
..........................................................................
4:8
Mirroring
4:8
Zoom to all
4:8
Stitch settings
4:9
Stitch width
..................................................................
4:9
Stitch positioning
.........................................................
4:9
Stitch length
..................................................................
4:9
Stitch density
..............................................................
4:10
Thread tension
...........................................................
4:10
Buttonhole slit length
................................................
4:10
Button stitch repetition
.............................................
4:11
Sequence start position
.............................................
4:11
Sewing techniques
4:12
Three-step zigzag stitch
............................................
4:12
Buttonholes
.................................................................
4:12
Sew on a button
.........................................................
4:14
Sewing hems in heavy fabric
...................................
4:15
Handlook quilting
.....................................................
4:15
Blindhem stitch
..........................................................
4:15
Sewing in zippers
......................................................
4:16
Rolled hem
..................................................................
4:16
Special sewing techniques
........................................
4:17
Common sewing pop-ups
4:18