Pfaff creative vision Owner's Manual - Page 106
Embroidery text editor
 |
View all Pfaff creative vision manuals
Add to My Manuals
Save this manual to your list of manuals |
Page 106 highlights
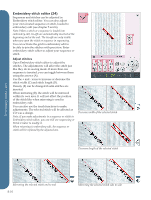
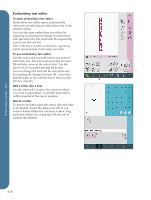
Embroidery text editor To open embroidery text editor Embroidery text editor opens automatically when you are selecting an embroidery font in the selection menu. You can also open embroidery text editor by adjusting an existing text already in embroidery edit. Just select the text and touch the sequencing icon (A) on the task bar. Note: If the text is created of stitch fonts, sequencing will be opened instead of embroidery text editor. To use embroidery text editor Use the stylus and touch the letters you want to add to the text. The text is shown in the text area (B) with the cursor at the active letter. Use the arrows (C) to step forward and backward. You can change the font and the size of the text by touching the change font icon (E). A preview and the name of the selected font is shown in the preview area (F). Add a letter into a text Use the arrows (C) to move the cursor to where you want to add a letter. Touch the letter and it will be inserted at the cursor position. Delete a letter To delete one letter, place the cursor after the letter to be deleted. Touch the delete icon (D). If you want to delete all the text you have written, long touch the delete icon. A pop-up will ask you to confirm the deletion. A F E B C D Embroidery mode - edit 8:20
-
 1
1 -
2
-
3
-
4
-
5
-
6
-
7
-
8
-
9
-
10
-
11
-
12
-
13
-
14
-
15
-
16
-
17
-
18
-
19
-
20
-
21
-
22
-
23
-
24
-
25
-
26
-
27
-
28
-
29
-
30
-
31
-
32
-
33
-
34
-
35
-
36
-
37
-
38
-
39
-
40
-
41
-
42
-
43
-
44
-
45
-
46
-
47
-
48
-
49
-
50
-
51
-
52
-
53
-
54
-
55
-
56
-
57
-
58
-
59
-
60
-
61
-
62
-
63
-
64
-
65
-
66
-
67
-
68
-
69
-
70
-
71
-
72
-
73
-
74
-
75
-
76
-
77
-
78
-
79
-
80
-
81
-
82
-
83
-
84
-
85
-
86
-
87
-
88
-
89
-
90
-
91
-
92
-
93
-
94
-
95
-
96
-
97
-
98
-
99
-
100
-
 101
101 -
 102
102 -
 103
103 -
 104
104 -
 105
105 -
 106
106 -
 107
107 -
 108
108 -
 109
109 -
 110
110 -
 111
111 -
112
-
113
-
114
-
115
-
116
-
117
-
118
-
119
-
120
-
121
-
122
-
123
-
124
-
125
-
126
-
127
-
128
-
129
-
130
-
131
-
132
-
133
-
134
-
135
-
136
-
137
-
138
-
139
-
140
-
141
-
142
 |
 |
