Pioneer BDP-150 Operating Instructions - Page 12
Front Panel, Rear Panel - remote control
 |
View all Pioneer BDP-150 manuals
Add to My Manuals
Save this manual to your list of manuals |
Page 12 highlights
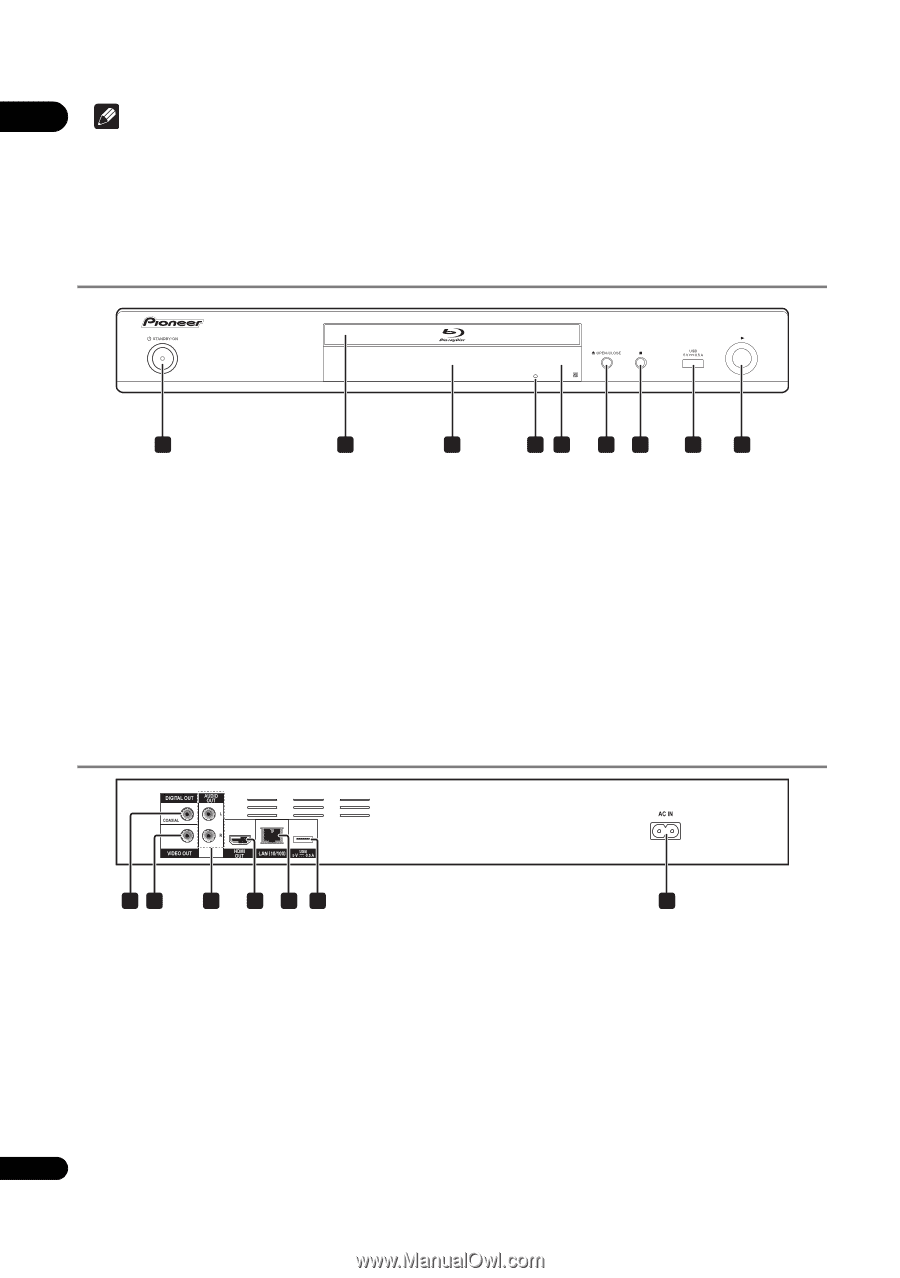
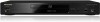
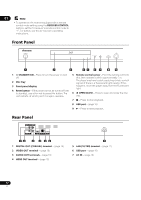
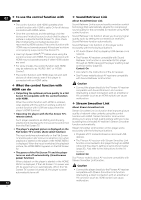
01 Note • To operate an AV receiver equipped with a remote control mode setting using the RECEIVER CONTROL buttons, set the AV receiver's remote control mode to "1". For details, see the AV receiver's operating instructions. Front Panel 1 2 3 45 6 7 8 9 1 STANDBY/ON - Press to turn the power on and off. 2 Disc tray 3 Front panel display 4 Reset button - If the power cannot be turned off (set to standby), use a thin rod to press this button. The unit restarts, at which point it is again operable. 5 Remote control sensor - Point the remote control to this, then operate it within approximately 7 m. The player may have trouble capturing remote control signals if there is a fluorescent light nearby. If this happens, move the player away from the fluorescent light. 6 OPEN/CLOSE - Press to open and close the disc tray. 7 - Press to stop playback. 8 USB port - (page 16) 9 - Press to start playback. Rear Panel 12 3 4 56 1 DIGITAL OUT (COAXIAL) terminal - (page 16) 2 VIDEO OUT terminal - (page 16) 3 AUDIO OUT terminals - (page 16) 4 HDMI OUT terminal - (page 13) 7 5 LAN (10/100) terminal - (page 17) 6 USB port - (page 16) 7 AC IN - (page 18) 12 En
-
 1
1 -
2
-
3
-
4
-
5
-
6
-
 7
7 -
 8
8 -
 9
9 -
 10
10 -
 11
11 -
 12
12 -
 13
13 -
 14
14 -
 15
15 -
 16
16 -
 17
17 -
18
-
19
-
20
-
21
-
22
-
23
-
24
-
25
-
26
-
27
-
28
-
29
-
30
-
31
-
32
-
33
-
34
-
35
-
36
-
37
-
38
-
39
-
40
-
41
-
42
-
43
-
44
-
45
-
46
-
47
-
48
-
49
-
50
-
51
-
52
 |
 |