Pioneer FH-P8800 Owner's Manual - Page 43
Auto-equalizing
 |
View all Pioneer FH-P8800 manuals
Add to My Manuals
Save this manual to your list of manuals |
Page 43 highlights
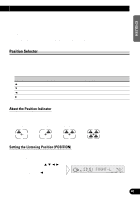
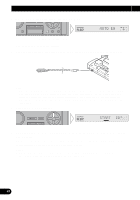
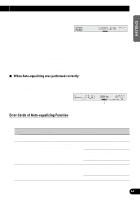
ENGLISH ESPAÑOL DEUTSCH • After the Auto-equalizing function countdown has started, do not switch a source ON by loading a CD or a cassette, or with the voice controller. Auto-equalizing 1. Select the position for the seat on which the microphone is placed. (Refer to "Position Selector" on page 40.) • When not setting for the "Front Seat Left" or "Front Seat Right", if you start Auto- equalizing, "Front Seat Right" is automatically selected. 2. Stop the car in a place that's as quiet as possible, close all doors, windows, the sun roof, and switch the engine off. If the engine is left running, engine noise may prevent correct Auto-equalizing. 3. Fix the provided microphone in the center of the headrest of the driver's seat, facing forward, using the belt (sold separately). The Auto-equalizer curve may differ depending on where you place the microphone. If desired, place the microphone on the front passenger seat and perform Auto-equalizing. 4. Switch the ignition switch to ON or ACC. If the car's air conditioner or heater is switched on, switch it off. Noise from the fan in the air conditioner or heater may prevent correct Auto-equalizing. 5. Switch the source OFF. Continued overleaf. 42 FRANÇAIS ITALIANO NEDERLANDS
-
 1
1 -
2
-
3
-
4
-
5
-
6
-
7
-
8
-
9
-
10
-
11
-
12
-
13
-
14
-
15
-
16
-
17
-
18
-
19
-
20
-
21
-
22
-
23
-
24
-
25
-
26
-
27
-
28
-
29
-
30
-
31
-
32
-
33
-
34
-
35
-
36
-
37
-
 38
38 -
 39
39 -
 40
40 -
 41
41 -
 42
42 -
 43
43 -
 44
44 -
 45
45 -
 46
46 -
 47
47 -
 48
48 -
49
-
50
-
51
-
52
-
53
-
54
-
55
-
56
-
57
-
58
-
59
-
60
-
61
-
62
-
63
-
64
-
65
-
66
-
67
-
68
-
69
-
70
-
71
-
72
-
73
-
74
-
75
-
76
-
77
-
78
-
79
-
80
-
81
-
82
-
83
-
84
-
85
-
86
-
87
-
88
-
89
-
90
-
91
-
92
-
93
-
94
-
95
-
96
-
97
-
98
-
99
-
100
-
101
-
102
-
103
-
104
-
105
-
106
-
107
-
108
-
109
-
110
-
111
-
112
 |
 |
