Pioneer SC-67 Owner's Manual - Page 46
Make sure 'OK' is selected, then press ENTER.
 |
View all Pioneer SC-67 manuals
Add to My Manuals
Save this manual to your list of manuals |
Page 46 highlights
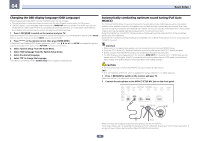
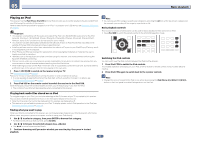
04 Basic Setup Install the microphone on a stable floor. Placing the microphone on any of the following surfaces may make accurate measurement impossible: ! Sofas or other soft surfaces. ! High places such as tabletops and sofa tops. The Full Auto MCACC display appears once the microphone is connected. 1a.Full Auto MCACC A/V RECEIVER Speaker System EQ Type MCACC THX Speaker : 9.1ch FH/FW : SYMMETRY : M1.MEMORY 1 : NO START Exit Return ! If you leave the GUI screen for over five minutes, the screen saver will appear. 3 Select the parameters you want to set. ! When data measurement is taken, the reverb characteristics data (both before- and after-calibration) that this receiver had been storing will be overwritten. ! When measurement is taken of the reverb characteristics data other than SYMMETRY, the data are not measured after the correction. If you will need to measure after correcting data, take the measurement using the EQ Professional menu in the Manual MCACC setup (page 92). If the speakers are connected using any setup other than 9.1ch FH/FW, be sure to set Speaker System before the Full Auto MCACC Setup. See Speaker system setting on page 98. ! Speaker System - Shows the current settings. When this is selected and ENTER is pressed, the speaker system selection screen appears. Select the proper speaker system, then press RETURN to return. If you are planning on bi-amping your front speakers, or setting up a separate speaker system in another room, read through Speaker system setting on page 98 and make sure to connect your speakers as necessary before continuing to step 4. ! EQ Type - This determines how the frequency balance is adjusted. Normally select SYMMETRY. For details, see Automatic MCACC (Expert) on page 90. ! MCACC - The six MCACC presets are used for storing surround sound settings for different listening positions. Simply choose an unused preset for now (you can rename it later in Data Management on page 96). ! THX Speaker - Select YES when using THX speakers (all speakers other than the front speakers are set to SMALL). In other cases, leave at NO. 4 Press then select START. 5 Follow the instructions on-screen. Make sure the microphone is connected, and if you're using a subwoofer, make sure it is switched on and set to a comfortable volume level. 6 Wait for the test tones to finish, then confirm the speaker configuration in the GUI screen. A progress report is displayed on-screen while the receiver outputs test tones to determine the speakers present in your setup. Try to be as quiet as possible while it's doing this. If no operations are performed for 10 seconds while the speaker configuration check screen is being displayed, the Full Auto MCACC Setup will resume automatically. In this case, you don't need to select 'OK' and press ENTER in step 7. ! With error messages (such as Too much ambient noise! or Check microphone.), select RETRY after checking for ambient noise (see Problems when using the Auto MCACC Setup on page 46) and verifying the mic connection. If there doesn't seem to be a problem, you can simply select GO NEXT and continue. 1a.Full Auto MCACC A/V RECEIVER Now Analyzing... 2/10 Environment Check Ambient Noise : OK Microphone : Speaker YES/NO : Exit Cancel L : FHL : C : FHR : R : SR : SBR : SBL : SL : SW : 10 OK 1a.Full Auto MCACC A/V RECEIVER YES YES YES YES YES YES YES YES YES YES RETRY Exit Cancel The configuration shown on-screen should reflect the actual speakers you have. ! If you see an ERR message (or the speaker configuration displayed isn't correct), there may be a problem with the speaker connection. If selecting RETRY doesn't work, turn off the power and check the speaker connections. If there doesn't seem to be a problem, you can simply use i/j to select the speaker and k/l to change the setting and continue. ! If the speaker is not pointed to the microphone (listening position) or when using speakers that affect the phase (dipole speakers, reflective speakers, etc.), Reverse Phase may be displayed even if the speakers are properly connected. If Reverse Phase is displayed, the speaker's wiring (+ and -) may be inverted. Check the speaker connections. - If the connections were wrong, turn off the power, disconnect the power cord, then reconnect properly. After this, perform the Full Auto MCACC procedure again. - If the connections were right, select GO NEXT and continue. 7 Make sure 'OK' is selected, then press ENTER. A progress report is displayed on-screen while the receiver outputs more test tones to determine the optimum receiver settings. Again, try to be as quiet as possible while this is happening. It may take 3 to 12 minutes. 8 The Full Auto MCACC Setup procedure is completed and the Home Menu menu reappears automatically. Be sure to disconnect the microphone from this receiver upon completion of the Full Auto MCACC Setup. The settings made in the Full Auto MCACC Setup should give you excellent surround sound from your system, but it is also possible to adjust these settings manually using The Advanced MCACC menu on page 89 or The System Setup and Other Setup menus on page 97. ! Depending on the characteristics of your room, sometimes identical speakers with cone sizes of around 12 cm (5 inches) will end up with different size settings. You can correct the setting manually using the Manual speaker setup on page 98. ! The subwoofer distance setting may be farther than the actual distance from the listening position. This setting should be accurate (taking delay and room characteristics into account) and generally does not need to be changed. ! If Full Auto MCACC Setup measurement results are incorrect due to the interaction of the speakers and viewing environment, we recommend adjusting the settings manually. Problems when using the Auto MCACC Setup If the room environment is not optimal for the Auto MCACC Setup (too much background noise, echo off the walls, obstacles blocking the speakers from the microphone) the final settings may be incorrect. Check for household appliances (air conditioner, fridge, fan, etc.), that may be affecting the environment and switch them off if necessary. If there are any instructions showing in the front panel display, please follow them. ! Some older TVs may interfere with the operation of the microphone. If this seems to be happening, switch off the TV when doing the Auto MCACC Setup. 46
-
 1
1 -
2
-
3
-
4
-
5
-
6
-
7
-
8
-
9
-
10
-
11
-
12
-
13
-
14
-
15
-
16
-
17
-
18
-
19
-
20
-
21
-
22
-
23
-
24
-
25
-
26
-
27
-
28
-
29
-
30
-
31
-
32
-
33
-
34
-
35
-
36
-
37
-
38
-
39
-
40
-
 41
41 -
 42
42 -
 43
43 -
 44
44 -
 45
45 -
 46
46 -
 47
47 -
 48
48 -
 49
49 -
 50
50 -
 51
51 -
52
-
53
-
54
-
55
-
56
-
57
-
58
-
59
-
60
-
61
-
62
-
63
-
64
-
65
-
66
-
67
-
68
-
69
-
70
-
71
-
72
-
73
-
74
-
75
-
76
-
77
-
78
-
79
-
80
-
81
-
82
-
83
-
84
-
85
-
86
-
87
-
88
-
89
-
90
-
91
-
92
-
93
-
94
-
95
-
96
-
97
-
98
-
99
-
100
-
101
-
102
-
103
-
104
-
105
-
106
-
107
-
108
-
109
-
110
-
111
-
112
-
113
-
114
-
115
-
116
-
117
-
118
-
119
-
120
-
121
-
122
-
123
-
124
-
125
-
126
-
127
-
128
-
129
-
130
-
131
 |
 |
