Pioneer SC-67 Owner's Manual - Page 48
Operation Mode Setup, About the Home Menu - software update
 |
View all Pioneer SC-67 manuals
Add to My Manuals
Save this manual to your list of manuals |
Page 48 highlights
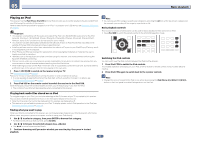
04 Basic Setup Operation Mode Setup This receiver is equipped with a great number of functions and settings. The Operation Mode feature is provided for users who find it difficult to master all these functions and settings. One of two settings can be selected for the Operation Mode: Expert and Basic. ! The OSD display is only displayed when the receiver's HDMI OUT terminal and the TV's HDMI input are con- nected with an HDMI cable. If the TV is connected with anything other than an HDMI cable, watch the front panel display while performing the various operations and making settings. Important ! Many of the settings and functions cannot be selected when the Operation Mode is changed to Basic. 1 Press on the remote control, then press HOME MENU. A Graphical User Interface (GUI) screen appears on your TV. Use i/j/k/l and ENTER to navigate through the screens and select menu items. Press RETURN to exit the current menu. 2 Select 'Operation Mode Setup' from the Home Menu. 3 Select the Operation Mode setting you want. ! Expert (default) - Users can set all the functions by themselves. ! Basic - The number of operable functions is restricted, and functions whose operations are restricted are automatically set to achieve the Pioneer-recommended sound and picture quality. The functions that can be operated are shown below. They can be set as necessary by referring to the operating instructions. Operable functions/items HOME MENU Full Auto MCACC Input Name Input Skip Software Update Network Information Audio Parameters MCACC (MCACC preset) DELAY (Sound Delay) S.RTRV (Auto Sound Retriever) DUAL (Dual Mono) V.SB (Virtual Surround Back) V.HEIGHT (Virtual Height) V.WIDE (Virtual Wide) V.DEPTH (Virtual Depth) Other functions Descriptions Makes high precision sound field settings easily. Input names can be changed as desired for easier use. Inputs not being used are skipped (not displayed). Updates to the latest version of the software. Checks the receiver's IP address. Selects your favorite MCACC preset memory. Adjusts the delay time of the overall sound. Plays compressed sound with high sound quality. Dual monaural audio setting. Creates a virtual surround back channel sound for playback. Creates a virtual height channel sound for playback. Creates a virtual wide channel sound for playback. Plays with a sound field suited for 3D images. Page 45 47 47 102 101 74 74 74 74 74 74 74 74 Operable functions/items INPUT SELECT (INPUT SELECTOR) VOLUME +/-, MUTE LISTENING MODE PQLS PHASE (Phase Control) PHASE (Full Band Phase Control) iPod iPhone iPad DIRECT CONTROL Descriptions Switches the input. Use to set the listening volume. Selects your favorite listening modes. Plays using the PQLS function. Plays with phase shifting in the low range corrected. The Full Band Phase Control feature calibrates the frequency-phase characteristics of the speakers connected. Switches the input to iPod/USB and sets the mode allowing operation from the iPod. 4 When you're finished, press RETURN. You will return to the Home Menu. Page 50 50 57 71 61 61 51 About the Home Menu This receiver's Home Menu (HOME MENU) can be used to make various settings and to check and adjust items that have been set. To display the Home Menu screen, press on the remote control, then press HOME MENU. HOME MENU A/V RECEIVER 1. Advanced MCACC 2. MCACC Data Check 3. Data Management 4. System Setup 5. Network Information 6. Operation Mode Setup Exit Return A Graphical User Interface (GUI) screen appears on your TV. Use i/j/k/l and ENTER to navigate through the screens and select menu items. Press RETURN to exit the current menu. The top level in the Home Menu is as shown below. Refer to the respective explanations to set, check and adjust as necessary. ! Advanced MCACC - Use this to make automatic settings and detailed manual settings for the surround sound. For details, see Making receiver settings from the Advanced MCACC menu on page 90. ! MCACC Data Check - Use this to check the MCACC memory. For details, see Checking MCACC Data on page 95. ! Data Management - Use this to manage the data in the MCACC memory. For details, see Data Management on page 96. ! System Setup - Use this to make various settings related to this system. For details, see Making receiver set- tings from the System Setup menu on page 98. ! Network Information - The setting status of the network-related items can be checked. For detail, see Checking the Network Information on page 101. ! Operation Mode Setup - Use this to select this receiver's operation mode. For details, see Operation Mode Setup on page 48. 48
-
 1
1 -
2
-
3
-
4
-
5
-
6
-
7
-
8
-
9
-
10
-
11
-
12
-
13
-
14
-
15
-
16
-
17
-
18
-
19
-
20
-
21
-
22
-
23
-
24
-
25
-
26
-
27
-
28
-
29
-
30
-
31
-
32
-
33
-
34
-
35
-
36
-
37
-
38
-
39
-
40
-
41
-
42
-
 43
43 -
 44
44 -
 45
45 -
 46
46 -
 47
47 -
 48
48 -
 49
49 -
 50
50 -
 51
51 -
 52
52 -
 53
53 -
54
-
55
-
56
-
57
-
58
-
59
-
60
-
61
-
62
-
63
-
64
-
65
-
66
-
67
-
68
-
69
-
70
-
71
-
72
-
73
-
74
-
75
-
76
-
77
-
78
-
79
-
80
-
81
-
82
-
83
-
84
-
85
-
86
-
87
-
88
-
89
-
90
-
91
-
92
-
93
-
94
-
95
-
96
-
97
-
98
-
99
-
100
-
101
-
102
-
103
-
104
-
105
-
106
-
107
-
108
-
109
-
110
-
111
-
112
-
113
-
114
-
115
-
116
-
117
-
118
-
119
-
120
-
121
-
122
-
123
-
124
-
125
-
126
-
127
-
128
-
129
-
130
-
131
 |
 |
