Ricoh Aficio MP 7000 Scanner Reference - Page 63
System Settings, Change, Connection Test, Cancel, number keys, and then press
 |
View all Ricoh Aficio MP 7000 manuals
Add to My Manuals
Save this manual to your list of manuals |
Page 63 highlights
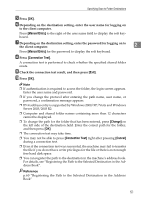
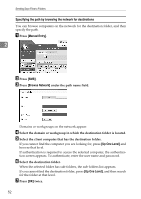
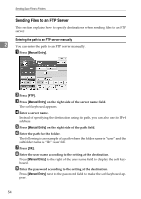
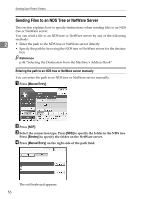
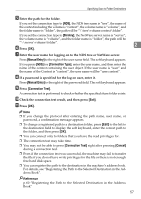
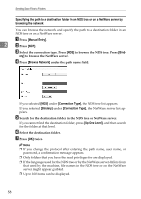
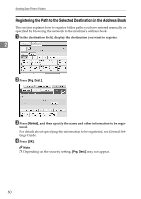
Specifying Scan to Folder Destinations J To change the port number which is set in [System Settings], press [Change] on the right side of the port number field. Enter a port number using the number keys, and then press the {q} key. K Press [Connection Test]. A connection test is performed to check whether the specified folder exists. L Check the connection test result, and then press [Exit]. 2 M Press [OK]. Note ❒ If you change the protocol after entering the path name, user name, or password, a confirmation message appears. ❒ The connection test may take time. ❒ You may not be able to press [Connection Test] right after pressing [Cancel] during a connection test. ❒ To change the registered path to a destination folder, press [Edit] to the left of the destination field to display the soft keyboard, enter the new path, and then click [OK]. ❒ You can register the path to the destination in the machine's address book. For details, see "Registering the Path to the Selected Destination in the Address Book". ❒ The machine may fail to transfer the file if you do not have write privileges for the folder or there is not enough free hard disk space. Reference p.60 "Registering the Path to the Selected Destination in the Address Book" 55
-
 1
1 -
2
-
3
-
4
-
5
-
6
-
7
-
8
-
9
-
10
-
11
-
12
-
13
-
14
-
15
-
16
-
17
-
18
-
19
-
20
-
21
-
22
-
23
-
24
-
25
-
26
-
27
-
28
-
29
-
30
-
31
-
32
-
33
-
34
-
35
-
36
-
37
-
38
-
39
-
40
-
41
-
42
-
43
-
44
-
45
-
46
-
47
-
48
-
49
-
50
-
51
-
52
-
53
-
54
-
55
-
56
-
57
-
 58
58 -
 59
59 -
 60
60 -
 61
61 -
 62
62 -
 63
63 -
 64
64 -
 65
65 -
 66
66 -
 67
67 -
 68
68 -
69
-
70
-
71
-
72
-
73
-
74
-
75
-
76
-
77
-
78
-
79
-
80
-
81
-
82
-
83
-
84
-
85
-
86
-
87
-
88
-
89
-
90
-
91
-
92
-
93
-
94
-
95
-
96
-
97
-
98
-
99
-
100
-
101
-
102
-
103
-
104
-
105
-
106
-
107
-
108
-
109
-
110
-
111
-
112
-
113
-
114
-
115
-
116
-
117
-
118
-
119
-
120
-
121
-
122
-
123
-
124
-
125
-
126
-
127
-
128
-
129
-
130
-
131
-
132
-
133
-
134
-
135
-
136
-
137
-
138
-
139
-
140
-
141
-
142
-
143
-
144
-
145
-
146
-
147
-
148
-
149
-
150
-
151
-
152
-
153
-
154
-
155
-
156
-
157
-
158
-
159
-
160
-
161
-
162
-
163
-
164
-
165
-
166
-
167
-
168
-
169
-
170
-
171
-
172
-
173
-
174
 |
 |