Ricoh Aficio MP 7500 S/P Copy/Document Server Reference - Page 153
Start, Clear/Stop, Continue, Document Server, Access Privileges, User Name
 |
View all Ricoh Aficio MP 7500 S/P manuals
Add to My Manuals
Save this manual to your list of manuals |
Page 153 highlights
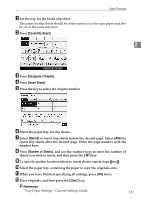
E Make scanning settings for the original. Storing Originals in the Document Server 2 F Press the {Start} key. Copies are delivered and scanned data is stored in the hard disk. Note ❒ When interrupting the scan, press the {Clear/Stop} key. Pressing [Continue] from the confirmation screen resumes the scan. Pressing [Stop] deletes the scanned images and the original on the automatic document feeder (ADF) will be ejected. ❒ When placing originals on the exposure glass, press the {q} key after all originals are scanned. ❒ According to the factory default, the documents stored on the Document Server are deleted three days (72 hours) after the storing date. You can cancel the automatic document deletion or select other period than three days for the automatic deletion. For more information about changing settings, see "Administrator Tools", General Settings Guide. ❒ To check if the document has been stored, press the {Document Server} key to display the document selection screen. ❒ If you want to store another document, do so after copying is complete. ❒ For further information about the Document Server, see "Document Server". ❒ For details about printing stored documents, see "Printing a Stored Document". ❒ For details about setting user name, file name, and password, see "Storing Data". ❒ Depending on the security settings, [Access Privileges] is displayed instead of [User Name]. ❒ For details about procedure for setting [Access Privileges], ask the administrator. Reference p.166 "Using the Document Server" p.176 "Printing a Stored Document" p.166 "Storing Data" "Administrator Tools", General Settings Guide. 135
-
 1
1 -
2
-
3
-
4
-
5
-
6
-
7
-
8
-
9
-
10
-
11
-
12
-
13
-
14
-
15
-
16
-
17
-
18
-
19
-
20
-
21
-
22
-
23
-
24
-
25
-
26
-
27
-
28
-
29
-
30
-
31
-
32
-
33
-
34
-
35
-
36
-
37
-
38
-
39
-
40
-
41
-
42
-
43
-
44
-
45
-
46
-
47
-
48
-
49
-
50
-
51
-
52
-
53
-
54
-
55
-
56
-
57
-
58
-
59
-
60
-
61
-
62
-
63
-
64
-
65
-
66
-
67
-
68
-
69
-
70
-
71
-
72
-
73
-
74
-
75
-
76
-
77
-
78
-
79
-
80
-
81
-
82
-
83
-
84
-
85
-
86
-
87
-
88
-
89
-
90
-
91
-
92
-
93
-
94
-
95
-
96
-
97
-
98
-
99
-
100
-
101
-
102
-
103
-
104
-
105
-
106
-
107
-
108
-
109
-
110
-
111
-
112
-
113
-
114
-
115
-
116
-
117
-
118
-
119
-
120
-
121
-
122
-
123
-
124
-
125
-
126
-
127
-
128
-
129
-
130
-
131
-
132
-
133
-
134
-
135
-
136
-
137
-
138
-
139
-
140
-
141
-
142
-
143
-
144
-
145
-
146
-
147
-
 148
148 -
 149
149 -
 150
150 -
 151
151 -
 152
152 -
 153
153 -
 154
154 -
 155
155 -
 156
156 -
 157
157 -
 158
158 -
159
-
160
-
161
-
162
-
163
-
164
-
165
-
166
-
167
-
168
-
169
-
170
-
171
-
172
-
173
-
174
-
175
-
176
-
177
-
178
-
179
-
180
-
181
-
182
-
183
-
184
-
185
-
186
-
187
-
188
-
189
-
190
-
191
-
192
-
193
-
194
-
195
-
196
-
197
-
198
-
199
-
200
-
201
-
202
-
203
-
204
-
205
-
206
-
207
-
208
-
209
-
210
-
211
-
212
-
213
-
214
-
215
-
216
-
217
-
218
-
219
-
220
-
221
-
222
-
223
-
224
-
225
-
226
 |
 |
