Samsung NP355E5C User Manual Windows 7 User Manual Ver.1.2 (English) - Page 51
Multi Card Slot (Optional - windows 8 problems
 |
View all Samsung NP355E5C manuals
Add to My Manuals
Save this manual to your list of manuals |
Page 51 highlights
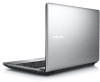
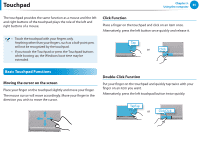
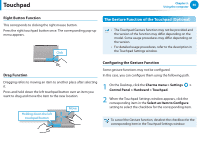
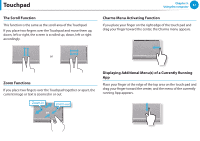
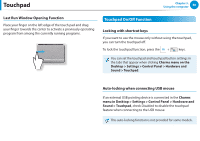
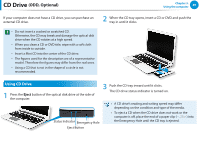
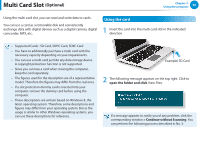
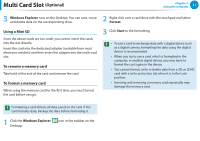
Multi Card Slot (Optional) Chapter 3. Using the computer 50 Using the multi card slot, you can read and write data to cards. You can use a card as a removable disk and conveniently exchange data with digital devices such as a digital camera, digital camcorder, MP3, etc.. Using the card 1 Insert the card into the multi card slot in the indicated direction. •• Supported Cards : SD Card, SDHC Card, SDXC Card •• You have to additionally purchase a multi card with the necessary capacity depending on your requirements. •• You can use a multi card just like any data storage device. A copyright protection function is not supported. •• Since you can lose a card when moving the computer, keep the card separately. •• The figures used for the description are of a representative model. Therefore the figures may differ from the real ones. •• If a slot protection dummy card is inserted into your computer, remove the dummy card before using the computer. •• These descriptions are written based on Windows 8, the latest operating system. Therefore, some descriptions and figures may differ from your operating system. But as the usage is similar to other Windows operating systems, you can use these descriptions for reference. Example) SD Card 2 The following message appears on the top right. Click to open the folder and click View Files. If a message appears to notify you of any problem, click the corresponding window > Continue without Scanning. You can perform the following process described in No. 3.
-
 1
1 -
2
-
3
-
4
-
5
-
6
-
7
-
8
-
9
-
10
-
11
-
12
-
13
-
14
-
15
-
16
-
17
-
18
-
19
-
20
-
21
-
22
-
23
-
24
-
25
-
26
-
27
-
28
-
29
-
30
-
31
-
32
-
33
-
34
-
35
-
36
-
37
-
38
-
39
-
40
-
41
-
42
-
43
-
44
-
45
-
 46
46 -
 47
47 -
 48
48 -
 49
49 -
 50
50 -
 51
51 -
 52
52 -
 53
53 -
 54
54 -
 55
55 -
 56
56 -
57
-
58
-
59
-
60
-
61
-
62
-
63
-
64
-
65
-
66
-
67
-
68
-
69
-
70
-
71
-
72
-
73
-
74
-
75
-
76
-
77
-
78
-
79
-
80
-
81
-
82
-
83
-
84
-
85
-
86
-
87
-
88
-
89
-
90
-
91
-
92
-
93
-
94
-
95
-
96
-
97
-
98
-
99
-
100
-
101
-
102
-
103
-
104
-
105
-
106
-
107
-
108
-
109
-
110
-
111
-
112
-
113
-
114
-
115
-
116
-
117
-
118
-
119
-
120
-
121
-
122
-
123
-
124
-
125
-
126
-
127
-
128
-
129
-
130
-
131
-
132
-
133
-
134
-
135
-
136
-
137
-
138
-
139
-
140
-
141
-
142
-
143
-
144
-
145
-
146
-
147
-
148
-
149
 |
 |
