Samsung NX1000 User Manual - Page 117
Using Auto Backup to send photos or videos, Installing the program for Auto Backup on your PC,
 |
View all Samsung NX1000 manuals
Add to My Manuals
Save this manual to your list of manuals |
Page 117 highlights
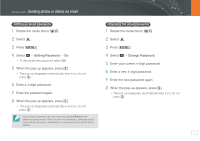
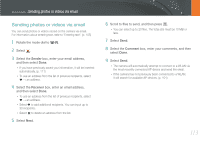
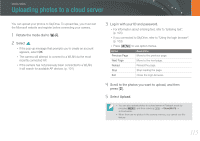
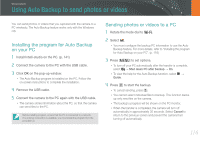
Wireless network Using Auto Backup to send photos or videos You can send photos or videos that you captured with the camera to a PC wirelessly. The Auto Backup feature works only with the Windows OS. Installing the program for Auto Backup on your PC 1 Install Intelli-studio on the PC. (p. 141) 2 Connect the camera to the PC with the USB cable. 3 Click OK on the pop-up window. • The Auto Backup program is installed on the PC. Follow the on-screen instructions to complete the installation. 4 Remove the USB cable. 5 Connect the camera to the PC again with the USB cable. • The camera stores information about the PC, so that the camera can send files to the PC. Before installing program, ensure that the PC is connected to a network. If no internet connection is available, you must install the program from the provided CD. Sending photos or videos to a PC 1 Rotate the mode dial to B. 2 Select . • You must configure the backup PC information to use the Auto Backup feature. For more details, refer to "Installing the program for Auto Backup on your PC". (p. 116) 3 Press [m] to set options. • To turn off your PC automatically after the transfer is complete, select → Shut down PC after backup → On. • To view the help for the Auto Backup function, select → Guide. 4 Press [o] to start the backup. • To cancel sending, press [o]. • You cannot select individual files to backup. This function backs up only new files on the camera. • The backup's progress will be shown on the PC monitor. • When the transfer is completed, the camera will turn off automatically in approximately 30 seconds. Select Cancel to return to the previous screen and prevent the camera from turning off automatically. 116
-
 1
1 -
2
-
3
-
4
-
5
-
6
-
7
-
8
-
9
-
10
-
11
-
12
-
13
-
14
-
15
-
16
-
17
-
18
-
19
-
20
-
21
-
22
-
23
-
24
-
25
-
26
-
27
-
28
-
29
-
30
-
31
-
32
-
33
-
34
-
35
-
36
-
37
-
38
-
39
-
40
-
41
-
42
-
43
-
44
-
45
-
46
-
47
-
48
-
49
-
50
-
51
-
52
-
53
-
54
-
55
-
56
-
57
-
58
-
59
-
60
-
61
-
62
-
63
-
64
-
65
-
66
-
67
-
68
-
69
-
70
-
71
-
72
-
73
-
74
-
75
-
76
-
77
-
78
-
79
-
80
-
81
-
82
-
83
-
84
-
85
-
86
-
87
-
88
-
89
-
90
-
91
-
92
-
93
-
94
-
95
-
96
-
97
-
98
-
99
-
100
-
101
-
102
-
103
-
104
-
105
-
106
-
107
-
108
-
109
-
110
-
111
-
 112
112 -
 113
113 -
 114
114 -
 115
115 -
 116
116 -
 117
117 -
 118
118 -
 119
119 -
 120
120 -
 121
121 -
 122
122 -
123
-
124
-
125
-
126
-
127
-
128
-
129
-
130
-
131
-
132
-
133
-
134
-
135
-
136
-
137
-
138
-
139
-
140
-
141
-
142
-
143
-
144
-
145
-
146
-
147
-
148
-
149
-
150
-
151
-
152
-
153
-
154
-
155
-
156
-
157
-
158
-
159
-
160
-
161
-
162
-
163
-
164
-
165
-
166
-
167
-
168
-
169
-
170
-
171
-
172
-
173
-
174
-
175
-
176
-
177
-
178
-
179
-
180
-
181
-
182
-
183
 |
 |
