Samsung UN60ES8000F Quick Guide Easy Manual Ver.1.0 (English) - Page 19
English - 19 - release date
 |
View all Samsung UN60ES8000F manuals
Add to My Manuals
Save this manual to your list of manuals |
Page 19 highlights
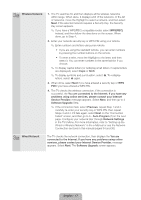
8 Auto Program (3): Channel memorization Channel memorization stars. Channel memorization can take up to 45 minutes, depending on your cable system. For more information, refer to Auto Program (Channel Menu → Memorizing Channels) in the e-Manual. ✎✎ Select Stop at any time to halt the memorization process. 9 Clock: Set the Clock Select Auto or Manual, and then select Next. ✎✎ If you selected I use a set-top box. in 6 - Auto Program (1), you can only set the current time and date manually, using your remote. Auto If you selected Auto, the TV will automatically download the correct time from a digital channel. The Time Zone screen will appear. Select your Time Zone, and then select Next. The DST (Daylight Savings Time) screen will appear. The DST function sets the time ahead one hour to adjust the clock for Daylight Savings Time. Select On if you want to turn the DST adjustment on. Select Off to turn off the DST adjustment. You can also turn the DST function on through the TV's on screen menu (Menu → System → Time → Clock → DST). Manual If you selected Manual, you'll go to the Clock screen. Select Date or Time. You can set the current date and time using your remote. When done setting the Date and Time, select Next. 10 Voice and Motion Control: Setting the Voice and Motion Control function. You can turn the Voice and Motion Control function on or off. Select Off or On, and then select Next. 11 Setup Complete Review the Setup data, and then select Close to finish. ✎✎ The completed settings are displayed. If You Want to Rerun Setup... Menu → System → Setup If You Want to Turn the Store Demo Mode On or Off. To set or unset Store Demo mode outside of Setup, press and release the Controller when the power is on. The Function menu screen appears. Push the Controller to the left (to MENU (m)) and hold for more than 5 seconds. The Store Demo mode is set. To cancel Store Demo, bring up the Function menu using the Controller, push the Controller to the right (to Source (s)) and hold for more than 5 seconds. See page 11 for information about the Controller. English - 19
-
 1
1 -
2
-
3
-
4
-
5
-
6
-
7
-
8
-
9
-
10
-
11
-
12
-
13
-
 14
14 -
 15
15 -
 16
16 -
 17
17 -
 18
18 -
 19
19 -
 20
20 -
 21
21 -
 22
22 -
 23
23 -
 24
24 -
25
-
26
-
27
-
28
-
29
-
30
-
31
-
32
-
33
-
34
-
35
-
36
-
37
-
38
-
39
-
40
-
41
-
42
-
43
-
44
-
45
-
46
-
47
-
48
-
49
-
50
-
51
-
52
-
53
-
54
-
55
-
56
-
57
-
58
-
59
-
60
-
61
-
62
 |
 |