Seagate Personal Storage 5000DV Installation Guide (Windows) - Page 12
Connecting with the USB Cable - personal storage 5000
 |
View all Seagate Personal Storage 5000DV manuals
Add to My Manuals
Save this manual to your list of manuals |
Page 12 highlights
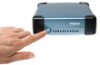
Connecting with the USB Cable Do not plug a USB cable into the drive when a FireWire cable is already connected to the drive.This drive will only operate on one interface at a time. Windows XP:To install your drive, using the USB interface, follow these steps: W 1. Attach the drive to your computer and the power adapter as instructed in this section. 2 The Maxtor Personal Storage 5000 drive is also compatible with computers equipped with built-in USB 1.1 ports.To achieve high-speed USB 2.0 data transfer rates, a USB 2.0 port or USB 2.0 Adapter Card for Windows is required. For more information about the USB interface, go to http:// www.usb.org and select the link to the USB FAQ section. To connect the USB cable When you connect your drive to a Windows XP system a window may appear with the message "Local Disk (X:) This disk or device contains more than one type of content. What do you want Windows to do?" You can disregard this window and close it. 2. Remove and re-insert the Maxtor Install CD back into your computer. 1. Plug the larger end of the USB cable into any available USB port on your computer.This USB logo ™ may help you identify a USB port. 2. Plug the smaller end of the USB cable into the USB connection on the drive. 3. From the menu that appears, select the option to Install Storage Drivers and Retrospect Express. 4. A Welcome screen appears, click Next. 5. The Program Maintenance screen appears. Select the Repair option, click Next. 6. The Ready to Repair the Program screen appears, click Install. 7. A Windows Alert appears with the message:"The software you are installing has not passed Windows logo testing...".This is normal. Click Continue Anyway. USB Port Figure 4. Connecting to the USB Port 8. The InstallShield Wizard completed screen appears, signifying that your installation was successful. Remove the Maxtor Install CD from your computer and click the Finish button. Allow up to 2 minutes for your computer to recognize the drive. 8 Installing the Drive
-
 1
1 -
2
-
3
-
4
-
5
-
6
-
 7
7 -
 8
8 -
 9
9 -
 10
10 -
 11
11 -
 12
12 -
 13
13 -
 14
14 -
 15
15 -
 16
16 -
 17
17 -
18
-
19
-
20
-
21
-
22
-
23
-
24
-
25
-
26
-
27
-
28
-
29
-
30
-
31
-
32
-
33
-
34
-
35
-
36
-
37
-
38
-
39
-
40
 |
 |
