Sharp MX-B350P MX-B350P MX-B450P User Manual - Page 6
Interior, Side And Back
 |
View all Sharp MX-B350P manuals
Add to My Manuals
Save this manual to your list of manuals |
Page 6 highlights
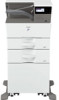
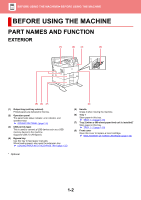
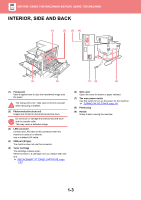
BEFORE USING THE MACHINE►BEFORE USING THE MACHINE INTERIOR, SIDE AND BACK (1) (2) (3) (4) (5) (6) (7) (8) (9) (1) Fusing unit Heat is applied here to fuse the transferred image onto the paper. The fusing unit is hot. Take care not to burn yourself when removing a misfeed. (2) Photoconductive drum unit Images are formed on the photoconductive drum. Do not touch or damage the photoconductive drum and the transfer roller. This may cause a defective image. (3) LAN connector Connect the LAN cable to this connector when the machine is used on a network. Use a shielded LAN cable. (4) USB port (B type) The machine does not use this connector. (5) Toner cartridge This cartridge contains toner. When the toner in a cartridge runs out, replace with new one. ► REPLACEMENT OF TONER CARTRIDGE (page 1-30) (6) Side cover Open this cover to remove a paper misfeed. (7) The main power switch Use this switch to turn on the power for the machine. ► TURNING ON THE POWER (page 1-9) (8) Power plug (9) Handle Grasp it when moving the machine. 1-3
-
 1
1 -
 2
2 -
 3
3 -
 4
4 -
 5
5 -
 6
6 -
 7
7 -
 8
8 -
 9
9 -
 10
10 -
 11
11 -
 12
12 -
13
-
14
-
15
-
16
-
17
-
18
-
19
-
20
-
21
-
22
-
23
-
24
-
25
-
26
-
27
-
28
-
29
-
30
-
31
-
32
-
33
-
34
-
35
-
36
-
37
-
38
-
39
-
40
-
41
-
42
-
43
-
44
-
45
-
46
-
47
-
48
-
49
-
50
-
51
-
52
-
53
-
54
-
55
-
56
-
57
-
58
-
59
-
60
-
61
-
62
-
63
-
64
-
65
-
66
-
67
-
68
-
69
-
70
-
71
-
72
-
73
-
74
-
75
-
76
-
77
-
78
-
79
-
80
-
81
-
82
-
83
-
84
-
85
-
86
-
87
-
88
-
89
-
90
-
91
-
92
-
93
-
94
-
95
-
96
-
97
-
98
-
99
-
100
-
101
-
102
-
103
-
104
-
105
-
106
-
107
-
108
-
109
-
110
-
111
-
112
-
113
-
114
-
115
-
116
-
117
-
118
-
119
-
120
-
121
-
122
-
123
-
124
-
125
-
126
-
127
-
128
-
129
-
130
-
131
-
132
-
133
-
134
-
135
-
136
-
137
-
138
-
139
-
140
-
141
-
142
-
143
-
144
-
145
-
146
-
147
-
148
-
149
-
150
-
151
-
152
-
153
-
154
-
155
-
156
-
157
-
158
-
159
-
160
-
161
-
162
-
163
-
164
 |
 |
