Sharp UP-600 UP-600 Operation Manual - Page 222
Installing the paper roll, Make sure the ink ribbon cassette has been
 |
View all Sharp UP-600 manuals
Add to My Manuals
Save this manual to your list of manuals |
Page 222 highlights
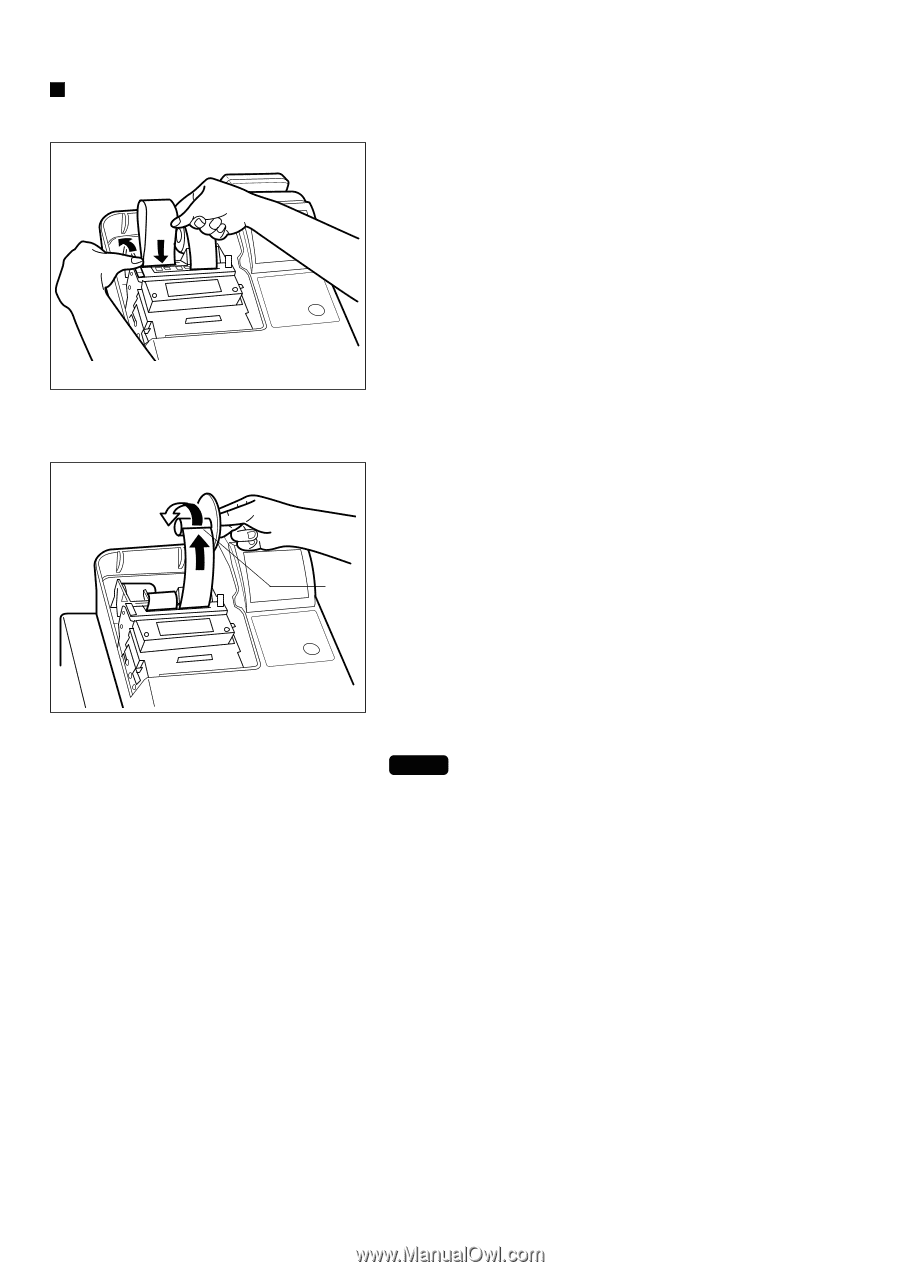
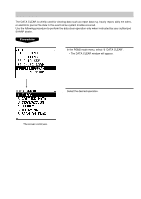
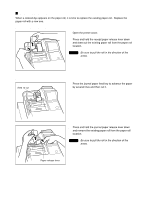
Installing the paper roll Installing the receipt paper roll 1. Open the printer cover. Set the paper roll correctly as illustrated and drop it into the printer. 2. Press the receipt paper release lever down and insert the paper end into the paper chute of the printer. Pull the paper end that has come out of the printer, holding down the lever. 3. Advance the paper by a required length by pressing the receipt paper feed key. Installing the journal paper roll Wind two or three turns. 1. Open the printer cover. Set the paper roll correctly and drop it into the printer. 2. Press the journal paper release lever down, insert the paper end that has come out of the printer into the slit in the paper take-up spool, wind it two or three turns Slit around the spool shaft, and set the spool on the bearing. NOTE Make sure the ink ribbon cassette has been mounted on the printer when installing the receipt paper roll or the journal paper roll. 220
-
 1
1 -
2
-
3
-
4
-
5
-
6
-
7
-
8
-
9
-
10
-
11
-
12
-
13
-
14
-
15
-
16
-
17
-
18
-
19
-
20
-
21
-
22
-
23
-
24
-
25
-
26
-
27
-
28
-
29
-
30
-
31
-
32
-
33
-
34
-
35
-
36
-
37
-
38
-
39
-
40
-
41
-
42
-
43
-
44
-
45
-
46
-
47
-
48
-
49
-
50
-
51
-
52
-
53
-
54
-
55
-
56
-
57
-
58
-
59
-
60
-
61
-
62
-
63
-
64
-
65
-
66
-
67
-
68
-
69
-
70
-
71
-
72
-
73
-
74
-
75
-
76
-
77
-
78
-
79
-
80
-
81
-
82
-
83
-
84
-
85
-
86
-
87
-
88
-
89
-
90
-
91
-
92
-
93
-
94
-
95
-
96
-
97
-
98
-
99
-
100
-
101
-
102
-
103
-
104
-
105
-
106
-
107
-
108
-
109
-
110
-
111
-
112
-
113
-
114
-
115
-
116
-
117
-
118
-
119
-
120
-
121
-
122
-
123
-
124
-
125
-
126
-
127
-
128
-
129
-
130
-
131
-
132
-
133
-
134
-
135
-
136
-
137
-
138
-
139
-
140
-
141
-
142
-
143
-
144
-
145
-
146
-
147
-
148
-
149
-
150
-
151
-
152
-
153
-
154
-
155
-
156
-
157
-
158
-
159
-
160
-
161
-
162
-
163
-
164
-
165
-
166
-
167
-
168
-
169
-
170
-
171
-
172
-
173
-
174
-
175
-
176
-
177
-
178
-
179
-
180
-
181
-
182
-
183
-
184
-
185
-
186
-
187
-
188
-
189
-
190
-
191
-
192
-
193
-
194
-
195
-
196
-
197
-
198
-
199
-
200
-
201
-
202
-
203
-
204
-
205
-
206
-
207
-
208
-
209
-
210
-
211
-
212
-
213
-
214
-
215
-
216
-
 217
217 -
 218
218 -
 219
219 -
 220
220 -
 221
221 -
 222
222 -
 223
223 -
 224
224 -
 225
225 -
 226
226 -
 227
227 -
228
-
229
-
230
 |
 |