Sharp XE A302 XE-A302 Operation Manual in English and Spanish - Page 7
Mode Switch and Mode Keys, 4. Keyboard, Keyboard layout, Key names, OP X/Z, X1/Z1, X2/Z2 - supplies
 |
UPC - 074000048294
View all Sharp XE A302 manuals
Add to My Manuals
Save this manual to your list of manuals |
Page 7 highlights
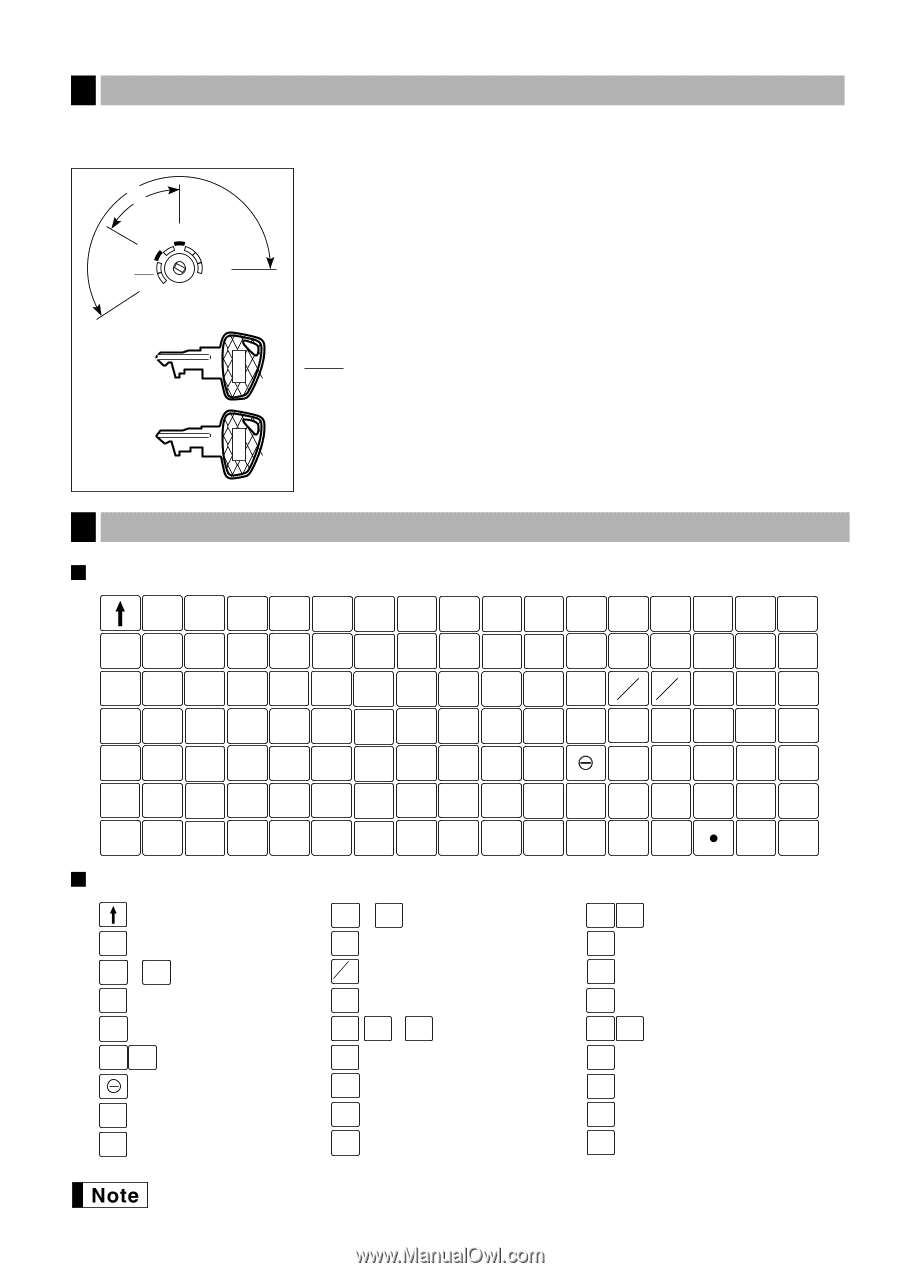
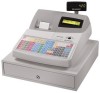
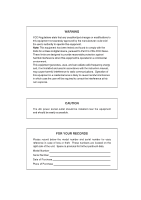
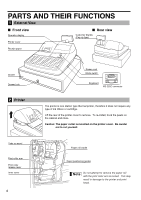
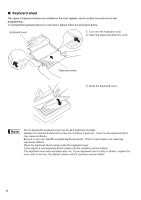
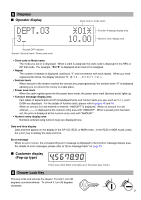
3 Mode Switch and Mode Keys The mode switch can be operated by inserting one of the two supplied mode keys - manager (MA) and operator (OP) keys. These keys can be inserted or removed only in the "REG" or "OFF" position. MA OP REG OPX/Z MGR OFF X1/Z1 VOID X2/Z2 PGM Manager key (MA) Operator key (OP) 4 Keyboard OP MA The mode switch has these settings: OFF: This mode locks all register operations. (AC power turns off.) No change occurs to register data. OP X/Z: To take individual clerk X or Z reports, and to take flash reports. It can be used to toggle receipt state "ON" and "OFF" by pressing the R key. REG: For entering sales. PGM: To program various items. VOID: Enters into the void mode. This mode allows correction after finalizing a transaction. MGR: For manager's entries. The manager can use this mode for an override entry. X1/Z1: To take the X/Z report for various daily totals X2/Z2: To take the X/Z report for periodic (weekly or monthly) consolidation Keyboard layout E/J CLK PRINT 67 68 69 70 71 72 73 74 75 # 2 4 6 AUTO ESC DEPT 56 57 58 59 60 61 62 63 64 65 66 # 1 3 5 RCPT /PO RA 45 46 47 48 49 50 51 52 53 54 55 %1 PLU @ SUB FOR CL TAX CONV 34 35 36 37 38 39 40 41 42 43 %2 44 7 8 9 TAX1 TAX2 SHIFT SHIFT 23 24 25 26 27 28 29 30 31 32 33 4 5 6 CH1 CH2 12 13 14 15 16 17 18 19 20 21 RFND 22 1 2 3 MDSE SBTL CHK 1 2 3 4 5 6 7 8 9 10 VOID 11 0 00 #/TM SBTL CA/AT Key names Paper feed key E/J PRINT Electronic journal print key 1 ~ 75 Direct PLU keys CLK# Clerk code entry key DEPT # Department code entry key %1 %2 Percent 1 and 2 keys Discount key RFND Refund key VOID Void key 1 ~ 6 Department keys PLU /SUB PLU/Subdepartment key @ FOR Multiplication key CL Clear key 00 0 ~ 9 Numeric keys • Decimal point key AUTO Automatic sequence key RCPT /PO Receipt print/Paid-out key TAX Tax key TAX1 TAX2 SHIFT SHIFT Tax 1 and 2 shift keys ESC Escape key RA Received-on account key CONV Conversion key CH1 CH2 Charge 1 and 2 keys CHK Check key MDSE SBTL Merchandise subtotal key #/TM Non-add code/Time display SBTL /Subtotal key CA/AT Total/Amount tender /No sale key p In this manual, key tops are shown in one line, such as for easy reading. Department keys ! are shown like , and numeric keys are indicated with simple number indication, such as 1, 5 unless otherwise specified.
-
 1
1 -
 2
2 -
 3
3 -
 4
4 -
 5
5 -
 6
6 -
 7
7 -
 8
8 -
 9
9 -
 10
10 -
 11
11 -
 12
12 -
13
-
14
-
15
-
16
-
17
-
18
-
19
-
20
-
21
-
22
-
23
-
24
-
25
-
26
-
27
-
28
-
29
-
30
-
31
-
32
-
33
-
34
-
35
-
36
-
37
-
38
-
39
-
40
-
41
-
42
-
43
-
44
-
45
-
46
-
47
-
48
-
49
-
50
-
51
-
52
-
53
-
54
-
55
-
56
-
57
-
58
-
59
-
60
-
61
-
62
-
63
-
64
-
65
-
66
-
67
-
68
-
69
-
70
-
71
-
72
-
73
-
74
-
75
-
76
-
77
-
78
-
79
-
80
-
81
-
82
-
83
-
84
-
85
-
86
-
87
-
88
-
89
-
90
-
91
-
92
-
93
-
94
-
95
-
96
-
97
-
98
-
99
-
100
-
101
-
102
-
103
-
104
-
105
-
106
-
107
-
108
-
109
-
110
-
111
-
112
-
113
-
114
-
115
-
116
-
117
-
118
-
119
-
120
-
121
-
122
-
123
-
124
 |
 |