Sharp XE A302 XE-A302 Operation Manual in English and Spanish - Page 71
Replacing the Paper Roll, How to set the paper roll
 |
UPC - 074000048294
View all Sharp XE A302 manuals
Add to My Manuals
Save this manual to your list of manuals |
Page 71 highlights
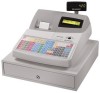
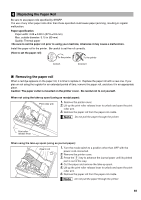
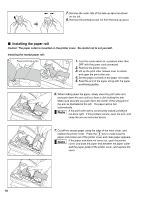
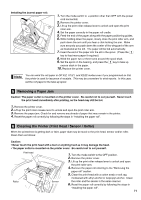
4 Replacing the Paper Roll Be sure to use paper rolls specified by SHARP. The use of any other paper rolls other than those specified could cause paper jamming, resulting in register malfunction. Paper specification Paper width: 2.25 ± 0.02 in (57.5 ± 0.5 mm) Max. outside diameter: 3.15 in (80 mm) Quality: Thermal paper • Be sure to set the paper roll prior to using your machine, otherwise it may cause a malfunction. Install the paper roll in the printer. Be careful to set the roll correctly. (How to set the paper roll) To the printer To the printer Correct Incorrect Removing the paper roll When a red dye appears on the paper roll, it is time to replace it. Replace the paper roll with a new one. If you plan on not using the register for an extended period of time, remove the paper roll, and store it in an appropriate place. Caution: The paper cutter is mounted on the printer cover. Be careful not to cut yourself. When not using the take-up spool (using as receipt paper): Print roller arm 1. Remove the printer cover. 2. Lift up the print roller release lever to unlock and open the print roller arm. 3. Remove the paper roll from the paper roll cradle. Do not pull the paper through the printer. Print roller release lever When using the take-up spool (using as journal paper): Area to cut 1. Turn the mode switch to a position other than OFF with the power cord connected. 2. Remove the printer cover. F 3. Press the key to advance the journal paper until its printed part is out of the way. 4. Cut the paper and remove the take-up spool. 5. Lift up the print roller release lever to unlock and open the print roller arm. 6. Remove the paper roll from the paper roll cradle. Do not pull the paper through the printer. 69
-
 1
1 -
2
-
3
-
4
-
5
-
6
-
7
-
8
-
9
-
10
-
11
-
12
-
13
-
14
-
15
-
16
-
17
-
18
-
19
-
20
-
21
-
22
-
23
-
24
-
25
-
26
-
27
-
28
-
29
-
30
-
31
-
32
-
33
-
34
-
35
-
36
-
37
-
38
-
39
-
40
-
41
-
42
-
43
-
44
-
45
-
46
-
47
-
48
-
49
-
50
-
51
-
52
-
53
-
54
-
55
-
56
-
57
-
58
-
59
-
60
-
61
-
62
-
63
-
64
-
65
-
 66
66 -
 67
67 -
 68
68 -
 69
69 -
 70
70 -
 71
71 -
 72
72 -
 73
73 -
 74
74 -
 75
75 -
 76
76 -
77
-
78
-
79
-
80
-
81
-
82
-
83
-
84
-
85
-
86
-
87
-
88
-
89
-
90
-
91
-
92
-
93
-
94
-
95
-
96
-
97
-
98
-
99
-
100
-
101
-
102
-
103
-
104
-
105
-
106
-
107
-
108
-
109
-
110
-
111
-
112
-
113
-
114
-
115
-
116
-
117
-
118
-
119
-
120
-
121
-
122
-
123
-
124
 |
 |