Sony CCD-TRV138 Camera Operations Guide - Page 80
Using the Direct Access to Click to, DVD function for the first time, Press the SEL/PUSH EXEC dial. - to dvd converter
 |
UPC - 027242666597
View all Sony CCD-TRV138 manuals
Add to My Manuals
Save this manual to your list of manuals |
Page 80 highlights
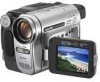
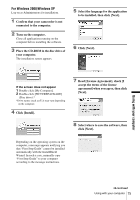
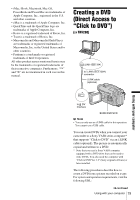
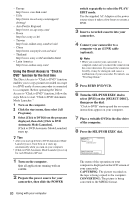
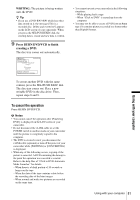
- Europe http://www.vaio-link.com/ - USA http://www.ita.sel.sony.com/support/ dvimag/ - Asia Pacific Regional http://www.css.ap.sony.com/ - Korea http://scs.sony.co.kr/ - Taiwan http://vaio-online.sony.com/tw/vaio/ - China http://www.sonystyle.com.cn/vaio/ - Thailand http://www.sony.co.th/vaio/index.html - Latin America http://vaio-online.sony.com/ Using the Direct Access to "Click to DVD" function for the first time The Direct Access to "Click to DVD" function enables you to copy pictures recorded on a tape to a DVD easily if your camcorder is connected to a computer. Before operating the Direct Access to "Click to DVD" function, follow the steps below to start "Click to DVD Automatic Mode Launcher." 1 Turn on the computer. 2 Click the start menu, then select [All Programs]. 3 Select [Click to DVD] from the programs displayed, then click [Click to DVD Automatic Mode Launcher]. [Click to DVD Automatic Mode Launcher] starts up. z Tips • After you start up [Click to DVD Automatic Mode Launcher] once, from then on it starts up automatically when you turn on your computer. • [Click to DVD Automatic Mode Launcher] is set up for each Windows XP user. 1 Turn on the computer. Quit all applications running with an i.LINK. 2 Prepare the power source for your camcorder, then slide the POWER switch repeatedly to select the PLAY/ EDIT mode. Use the supplied AC Adaptor as the power source since it takes a few hours to create a DVD. 3 Insert a recorded cassette into your camcorder. 4 Connect your camcorder to a computer via an i.LINK cable (optional). b Note • When you connect your camcorder to a computer, make sure you insert the connector in the correct direction. If you insert the connector forcibly, it may be damaged, and causes a malfunction of your camcorder. For details, see "First Step Guide." 5 Press BURN DVD/VCD. 6 Turn the SEL/PUSH EXEC dial to select [DVD] on the [SELECT DISC], then press the dial. "Click to DVD" starts up and the on-screen instructions appear on your computer. 7 Place a writable DVD in the disc drive of the computer. 8 Press the SEL/PUSH EXEC dial. 60min 0:00:00:00 BURN DVD START CREATE DVD? [EXEC] :EXECUTE [BURN DVD/VCD] : CANCEL The status of the operation on your computer is displayed on the LCD screen of your camcorder. CAPTURING: The picture recorded on the tape is being copied to the computer. CONVERTING: The picture is being converted to the MPEG2 format. 80 Using with your computer
-
 1
1 -
2
-
3
-
4
-
5
-
6
-
7
-
8
-
9
-
10
-
11
-
12
-
13
-
14
-
15
-
16
-
17
-
18
-
19
-
20
-
21
-
22
-
23
-
24
-
25
-
26
-
27
-
28
-
29
-
30
-
31
-
32
-
33
-
34
-
35
-
36
-
37
-
38
-
39
-
40
-
41
-
42
-
43
-
44
-
45
-
46
-
47
-
48
-
49
-
50
-
51
-
52
-
53
-
54
-
55
-
56
-
57
-
58
-
59
-
60
-
61
-
62
-
63
-
64
-
65
-
66
-
67
-
68
-
69
-
70
-
71
-
72
-
73
-
74
-
 75
75 -
 76
76 -
 77
77 -
 78
78 -
 79
79 -
 80
80 -
 81
81 -
 82
82 -
 83
83 -
 84
84 -
 85
85 -
86
-
87
-
88
-
89
-
90
-
91
-
92
-
93
-
94
-
95
-
96
-
97
-
98
-
99
-
100
-
101
-
102
-
103
-
104
-
105
-
106
-
107
-
108
-
109
-
110
-
111
-
112
 |
 |