Sony HCD-FL7D Operating Instructions - Page 12
Hooking up the system continued
 |
View all Sony HCD-FL7D manuals
Add to My Manuals
Save this manual to your list of manuals |
Page 12 highlights
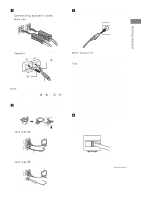
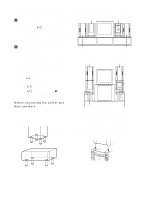
Hooking up the system (continued) 5 Connect the power cord to a wall outlet. The demonstration appears in the display. When you press ?/1, the system turns on and the demonstration automatically ends. If the supplied adaptor on the plug does not fit your wall outlet, detach it from the plug (only for models equipped with an adaptor). 6 (Except for Pan American and European models) Set the color system according to your TV. The color system is factory set to NTSC for region code 3 models, and PAL for other region code models. Each time you perform the procedure below, the color system changes as follows: NTSC y PAL Use the buttons on the unit. 1 Press ?/1 to turn off the system. 2 Press ?/1 while holding down X. The system turns on and the color system is changed. Before connecting the Center and Rear speakers Stick the supplied speaker pads to the bottom of the center speaker and rear speakers to stabilize the speakers and prevent them from slipping. Rear speaker After hooking up the system, we recommend to place the system as follows: Sub woofer Main unit Front speaker (Left) Front speaker (Left) Front speaker (Right) Front speaker (Right) Optional stand (not supplied)* Sub woofer Main unit * The optional stands are supplied for U.S.A. model. When placing the speakers on top of the sub woofer and the main unit, be sure to place the foot of the speakers to fit in the hollows on top of the sub woofer and the main unit. Center speaker 12GB
-
 1
1 -
2
-
3
-
4
-
5
-
6
-
 7
7 -
 8
8 -
 9
9 -
 10
10 -
 11
11 -
 12
12 -
 13
13 -
 14
14 -
 15
15 -
 16
16 -
 17
17 -
18
-
19
-
20
-
21
-
22
-
23
-
24
-
25
-
26
-
27
-
28
-
29
-
30
-
31
-
32
-
33
-
34
-
35
-
36
-
37
-
38
-
39
-
40
-
41
-
42
-
43
-
44
-
45
-
46
-
47
-
48
-
49
-
50
-
51
-
52
-
53
-
54
-
55
-
56
-
57
-
58
-
59
-
60
-
61
-
62
-
63
-
64
-
65
-
66
-
67
-
68
-
69
-
70
-
71
-
72
-
73
-
74
-
75
-
76
 |
 |
