Sony HCD-FL7D Operating Instructions - Page 16
Setting the clock
 |
View all Sony HCD-FL7D manuals
Add to My Manuals
Save this manual to your list of manuals |
Page 16 highlights
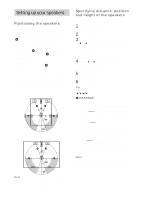
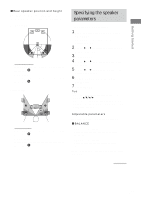
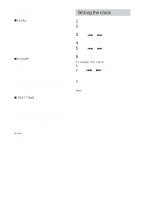
Specifying the speaker parameters (continued) x LEVEL • CENTER: (0 dB) Level of the center speaker (-6 dB to +6 dB, 1 dB steps). • REAR: (0 dB) Level of the rear speakers (-6 dB to +6 dB, 1 dB steps). • SUB W.: (0 dB) Level of the subwoofer (-6 dB to +6 dB, 1 dB steps). x D.COMP. • D.COMP.: (OFF) Dynamic range compression. Range: OFF, 0.1 to 0.9, STD, MAX "OFF" does not compress the dynamic range. "0.1" to "0.9" settings allow you to compress the dynamic range in small steps. "STD" reproduces the sound track with the dynamic range intended by the recording engineer. "MAX" provides a great compression of the dynamic range. x TEST TONE • TEST TONE: (OFF) Test tone output. Range: OFF, ON "ON" outputs the test tone from each speaker in sequence. Adjust the LEVEL and BALANCE parameters so that the volume level of the test tone from each speaker sounds the same using the remote from your listening position. Select "OFF" to turn off the test tone. Notes • When 2.1CH/MULTI is set to "2.1CH" (page 53), you cannot set rear speaker balance, center level, rear level. • Dynamic range compression is possible with Dolby Digital sources only. Setting the clock 1 Turn on the system. 2 Press CLOCK/TIMER SET on the remote. 3 Press . or > repeatedly to set the hour. 4 Press ENTER on the remote. 5 Press . or > repeatedly to set the minutes. 6 Press ENTER on the remote. To adjust the clock 1 Press CLOCK/TIMER SET on the remote. 2 Press . or > repeatedly to select "CLOCK SET?", then press ENTER on the remote. 3 Do the same procedures as step 3 to 6 above. Note The clock settings are canceled when you disconnect the power cord or if a power failure occurs. 16GB
-
 1
1 -
2
-
3
-
4
-
5
-
6
-
7
-
8
-
9
-
10
-
 11
11 -
 12
12 -
 13
13 -
 14
14 -
 15
15 -
 16
16 -
 17
17 -
 18
18 -
 19
19 -
 20
20 -
 21
21 -
22
-
23
-
24
-
25
-
26
-
27
-
28
-
29
-
30
-
31
-
32
-
33
-
34
-
35
-
36
-
37
-
38
-
39
-
40
-
41
-
42
-
43
-
44
-
45
-
46
-
47
-
48
-
49
-
50
-
51
-
52
-
53
-
54
-
55
-
56
-
57
-
58
-
59
-
60
-
61
-
62
-
63
-
64
-
65
-
66
-
67
-
68
-
69
-
70
-
71
-
72
-
73
-
74
-
75
-
76
 |
 |
