Sony HCD-FL7D Operating Instructions - Page 58
Listening to audio from a, connected component
 |
View all Sony HCD-FL7D manuals
Add to My Manuals
Save this manual to your list of manuals |
Page 58 highlights
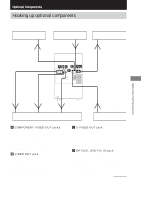
Hooking up optional components (continued) E OPTICAL DVD DIGITAL OUT jack Use a digital optical cable (square, not supplied) to connect an MD deck to this jack. You can then output the digital audio to the MD deck from this system. F VIDEO (MD) IN jacks (North American model only) MD (VIDEO) IN jacks (other models) Use audio cords (not supplied) to connect an MD deck or VCR to these jacks. You can then listen to analog audio from the MD deck or VCR through this system. G VIDEO (MD) OUT jack (North American model only) MD (VIDEO) OUT jacks (other models) Use audio cords (not supplied) to connect an MD deck or VCR to these jacks. You can then output audio to the MD deck or VCR from this system. Tip When you remove the optical cover, keep it for future use. Listening to audio from a connected component Listening to the digital audio from the connected MD deck or DVD player 1 Connect the digital optical cable. See "Hooking up optional components" on page 57. 2 Press DIGITAL (or FUNCTION on the remote repeatedly until "DIGITAL" appears). Start playing the connected component. Listening to the analog audio from the connected MD deck or VCR 1 Connect the audio cords. See "Hooking up optional components" on page 57. 2 (For North American model) To listen to the sound of the connected VCR: Press VIDEO (MD) (or FUNCTION on the remote repeatedly until "VIDEO (MD)" appears). Start playing the connected component. To listen to the sound of the connected MD deck: Hold down VIDEO (MD) and press ?/1 while the power is on. Release ?/1 first, then release VIDEO (MD). This switches the function from VIDEO to MD. Once you switched to the MD function, just press VIDEO (MD). Start playing the connected component. 58GB
-
 1
1 -
2
-
3
-
4
-
5
-
6
-
7
-
8
-
9
-
10
-
11
-
12
-
13
-
14
-
15
-
16
-
17
-
18
-
19
-
20
-
21
-
22
-
23
-
24
-
25
-
26
-
27
-
28
-
29
-
30
-
31
-
32
-
33
-
34
-
35
-
36
-
37
-
38
-
39
-
40
-
41
-
42
-
43
-
44
-
45
-
46
-
47
-
48
-
49
-
50
-
51
-
52
-
 53
53 -
 54
54 -
 55
55 -
 56
56 -
 57
57 -
 58
58 -
 59
59 -
 60
60 -
 61
61 -
 62
62 -
 63
63 -
64
-
65
-
66
-
67
-
68
-
69
-
70
-
71
-
72
-
73
-
74
-
75
-
76
 |
 |
