Sony KP-46WT520 Operating Instructions - Page 74
If you select Skip, your TV skips this input when you, press the TV/VIDEO button., DVD, Satellite
 |
View all Sony KP-46WT520 manuals
Add to My Manuals
Save this manual to your list of manuals |
Page 74 highlights
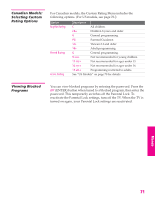
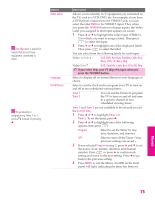
SETUP SETUP Menus z The Skip label is useful for inputs that do not have equipment connected to them. z To go directly to programming Timer 1 or 2, press instead of pressing b. Option Video Label Language Clock/Timers Description Allows you to identify A/V equipment you connected to the TV, such as a VCR, DVD, etc. For example, if you have a DVD player connected to the VIDEO 5 jack, you can select the label DVD for the VIDEO 5 input. Then when you press the TV/VIDEO button to change inputs, the Video Label you assigned to that input appears on screen. 1 Press V or v to highlight the video input (VIDEO 1- 7) to which you want to assign a label. Then press to select the input. 2 Press V or v to highlight one of the displayed labels. Then press to select the label. You can select from the following labels for each input: Video 1/2/3/4 VHS, DVD, Receiver, Satellite, Cable Box, 8mm, DTV, LD, Beta, Skip Video 5/6/7 DVD, Satellite, Cable Box, DTV, HD, Skip ✍ If you select Skip, your TV skips this input when you press the TV/VIDEO button. Select to display all on-screen Menus in your language of choice. Select to set the clock and to program your TV to turn on and off at two scheduled viewing times. Timer 1 Timer 2 You can use the Timers to program the TV to turn on and off and tune to a specific channel at two scheduled viewing times. Timer 1 and Timer 2 are not available to be set until you set the Current Time. 1 Press V or v to highlight Timer 1 or Timer 2. To set the timer, press b. 2 Press V or v to highlight one of the following options, then press . Program Select to set the Timer by day, time, duration, and channel. Off Select to turn off the Timer. (Your previous settings are saved.) 3 If you selected Program in step 2, press V and v to set the day(s), hour, minute, duration, and channel number. Press or press b to confirm each setting and move to the next setting. Press B to go back to the previous setting. 4 Press MENU to exit the Menu. An LED on the front panel will light, indicating the timer has been set. SETUP Menus SETUP 73
-
 1
1 -
2
-
3
-
4
-
5
-
6
-
7
-
8
-
9
-
10
-
11
-
12
-
13
-
14
-
15
-
16
-
17
-
18
-
19
-
20
-
21
-
22
-
23
-
24
-
25
-
26
-
27
-
28
-
29
-
30
-
31
-
32
-
33
-
34
-
35
-
36
-
37
-
38
-
39
-
40
-
41
-
42
-
43
-
44
-
45
-
46
-
47
-
48
-
49
-
50
-
51
-
52
-
53
-
54
-
55
-
56
-
57
-
58
-
59
-
60
-
61
-
62
-
63
-
64
-
65
-
66
-
67
-
68
-
 69
69 -
 70
70 -
 71
71 -
 72
72 -
 73
73 -
 74
74 -
 75
75 -
 76
76 -
 77
77 -
 78
78 -
 79
79 -
80
-
81
-
82
-
83
-
84
-
85
 |
 |