Sony LBT-ZUX9 Operating Instructions
Sony LBT-ZUX9 - Mini Hifi Component Manual
 |
View all Sony LBT-ZUX9 manuals
Add to My Manuals
Save this manual to your list of manuals |
Sony LBT-ZUX9 manual content summary:
- Sony LBT-ZUX9 | Operating Instructions - Page 1
Mini Hi-Fi Component System Operating Instructions Owner's Record The model and serial numbers are located on the rear of the unit. Record the serial number in the space provided below. Refer to them whenever you call upon your Sony dealer regarding this product. Model No. Serial No. LBT - Sony LBT-ZUX9 | Operating Instructions - Page 2
in cabinet. Install this system so that the power cord can be unplugged from the wall socket immediately in the event of trouble. NOTICE FOR THE user to the presence of important operating and maintenance (servicing) instructions in the literature accompanying the appliance. This appliance - Sony LBT-ZUX9 | Operating Instructions - Page 3
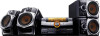
to Part 15 of instructions manual The LBT-ZUX9 consists of: - Unit HCD-ZUX9 - Speaker System • Front speakers SS-ZUX9 • Surround speakers SS-ZUX9 "WALKMAN" and "WALKMAN" logo are registered trademarks of Sony Corporation. MICROVAULT is a trademark of Sony Corporation. MPEG Layer-3 audio - Sony LBT-ZUX9 | Operating Instructions - Page 4
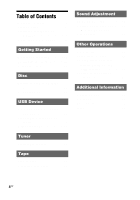
Contents About this manual 3 Playable discs 5 Playable/Recordable USB devices 6 Guide to parts and controls.......... 7 Getting Started Hooking up the system 15 Positioning the speakers 17 Setting the clock 18 Disc Playing an AUDIO CD/MP3 disc 19 Using play mode 21 USB Device Recording from - Sony LBT-ZUX9 | Operating Instructions - Page 5
part of Mixed CDs2) • CD-R/-RW discs that have not been correctly finalized (processing to allow play back by a normal CD player). • CD-R/-RW discs recorded in Multi Session that have not ended by "closing the session". • A disc recorded in packet write format. • Audio audio (AUDIO audio (AUDIO system - Sony LBT-ZUX9 | Operating Instructions - Page 6
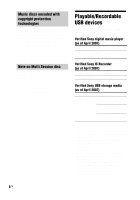
first session. Playable/Recordable USB devices You can use the following Sony USB devices on this system. Verified Sony digital music player (as USB devices. • Some of these USB devices may not be available for purchase in certain areas. • See the operating instructions supplied with the USB - Sony LBT-ZUX9 | Operating Instructions - Page 7
Guide to parts and controls This manual mainly explains operations using the buttons on the unit, but the same operations can also be performed using the buttons on the remote having the - Sony LBT-ZUX9 | Operating Instructions - Page 8
, 56) F IR Receptor (page 50) G Function buttons: AUDIO (pages 38, 45, 48) VIDEO (pages 38, 45, 48) USB (pages 25, 27, 38, 45) Press to select a speaker system. L FRONT BEAM (Right) (page 45) M CHORUS (pages 38, 50, 55) AQUA (pages 38, 50, 55) Press to select an effector mode. N Power illuminator - Sony LBT-ZUX9 | Operating Instructions - Page 9
adjust the brightness of the display and built-in beam or change the power illuminator pattern. Z BEAM MODE (page 45) Press to change the (page 25) Press to erase MP3 audio tracks or folders on the connected optional USB device (Digital music player or USB storage media). RETURN (pages 19, 28 - Sony LBT-ZUX9 | Operating Instructions - Page 10
the connected optional USB device (Digital music player or USB storage media). Press to record a track from a disc onto the connected optional USB device (Digital music player or USB storage media). TAPE input the tempo of the audio source. PAD A/PAD B (page 40) Press to add percussion sound. 10US - Sony LBT-ZUX9 | Operating Instructions - Page 11
USB device (Digital music player or USB storage media) is recognized. E Indicators for the tuner band (page 31). F Lights up when the MP3 audio Play Timer or Recording Timer is set (page 43). Q Indicators for the speaker system (page 42). R Indicators for the selected play mode (page 21). S Indicators - Sony LBT-ZUX9 | Operating Instructions - Page 12
to turn the system on or off. B CLOCK/TIMER SELECT (page 44) CLOCK/TIMER SET (pages 18, 43) Press to set the clock and the timers. C REPEAT/FM MODE (pages 23, 32, 54) Press to change the Repeat Play setting. Press to select the FM monaural or stereo reception. D USB (page 27) Press - Sony LBT-ZUX9 | Operating Instructions - Page 13
VOLUME + button has a tactile dot. Use the tactile dot as a reference when operating the system. J EQ (page 36) Press to select a preset effect. K CLEAR (page 23) (pages 21, 31, 32) Press to select the play mode of CD or USB function. Press to select the tuning mode. qd TUNER MEMORY (page 31) Press - Sony LBT-ZUX9 | Operating Instructions - Page 14
+/-* (pages 19, 27, 44, 49) Press to adjust the volume. * The VOLUME + button has a tactile dot. Use the tactile dot as a reference when operating the system. H BEAT ON/OFF (page 41) Press to turn on or off the rhythms of the beat. BEAT SPEED + (page 41) BEAT SPEED - (page 41) Press - Sony LBT-ZUX9 | Operating Instructions - Page 15
2 To FM lead antenna 3 To front speaker (right) 4 To front speaker (left) 5 To surround speaker (right) 6 To surround speaker (left) A Antennas Set up the AM loop antenna, then connect it. Note Keep the antennas away from the speaker cords, the power cord and the USB cable to avoid picking up noise - Sony LBT-ZUX9 | Operating Instructions - Page 16
. • Be sure to connect the speakers securely and correctly. When connecting speaker cords, insert the connector straight into the terminals. C Power Connect the power cord to a wall outlet. The demonstration appears in the display. When you press "/1, the system turns on and the demonstration - Sony LBT-ZUX9 | Operating Instructions - Page 17
Unplug the AC power cord. Positioning the speakers There are 2 ways to place front speakers and the surround speakers. To create a party environment, we recommend that you place your speakers as shown in example 1. A Front speaker (left) B Front speaker (right) C Surround speaker (left) D Surround - Sony LBT-ZUX9 | Operating Instructions - Page 18
clock Use buttons on the remote for the operation. 1 Press "/1 to turn on the system. 2 Press CLOCK/TIMER SET. The hour indication flashes in the display. If "PLAY SET clock starts functioning. Note The clock settings are canceled when you disconnect the power cord or if a power failure occurs. 18US - Sony LBT-ZUX9 | Operating Instructions - Page 19
you want, then press ENTER. To return to the parent folder, press RETURN. Search for a Turn OPERATION track on an DIAL to select the track AUDIO CD by you want, then press its track number ENTER. and start playback the track (TRACK SEARCH) Find a point in a track* Hold down m or M on - Sony LBT-ZUX9 | Operating Instructions - Page 20
may encounter problems such as cannot play back, sound interruptions and noise. Tip When you press CD or one of the DISC 1 ~ 3 buttons to switch to CD function from TUNER function, you may require a longer time to access the disc. In the case, set the CD/USB power manage function to "CD/USB POWER ON - Sony LBT-ZUX9 | Operating Instructions - Page 21
. 1 DISC The tracks on the disc (Normal Play) you have selected in original order. (Normal Play) The MP3 audio tracks in the folder on the disc you have selected in original order. For AUDIO CDs, this play mode performs the same operation as "1 DISC" play mode. ALL DISCS The tracks on all - Sony LBT-ZUX9 | Operating Instructions - Page 22
You can synchro record the programmed tracks onto a tape (page 34) or a USB device (page 24). 1 Press CD. 2 When playback is stopped, press PLAY MODE you want appears in the display. The total playing time flashes in the display. To program an MP3 audio track: Press +/- repeatedly until the folder - Sony LBT-ZUX9 | Operating Instructions - Page 23
playing time during programming, this means: - you have programmed a track in an AUDIO CD with track number exceeds 20. - the total playing time has exceeded 100 minutes. - you have programmed an MP3 audio track. Playing repeatedly - Repeat Play You can play back all the tracks or a single track - Sony LBT-ZUX9 | Operating Instructions - Page 24
You can record music from a disc to an optional USB device (Digital music player or USB storage media) by connecting it to the (USB) port on the unit. You can record from an AUDIO CD or MP3 disc. The audio format recorded by this system is MP3. The approximate size of the recording from - Sony LBT-ZUX9 | Operating Instructions - Page 25
and there is no sub folder. Notes • The program list is cleared when you perform the erase operation. • You cannot erase MP3 audio tracks and folders in Shuffle Play mode or Program Play mode. Folder and track generation rules When recording to a USB device for the first time, a "MUSIC" folder - Sony LBT-ZUX9 | Operating Instructions - Page 26
recording is performed. Notes • Do not connect the system and the USB device through a USB hub. • You cannot eject the disc during CD-USB Synchro Recording or REC1 Recording. • When recording from an AUDIO CD, the tracks are recorded as 128 kbps MP3 audio tracks. When recording from an MP3 disc, MP3 - Sony LBT-ZUX9 | Operating Instructions - Page 27
appears in the display. 2 Press NX (or N on the remote). The system starts playback from the point you stopped in step 1. Resume Play is not funtion except - you change to TUNER function when CD/USB power manage is set to OFF. To remove the USB device 1 Press x to stop playback. 2 Check that - Sony LBT-ZUX9 | Operating Instructions - Page 28
time for the USB device may vary. • If the system is turned off or a power failure occurs during "RESUME", then you turn on the system and start playback, the system will start playback from the beginning of the track where you stopped playback. • This system does not necessarily support all the - Sony LBT-ZUX9 | Operating Instructions - Page 29
your own program - Program Play You can make a program of up to 25 steps in the order you want them to be played back. 1 Press USB (or USB on the remote). 2 When playback is stopped, press PLAY MODE on the remote repeatedly until "PROGRAM" lights up in the display. 3 Press +/- repeatedly until - Sony LBT-ZUX9 | Operating Instructions - Page 30
you perform the erase operation. Tip The program you made remains in the system's memory even after it has been played back. Press NX (or N Repeat Play You can play back all the tracks or a single track on an USB device repeatedly. Press REPEAT on the remote repeatedly during playback until "REP" or - Sony LBT-ZUX9 | Operating Instructions - Page 31
preset station, or by manually tuning in the station. system scans for a station. Scanning stops automatically when a station is tuned in and "TUNED" lights up in the display. When a FM stereo program is tuned in, "STEREO day even if you unplug the power cord or if a power failure occurs. 8 To listen - Sony LBT-ZUX9 | Operating Instructions - Page 32
MODE repeatedly until "MANUAL" lights up in the system. 3 Press "/1 while holding down x. The system turns on automatically. "CD/USB POWER OFF" appears in the display. To set to "CD/USB POWER ON" Repeat the procedure above and "CD/ USB POWER ON" appears in the display. Notes • When "CD/USB POWER - Sony LBT-ZUX9 | Operating Instructions - Page 33
tape deck. Tip If you press NX (or N on the remote) when the TAPE A function is selected and there is no tape in Deck A, the system automatically switches to the TAPE B function when there is a tape in Deck B and vice versa. Then, playback will start. 33US - Sony LBT-ZUX9 | Operating Instructions - Page 34
-TAPE Synchro Recording: You can record tracks from AUDIO CDs and MP3 discs onto a tape. The recording level is adjusted automatically. Manual Recording: You can record just the portion you want from an audio source, including connected audio components. Sound Mixing: You can "mix" sound from any - Sony LBT-ZUX9 | Operating Instructions - Page 35
5 For Manual Recording and Sound Mixing, start playing the source to be recorded. Tip would be recorded onto a tape. Tip When high level sound signals are input, the system automatically adjusts the recording level to prevent distortion of the recorded sound signals (Auto Level Control Function). Tape - Sony LBT-ZUX9 | Operating Instructions - Page 36
ON t ... * The volume switches to power mode and the equalizer curve changes. Tip The SAMBA, REGGAE, HIP HOP, TECHNO Standard audio sources FLAT Original audio source (cancel the preset effect) USER sound by raising or lowering the level of specific frequency band or selecting the surround effect, - Sony LBT-ZUX9 | Operating Instructions - Page 37
setting stored at this memory location is erased and replaced by the new setting. Enhancing the sound quality This system is equipped with MP3 BOOSTER function. When an MP3 audio track is played back, the MP3 BOOSTER function is automatically activated to enhance the sound quality. Creating a party - Sony LBT-ZUX9 | Operating Instructions - Page 38
cancel the AQUA sound effect. Notes • You can only select the effector mode in CD, USB, AUDIO and VIDEO function. • The current effector mode is automatically turns off when you: - turn off the system. - change the function. - select another effector mode. • If you activate the effector mode during - Sony LBT-ZUX9 | Operating Instructions - Page 39
Turn the X-ROUND JOG or press X-ROUND +/- on the X-TRANCE PRO remote repeatedly to change the sound movement from one speaker to another speaker during MANUAL WAVE, MANUAL FADER and MANUAL BALANCE. To change the speed of sound movement Turn the X-ROUND JOG or press X-ROUND +/- on the X-TRANCE PRO - Sony LBT-ZUX9 | Operating Instructions - Page 40
select the X-ROUND mode you want. 3 Press MAX/JUMP MODE repeatedly until "MANUAL" appears in the display. 4 Press MAX PAD or JUMP PAD to activate the JUMP PAD during tempo input, the MAX/JUMP MODE would automatically changed to "MANUAL" during "TEMPO" mode. • If "Hit Faster" appears in the display, - Sony LBT-ZUX9 | Operating Instructions - Page 41
in the display. Hit again with slower tempo. • If the tempo of the beat pattern cannot match the tempo of the music, change the speed manually after you input the tempo. Tips • You can use the drum pads and the beat function together. • You can record the sound of the drum - Sony LBT-ZUX9 | Operating Instructions - Page 42
changes cyclically as follow: SPEAKERS A t SPEAKERS B t SPEAKERS A+B To select The front speakers The surround speakers Both the front and surround speakers Display SPEAKERS A SPEAKERS B SPEAKERS A+B Notes • When X-ROUND mode is selected, the speaker system setting automatically changes to - Sony LBT-ZUX9 | Operating Instructions - Page 43
system automatically turns off after the playback of the disc, tape or USB stops or in 100 minutes. Do not select "AUTO" during CD-TAPE or CD-USB 1 Prepare the audio source. For Play Timer: Prepare the audio source and then press VOLUME +/- to adjust the volume. To start from a specific track, create - Sony LBT-ZUX9 | Operating Instructions - Page 44
priority. • The Play Timer and Recording Timer will not be activated if the system is turned on or if "STANDBY" flashes in the display. • The volume Select the pattern of the power illuminator when the X-ROUND mode is not selected. X-ROUND ILLUM Turn on or off the power illuminator when the X-ROUND - Sony LBT-ZUX9 | Operating Instructions - Page 45
the clock (page 18). - Changing the AM tuning interval (page 32). - Turning on the system by pressing the function buttons (CD, TUNER/BAND, TAPE A/B, AUDIO, VIDEO or USB ). - Changing the CD/USB power manage setting (page 32). Changing the lighting effect of the beam - BUILT-IN BEAM 1 Press - Sony LBT-ZUX9 | Operating Instructions - Page 46
number of programmed step1)2) (for 8 seconds) 3 Memory free space of connected USB device3) 4 Clock display (for 8 seconds) 5 Effect name (for 8 seconds) AUDIO CD with play mode other than "PROGRAM": 1 Total number of tracks and total playing time 2 Clock display (for 8 seconds) 3 Effect name (for - Sony LBT-ZUX9 | Operating Instructions - Page 47
MP3 audio tracks with play mode other than "PROGRAM": • When " " or " SHUF" play mode is selected 1 Total number of tracks of the current folder and folder name 2 Memory free space of connected USB device3) 3 Clock display (for 8 seconds) 4 Effect name (for 8 seconds) • When play mode other than " - Sony LBT-ZUX9 | Operating Instructions - Page 48
would be output through AUDIO OUT jacks. C AUDIO (AUDIO IN) L/R jacks Use an audio cord to connect to the audio output jacks of an optional component (such as an MD deck). D VIDEO (AUDIO IN) L/R jacks Use an audio cord to connect to the audio output jacks of an optional component (such as a TV or - Sony LBT-ZUX9 | Operating Instructions - Page 49
and firmly. 2 Find your problem in the troubleshooting checklist below and take the indicated corrective action. If the problem persists after doing all of the above, consult your nearest Sony dealer. Note that if service personnel changes some parts during repair, these parts may be retained. When - Sony LBT-ZUX9 | Operating Instructions - Page 50
a different wall outlet. • Install a noise filter (commercially available) to the power cord. The timer does not function. • Check the timer setting and set the Move the microphone away from the speakers or change the direction of the microphone. The sound from the audio source has echo effects. • - Sony LBT-ZUX9 | Operating Instructions - Page 51
. • Consult your nearest Sony dealer or local authorized Sony service facility. The disc tray does system turned on for a few hours until the moisture evaporates. • Press NX (or N on the remote) to start playback. Disc access take a longer time. • Set the CD/USB power manage function to "CD/USB POWER - Sony LBT-ZUX9 | Operating Instructions - Page 52
again. If this does not fix the problem, the USB device may be broken. Refer to operating instructions of the USB device on how to remedy this problem. • Turn off the system and remove the USB device. If the USB device has a power switch, turn the USB device off and then on again after removing - Sony LBT-ZUX9 | Operating Instructions - Page 53
Total folders on USB device: 100 or less - Total system, then reconnect the USB device. • Connect the supported USB device (page 6). • The USB device does not work properly. Refer to the USB device operating manual for how to deal with this problem. If the problem persists, contact your nearest Sony - Sony LBT-ZUX9 | Operating Instructions - Page 54
cannot be played back. • The data is not in MP3 format. * This system supports FAT16 and FAT32, but some USB storage media may not support all of these FAT. For details, see the operating instructions of each USB storage media or contact the manufacturer. Tuner The radio presetting is canceled - Sony LBT-ZUX9 | Operating Instructions - Page 55
instructions supplied with the connected component and start playing. If the system still does not operate properly after performing the above measures or other troubles not described above occur, reset the system as follows: Use the buttons on the unit for the operation. 1 Unplug the power - Sony LBT-ZUX9 | Operating Instructions - Page 56
the programmed tracks have been erased. Not Supported An unsupported USB device is connected or the USB device is connected through an USB hub. No Track No playable MP3 audio track is loaded in the system. Not in Use You tried to perform a specific operation under conditions where that operation is - Sony LBT-ZUX9 | Operating Instructions - Page 57
folder has reached its maximum. Device Full! The memory of the USB device is full. Precautions Discs that this system CANNOT play back • Discs of non-standard shape (for example dealer. • The AC power cord can be changed only by a qualified service facility. Additional Information Continued l 57US - Sony LBT-ZUX9 | Operating Instructions - Page 58
speakers on surfaces that have been specially treated (for example, with wax, oil, polish) as staining or discoloration of the surface may result. • If the system or an inability of the system to record or play back tapes. For details, refer to the instructions of the cleaning tape. Demagnetizing - Sony LBT-ZUX9 | Operating Instructions - Page 59
minimum RMS power, with no more than 0.7% total harmonic distortion from 250 miliwatts to rated output. Amplifier section The following are measured at AC 120 V, 60 Hz Front/Surround speaker RMS output power (reference): 250 W + 250 W (per channel at 6 Ω, 1 kHz, 10% THD) Inputs VIDEO (AUDIO IN - Sony LBT-ZUX9 | Operating Instructions - Page 60
Supported USB device Mass Storage Class Maximum current 500 mA Speaker Front/Surround speakers (SS-ZUX9) Speaker system 2-way, 2-drivers speaker system, Bass-reflex Speaker antenna (1) Front speaker pads (8) Surround speaker pads (8) Speaker cords (4) Design and specifications are subject to change - Sony LBT-ZUX9 | Operating Instructions - Page 61
32 G GROOVE 36 H Handling discs 57 Hooking up the optional components 47 system 15 J JUMP PAD 39 M Manual Recording 34 MAX PAD 39 Multi Session 6 N Non-playable disc 5 Normal Play 21, 29 P Playable disc 5 Playable/Recordable USB devices 6 Power Saving Mode 45 Preset effect 36 Program Play 22, 29 - Sony LBT-ZUX9 | Operating Instructions - Page 62
- Sony LBT-ZUX9 | Operating Instructions - Page 63
- Sony LBT-ZUX9 | Operating Instructions - Page 64
(3) Sony Corporation Printed in Malaysia
-
 1
1 -
 2
2 -
 3
3 -
 4
4 -
 5
5 -
 6
6 -
 7
7 -
8
-
9
-
10
-
11
-
12
-
13
-
14
-
15
-
16
-
17
-
18
-
19
-
20
-
21
-
22
-
23
-
24
-
25
-
26
-
27
-
28
-
29
-
30
-
31
-
32
-
33
-
34
-
35
-
36
-
37
-
38
-
39
-
40
-
41
-
42
-
43
-
44
-
45
-
46
-
47
-
48
-
49
-
50
-
51
-
52
-
53
-
54
-
55
-
56
-
57
-
58
-
59
-
60
-
61
-
62
-
63
-
64
 |
 |
©2007 Sony Corporation
3-100-770-
71
(3)
Mini Hi-Fi
Component
System
Operating Instructions
Owner’s Record
The model and serial numbers are located on the rear of the unit. Record the serial
number in the space provided below. Refer to them whenever you call upon your
Sony dealer regarding this product.
Model No.
Serial No.
LBT-ZUX9