Sony LBT-ZUX9 Operating Instructions - Page 8
Tape A/b S 33 - usb
 |
View all Sony LBT-ZUX9 manuals
Add to My Manuals
Save this manual to your list of manuals |
Page 8 highlights
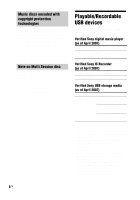
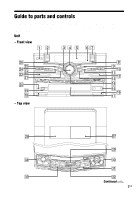
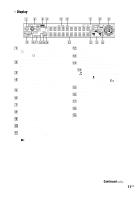
1 "/1 (on/standby) (pages 16, 17, 18, 25, 32, 44, 49, 55) Press to turn the system on or off. B Function buttons: CD (pages 17, 19, 21, 24, 32, 34, 45) TUNER/BAND (pages 31, 45) TAPE A/B (pages 33, 45) Press to select a function. C MASTER VOLUME (pages 19, 27, 44, 49) Turn to adjust the volume. D OPERATION DIAL (pages 19, 28, 36, 40, 44) Turn to select a track or folder. Turn to select a setting. E Display (pages 11, 44, 46, 56) F IR Receptor (page 50) G Function buttons: AUDIO (pages 38, 45, 48) VIDEO (pages 38, 45, 48) USB (pages 25, 27, 38, 45) Press to select a function. H DISPLAY (pages 45, 46) Press to change the information on the display. I GROOVE (page 36) Press to reinforce the bass. J FLAT (page 36) SAMBA (page 36) REGGAE (page 36) HIP HOP (page 36) TECHNO (page 36) Press to select a preset effect. K SPEAKERS (page 42) Press to select the speaker system. L FRONT BEAM (Right) (page 45) M CHORUS (pages 38, 50, 55) AQUA (pages 38, 50, 55) Press to select an effector mode. N Power illuminator (page 44) O MIC (jack) (pages 42, 49, 59) Connect an optional microphone. MIC LEVEL (pages 35, 42, 49) Turn to adjust the microphone volume. P BOTTOM BEAM (Right) (page 45) Q Disc tray (pages 17, 19, 51) R BOTTOM BEAM (Left) (page 45) S (USB) port (pages 24, 25, 27, 53, 59) Connect an optional USB device (Digital music player or USB storage media). REC/ERASE (indicator) (pages 25, 27) Lights up when recording from a disc onto the connected optional USB device (Digital music player or USB storage media). Lights up when erasing MP3 audio tracks from the connected optional USB device (Digital music player or USB storage media). T PHONES (jack) (pages 39, 42, 49, 59) Connect the headphones. U FLANGER (pages 37, 50, 55) DELAY (pages 37, 50, 55) Press to select an effector mode. V FRONT BEAM (Left) (page 45) 8US
-
 1
1 -
2
-
 3
3 -
 4
4 -
 5
5 -
 6
6 -
 7
7 -
 8
8 -
 9
9 -
 10
10 -
 11
11 -
 12
12 -
 13
13 -
14
-
15
-
16
-
17
-
18
-
19
-
20
-
21
-
22
-
23
-
24
-
25
-
26
-
27
-
28
-
29
-
30
-
31
-
32
-
33
-
34
-
35
-
36
-
37
-
38
-
39
-
40
-
41
-
42
-
43
-
44
-
45
-
46
-
47
-
48
-
49
-
50
-
51
-
52
-
53
-
54
-
55
-
56
-
57
-
58
-
59
-
60
-
61
-
62
-
63
-
64
 |
 |