Sony PCWA-C800S Wireless Panel Guide - Page 59
Easy Setting display, Network Name SSID, Data encryption WEP, Confirm key, Advanced button
 |
View all Sony PCWA-C800S manuals
Add to My Manuals
Save this manual to your list of manuals |
Page 59 highlights
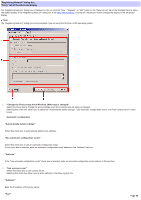
"Registering Network" dialog box Easy Setting display The "Registering Netw ork" dialog box is displayed w hen you click the "New ", "Register", or "Edit" button on the "Netw ork List" tab of the Wireless Panel w indow . Note The "Registering Netw ork" dialog box is only available if you are using the Window s 2000 operating system. 1. Ne tw ork Nam e (SSID) Enter the netw ork name (SSID) of the netw ork that you w ant to register or the registered netw ork that you w ant to edit. If you click , a search for w ireless netw orks operating w ithin the communication range of your computer starts, and any netw orks found are displayed on the drop-dow n list. From the list, you can select the w ireless netw ork that you w ant to register or edit. 2. Data e ncryption (WEP) You can configure settings related to data encryption (WEP). "WEP" Selecting the WEP check box enables data encryption (WEP). "Ke y" If you selected the "WEP" check box, enter an encryption key in this text box. Hint The encryption key is also called "WEP key" or "netw ork key". "Confirm key" Re-enter the encryption key. 3. "Advanced" button Changes the display to the Advanced display. In the Advanced display, you can configure the netw ork mode, TCP/IP settings, and proxy settings. 4. Other buttons "Connect" button Saves any settings that you configured and connects to the w ireless netw ork. "Save " button Saves any settings that you configured. No attempt is made to connect to a w ireless netw ork. "Cancel" button Closes the dialog box w ithout applying any settings or connecting to a w ireless netw ork. Page 59
-
 1
1 -
2
-
3
-
4
-
5
-
6
-
7
-
8
-
9
-
10
-
11
-
12
-
13
-
14
-
15
-
16
-
17
-
18
-
19
-
20
-
21
-
22
-
23
-
24
-
25
-
26
-
27
-
28
-
29
-
30
-
31
-
32
-
33
-
34
-
35
-
36
-
37
-
38
-
39
-
40
-
41
-
42
-
43
-
44
-
45
-
46
-
47
-
48
-
49
-
50
-
51
-
52
-
53
-
 54
54 -
 55
55 -
 56
56 -
 57
57 -
 58
58 -
 59
59 -
 60
60 -
 61
61 -
 62
62 -
 63
63 -
 64
64 -
65
-
66
-
67
-
68
-
69
-
70
-
71
-
72
-
73
-
74
-
75
-
76
-
77
-
78
-
79
-
80
-
81
 |
 |
