Toshiba 56HM66 Owner's Manual - English - Page 15
Setup/Installation menu layout, Navigating the menu system
 |
UPC - 022265251454
View all Toshiba 56HM66 manuals
Add to My Manuals
Save this manual to your list of manuals |
Page 15 highlights
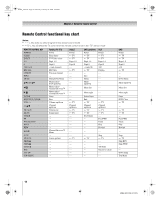
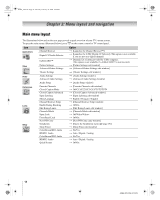
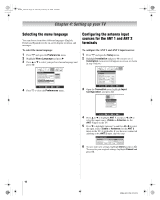
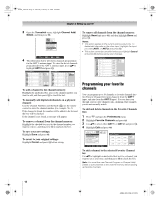
HM66_EN.book Page 15 Thursday, February 23, 2006 2:49 PM Chapter 3: Menu layout and navigation Setup/Installation menu layout To open the Installation menu (illustrated below), press Y on the remote control or TV control panel, open the Setup menu, select Installation, and press T. Press Y. Open the Setup menu, and then open the Installation sub-menu. Icon Terrestrial Item Input Configuration Channel Program Channel Add/Delete Signal Meter Option S [Input Configuration window] S ANT1 S [Scans for new channels on desired Antenna] S ANT2 S [Scans for new channels on desired Antenna] S [Channel Add / Delete Window] S [Signal Meter Window] System Status System Information S [Opens the System Information window] Navigating the menu system You can use the buttons on the remote control or TV control panel to access and navigate your TV's on-screen menu system. • Press Y to open the menu system. • When a menu is open, use the up/down/left/right arrow buttons (BbC c) on the remote control or TV control panel to move in the corresponding direction in the menu. • Press T to save your menu settings or select a highlighted item. (A highlighted menu item appears in a different color in the menu.) • All menus close automatically if you do not make a selection within 60 seconds, except the signal meter menu, which closes automatically after about 5 minutes. • To close a menu instantly, press O. Note: The menu background may sometimes appear black, depending on the signal the TV is receiving. This is not a sign of malfunction. Applications Channel Browser Digital CC/Audio Selector CableCARD Navigate ENTER Select CH RTN Back EXIT Exit 15 HM66 (E/F) Web 213:276
-
 1
1 -
2
-
3
-
4
-
5
-
6
-
7
-
8
-
9
-
 10
10 -
 11
11 -
 12
12 -
 13
13 -
 14
14 -
 15
15 -
 16
16 -
 17
17 -
 18
18 -
 19
19 -
 20
20 -
21
-
22
-
23
-
24
-
25
-
26
-
27
-
28
-
29
-
30
-
31
-
32
-
33
-
34
-
35
-
36
-
37
-
38
-
39
-
40
-
41
-
42
-
43
-
44
-
45
-
46
-
47
-
48
-
49
-
50
-
51
-
52
-
53
-
54
-
55
-
56
 |
 |