Toshiba 56HM66 Owner's Manual - English - Page 20
Setting the ColorStream HD audio, Setting the HDMI™ audio mode, Viewing the CableCARD™ menu, Setting
 |
UPC - 022265251454
View all Toshiba 56HM66 manuals
Add to My Manuals
Save this manual to your list of manuals |
Page 20 highlights
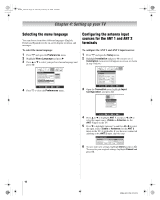
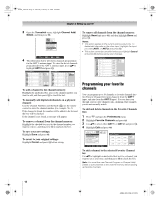
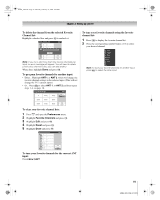
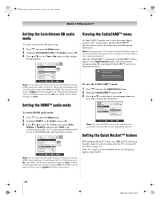
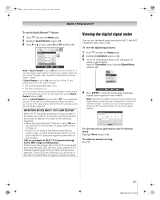
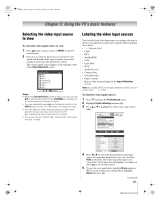
HM66_EN.book Page 20 Thursday, February 23, 2006 2:49 PM Chapter 4: Setting up your TV Setting the ColorStream HD audio mode To set the ColorStream HD audio mode: 1 Press Y and open the Setup menu. 2 Highlight ColorStream HD1(or 2) Audio and press c. 3 Press B or b to select Yes or No and press T to display the information. Setup Installation No Sleep Timer Yes ColorStream HD1 Audio No HDMI 1 Audio Auto ColorStream HD2 Audio No HDMI 2 Audio Auto Quick Restart On Navigate ENTER Select CH RTN Back EXIT Exit Note: The analog audio terminals for the ColorStream HD and HDMI inputs are used in common. When the ColorStream HD 1 (or 2) audio mode is set to Yes, the HDMI 1 (or 2) audio mode is set to Digital and will be greyed out. When the ColorStream HD 1 (or 2) audio mode is set to No, the HDMI 1 (or 2) Audio changes to Auto. Setting the HDMI™ audio mode To set the HDMI audio mode: 1 Press Y and open the Setup menu. 2 Highlight HDMI 1 (or 2) Audio and press c. 3 Press b or B to select the HDMI audio mode (Auto, Digital, or Analog) and press T. (Auto is the recommended mode.) See "Connecting an HDMI or DVI device to the HDMI input" (- Installation Guide). Setup Installation Sleep Timer ColorStream HD1 Audio HDMI 1 Audio ColorStream HD2 Audio HDMI 2 Audio Quick Restart No Auto No Auto On Auto Digital Analog Navigate ENTER Select CH RTN Back EXIT Exit Note: The ColorStream HD1/HD2 Audio settings influence the HDMI Audio settings. If ColorStream HD1 (or 2) Audio is set to No, the HDMI 1 (or 2) Audio setting changes to Auto. If either ColorStream HD1 (or 2) Audio is set to Yes, the HDMI 1 (or 2) Audio setting is set to Digital and will be greyed out. Viewing the CableCARD™ menu A CableCARD™ enables you to view encrypted digital channels. See "Connecting a digital CableCARD™" (- Installation Guide) for connection and subscription information. Note: Connecting your TV directly to the Audio/Video output of your Set-Top-Box will assure a more vivid picture and enhance your viewing enjoyment. After the CableCARD™ is inserted, a CableCARD™ option appears in the Applications menu, with informational screens provided by your digital CableCARD™ service (see illustrations below). CableCard Connected -- Acquiring channel information. CableCard services will only operate with cable signal connected to Antenna 1. To view the CableCARD™ menu: 1 Press Y and open the Applications menu. 2 Highlight CableCARD™ and press c. 3 Press B or b to select one of the side menu items and press T to display the information. Applications Channel Browser Digital CC/Audio Selector CableCARD IP Service Conditional Access CableCARD(tm) Status Network Setup CableCARD(tm) Pairing Navigate ENTER Select CH RTN Back EXIT Exit Note: The CableCARD™ menu is for informational purposes only and has no user-adjustable options. Setting the Quick Restart™ feature With the Quick Restart™ feature set to On, the TV will stay in Standby mode for several minutes after the TV is turned off (see Note on page 21). If the TV is turned on from Standby mode, the full picture appears immediately. 20 HM66 (E/F) Web 213:276
-
 1
1 -
2
-
3
-
4
-
5
-
6
-
7
-
8
-
9
-
10
-
11
-
12
-
13
-
14
-
 15
15 -
 16
16 -
 17
17 -
 18
18 -
 19
19 -
 20
20 -
 21
21 -
 22
22 -
 23
23 -
 24
24 -
 25
25 -
26
-
27
-
28
-
29
-
30
-
31
-
32
-
33
-
34
-
35
-
36
-
37
-
38
-
39
-
40
-
41
-
42
-
43
-
44
-
45
-
46
-
47
-
48
-
49
-
50
-
51
-
52
-
53
-
54
-
55
-
56
 |
 |