Toshiba DW65X91 Owners Manual - Page 52
Picture Quality Controls
 |
View all Toshiba DW65X91 manuals
Add to My Manuals
Save this manual to your list of manuals |
Page 52 highlights
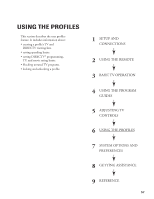
ADJUSTING TV CONTROLS PICTURE QUALITY CONTROLS The Picture Quality menu contains all of the TV's video configuration controls. To access the Picture Quality menu, press MENU on the remote control to go to the main menu, then select Picture Quality. RTN Help 1 Program Guide... 2 Picture Quality... 3 Audio... 4 Profiles... 5 System Options... 6 Preferences... 7 Assistance... RTN Help 1 Picture Settings... 2 Color Temp 3 Convergence 4 Picture Pref 5 Reset Controls Picture Settings The Picture Settings menu displays the controls for adjusting the way the picture looks. The picture settings you specify apply to your current mode. Use the left and right arrow (x •) buttons on the remote control to move the slider to the desired position. Then select RTN when you are finished. Your options under the Picture Settings menu are: • Contrast Adjusts differences between the light and dark areas of the picture. • Color Adjusts the richness of the color. • Tint Adjusts the balance between the red and green levels. • Brightness Adjusts the brightness of the picture. • Sharpness Adjusts the crispness of edges in the picture. You can have seven different picture settings: one for analog channels, one for digital channels (including DIRECTV channels), and one for components attached to VIDEO 1, VIDEO 2, VIDEO 3, ColorStream HD1 and ColorStream HD2. To make settings for analog and digital channels: 1. Enter the "mode" for which you would like to apply the setting by pressing TV/SAT. 2. Then press MENU. 3. Select Picture Quality, and then select Picture Settings to set picture settings. To make settings for the components connected to VIDEO 1, VIDEO 2, VIDEO 3, ColorStream HD1 and ColorStream HD2, take the following steps: 1. Press TV/VIDEO on the remote control until the input that corresponds with the component you want to make settings for appears in the channel banner. (For example, if your VCR is connected to V-1, stop pressing TV/VIDEO when V-1 appears.) 2. Point the remote at the TV once again, press MENU, and select your picture settings. 52
-
 1
1 -
2
-
3
-
4
-
5
-
6
-
7
-
8
-
9
-
10
-
11
-
12
-
13
-
14
-
15
-
16
-
17
-
18
-
19
-
20
-
21
-
22
-
23
-
24
-
25
-
26
-
27
-
28
-
29
-
30
-
31
-
32
-
33
-
34
-
35
-
36
-
37
-
38
-
39
-
40
-
41
-
42
-
43
-
44
-
45
-
46
-
 47
47 -
 48
48 -
 49
49 -
 50
50 -
 51
51 -
 52
52 -
 53
53 -
 54
54 -
 55
55 -
 56
56 -
 57
57 -
58
-
59
-
60
-
61
-
62
-
63
-
64
-
65
-
66
-
67
-
68
-
69
-
70
-
71
-
72
-
73
-
74
-
75
-
76
-
77
-
78
-
79
-
80
-
81
-
82
-
83
-
84
-
85
-
86
-
87
-
88
-
89
-
90
-
91
-
92
-
93
-
94
-
95
-
96
 |
 |
