Whirlpool GR556LRKS Use and Care Guide - Page 10
Positioning Racks and Bakeware, Bakeware, Meat Thermometer, Oven Vent with Removable Deflector
 |
View all Whirlpool GR556LRKS manuals
Add to My Manuals
Save this manual to your list of manuals |
Page 10 highlights
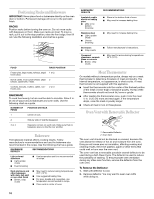
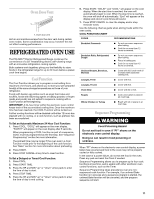
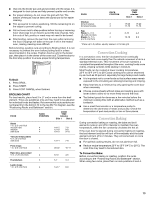
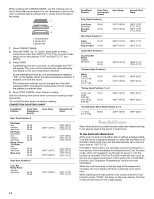
Positioning Racks and Bakeware IMPORTANT: Never place food or bakeware directly on the oven door or bottom. Permanent damage will occur to the porcelain finish. RACKS Position racks before turning the oven on. Do not move racks with bakeware on them. Make sure racks are level. To move a rack, pull it out to the stop position, raise the front edge, then lift out. Use the following illustration and chart as a guide. 5 4 3 2 1 FOOD RACK POSITION Frozen pies, large roasts, turkeys, angel 1 or 2 food cakes Bundt cakes, most quick breads, yeast 2 breads, casseroles, meats Cookies, biscuits, muffins, cakes, non- 2 or 3 frozen pies BAKEWARE To cook food evenly, hot air must be able to circulate. Allow 2 in. (5 cm) of space around bakeware and oven walls. Use the following chart as a guide. NUMBER OF PAN(S) POSITION ON RACK 1 Center of rack. 2 Side by side or slightly staggered. 3 or 4 Opposite corners on each rack. Make sure that no bakeware piece is directly over another. Bakeware The bakeware material affects cooking results. Follow manufacturer's recommendations and use the bakeware size recommended in the recipe. Use the following chart as a guide. BAKEWARE/ RESULTS RECOMMENDATIONS Light colored aluminum s Light golden crusts s Even browning s Use temperature and time recommended in recipe. Dark aluminum and other bakeware with dark, dull and/ or non-stick finish s Brown, crisp crusts s May need to reduce baking temperatures 25°F (15°C). s Use suggested baking time. s For pies, breads and casseroles, use temperature recommended in recipe. s Place rack in center of oven. BAKEWARE/ RESULTS RECOMMENDATIONS Insulated cookie sheets or baking pans s Little or no bottom browning s Place in the bottom third of oven. s May need to increase baking time. Stainless steel s Light, golden crusts s Uneven browning s May need to increase baking time. Stoneware s Crisp crusts s Follow manufacturer's instructions. Ovenproof glassware, ceramic glass or ceramic s Brown, crisp crusts s May need to reduce baking temperatures 25°F (15°C). Meat Thermometer On models without a temperature probe, always rely on a meat thermometer to determine doneness of meat and poultry. The internal temperature, not appearance, is what counts. A meat thermometer is not supplied with this appliance. s Insert the thermometer into the center of the thickest portion of the meat or inner thigh or breast of poultry. The tip of the thermometer should not touch fat, bone or gristle. s After reading the thermometer once, push it into the meat ¹⁄₂ in. (1.25 cm) more and read again. If the temperature drops, cook the meat or poultry longer. s Check all meat in two or three places. Oven Vent with Removable Deflector 1 2 1. Removable Deflector 2. Oven Vent The oven vent should not be blocked or covered, because the vent allows the release of hot air and moisture from the oven. Doing so will cause poor air circulation, affecting cooking and cleaning results. Never set plastics, paper or other items that could melt or burn near the oven vent. The oven vent has a removable porcelain enamel deflector to be used during a Self-Clean Cycle. The deflector is used to reduce the possibility of staining. To ensure proper oven ventilation during any other oven function, remove the deflector from the oven vent. To Remove the Deflector: 1. Wait until deflector is cool. 2. Remove deflector. You may want to wear oven mitts while doing so. 10
-
 1
1 -
2
-
3
-
4
-
 5
5 -
 6
6 -
 7
7 -
 8
8 -
 9
9 -
 10
10 -
 11
11 -
 12
12 -
 13
13 -
 14
14 -
 15
15 -
16
-
17
-
18
-
19
-
20
-
21
-
22
-
23
-
24
-
25
-
26
-
27
-
28
-
29
-
30
-
31
-
32
-
33
-
34
-
35
-
36
-
37
-
38
-
39
-
40
-
41
-
42
-
43
-
44
 |
 |
