Whirlpool GR556LRKS Use and Care Guide - Page 13
Convection Cooking, Convection Baking
 |
View all Whirlpool GR556LRKS manuals
Add to My Manuals
Save this manual to your list of manuals |
Page 13 highlights
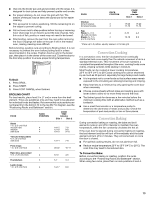
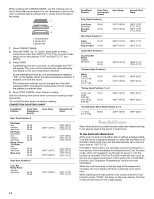
s Use only the broiler pan and grid provided with the range. It is designed to drain juices and help prevent spatter and smoke. s For proper draining, do not cover the grid with foil. The bottom of the pan may be lined with aluminum foil for easier cleaning. s Trim excess fat to reduce spattering. Slit the remaining fat on the edges to prevent curling. s Pull out oven rack to stop position before turning or removing food. Use tongs to turn food to avoid the loss of juices. Very thin cuts of fish, poultry or meat may not need to be turned. s After broiling, remove the pan from the oven when removing the food. Drippings will bake on the pan if left in the heated oven, making cleaning more difficult. Before broiling, position rack according to Broiling Chart. It is not necessary to preheat the oven before putting food in unless recommended in the recipe. Position food on grid in the broiler pan, then place it in the center of the oven rack. Close the door to the broil stop position to ensure proper broiling temperature. To Broil: 1. Press BROIL. 2. Press START. 3. Press STOP CANCEL when finished. BROILING CHART For best results, place food 3 in. (7 cm) or more from the broil element. Times are guidelines only and may need to be adjusted for individual foods and tastes. Recommended rack positions are numbered from the bottom (1) to the top (5). For diagram, see the "Positioning Racks and Bakeware" section. FOOD RACK POSITION COOK TIME minutes Side 1 Side 2 Steak 1 in. (2.5 cm) thick medium rare 4 medium 4 well done 4 14-15 15-16 18-19 7-8 8-9 9-10 *Ground meat patties ³ ₄ in. (2 cm) thick well done 4 13-14 7-8 Pork chops 1 in. (2.5 cm) thick 4 20-22 10-11 Ham slice, precooked ¹ ₂ in. (1.25 cm) thick 4 8-10 4-5 Frankfurters 4 5-7 3-4 Lamb chops 1 in. (2.5 cm) thick 4 14-17 8-9 FOOD RACK POSITION COOK TIME minutes Side 1 Side 2 Chicken bone-in pieces 3 boneless breasts 4 17-20 11-16 17-20 11-16 Fish Fillets in. 4 (.6-1.25 cm) thick Steaks ³ ₄- 1 in. 4 (2-2.5 cm) thick 8-10 4-5 16-18 8-9 * Place up to 9 patties, equally spaced, on broiler grid. Convection Cooking In a convection oven, the fan-circulated hot air continually distributes heat more evenly than the natural movement of air in a standard thermal oven. This movement of hot air maintains a consistent temperature throughout the oven, cooking foods more evenly, crisping surfaces while sealing in moisture. Most foods can be cooked at lower cooking temperatures 25°F to 50°F (14°C to 28°C) and cooking time can be shortened by as much as 30 percent, especially for large turkeys and roasts. s It is important not to cover foods so that surface areas remain exposed to the circulating air, allowing browning and crisping. s Keep heat loss to a minimum by only opening the oven door when necessary. s Choose cookie sheets without sides and roasting pans with lower sides to allow air to move freely around the food. s Test baked goods for doneness a few minutes before the minimum cooking time with an alternative method such as a toothpick. s Use a meat thermometer or a temperature probe to determine the doneness of meats and poultry. Check the temperature of pork and poultry in two or three places. Convection Baking During convection baking or roasting, the bake and broil elements cycle on and off in intervals to maintain the oven temperature, while the fan constantly circulates the hot air. If the oven door is opened during convection baking or roasting, the broil element and fan will turn off immediately and the bake element will turn off in 2 minutes. They will come back on once the door is closed. s For optimal cooking results, do not use aluminum foil. s Reduce recipe temperature 25°F to 50°F (14°C to 28°C). The cook time may need to be reduced also. To Convection Bake: Before convection baking or roasting, position the racks according to the "Positioning Racks and Bakeware" section. When using two racks, place them on rack positions 2 and 4. 13
-
 1
1 -
2
-
3
-
4
-
5
-
6
-
7
-
 8
8 -
 9
9 -
 10
10 -
 11
11 -
 12
12 -
 13
13 -
 14
14 -
 15
15 -
 16
16 -
 17
17 -
 18
18 -
19
-
20
-
21
-
22
-
23
-
24
-
25
-
26
-
27
-
28
-
29
-
30
-
31
-
32
-
33
-
34
-
35
-
36
-
37
-
38
-
39
-
40
-
41
-
42
-
43
-
44
 |
 |
