Whirlpool GR556LRKS Use and Care Guide - Page 8
Electronic Oven Control - pf
 |
View all Whirlpool GR556LRKS manuals
Add to My Manuals
Save this manual to your list of manuals |
Page 8 highlights
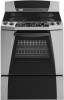
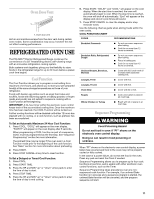
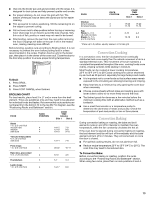
ELECTRONIC OVEN CONTROL 1 2 3 4 ACCUBAKE FIRST STEP/ NEXT STEP REVIEW STEPS 1,2,3,4 UNDO PROGRAMMING C OOL CONVECT BAKE BAKE BROIL WARM AUTO CLEAN TEMP H E AT I N G O P T I O N S OVEN LIGHT B SA C E TIMER SET TIMER OFF CLOCK SET START TIME ST OP TIME MIN HR STOP CANCEL START TIMING OPTIONS 14 1. Sequence Programming 2. Electronic Oven Control Display 3. Oven Light 4. ACCUSIMMER™ Pad 13 12 11 5. Stop/Cancel 6. Start 7. Clock Set 10 9 8 76 5 8. Timer Functions 9. Hour/Minute Adjustment 10. Timed Cooking/Timed Cooling 11. Auto Clean 12. Temperature Adjustment 13. Oven Functions 14. Cool Function Display WARNING Food Poisoning Hazard Do not eat food in oven if "PF" shows on the electronic oven control display. Doing so can result in food poisoning or sickness. When "PF" shows on the electronic oven control display, a power failure has occurred and food in the oven may not be properly cooled or fully cooked. In the case of a power failure, do not eat the food in the oven. Press any pad and reset the Clock if needed. When power is first supplied to the appliance, "PF" and the current time will appear on the display. Press any pad to clear "PF" from the display. When the oven is not in use, the display shows the time of day. When performing a timed cook function, the display will show either hours and minutes, or minutes and seconds. Start The START pad begins any oven function. If not pressed within 5 seconds after pressing a function pad, the "START?" indicator light will flash as a reminder. On some models, "START?" will appear on the display. If not pressed within 5 minutes after pressing a function pad, the oven display will return to the time of day mode and the programmed function will be canceled. Stop Cancel The STOP CANCEL pad stops any function except the Clock, Timer and Control Lock. Clock This is a 12-hour clock that shows a.m. and p.m. To Set: Before setting, make sure the oven and Timer are off. 1. Press CLOCK SET. 2. Press the HR or MIN "up" or "down" arrow pads to set the time of day, including a.m. or p.m. 3. Press CLOCK SET or START. Tones Tones are audible signals, indicating the following: One tone s Valid pad press s Oven is preheated (long tone) s Function has been entered Three tones s Invalid pad press Four tones s End-of-cycle s Reminder, repeating each minute after the end-of-cycle tones Reminder Tones: Reminder tones may be turned off. Press and hold STOP TIME for 5 seconds. "rEP OFF" will appear in the display. Repeat to turn reminder tones back on, and "rEP on" will appear in the display. All Tones: All of the above tones are preset on. All except the end-of-cycle tones can be turned off. 8
-
 1
1 -
2
-
 3
3 -
 4
4 -
 5
5 -
 6
6 -
 7
7 -
 8
8 -
 9
9 -
 10
10 -
 11
11 -
 12
12 -
 13
13 -
14
-
15
-
16
-
17
-
18
-
19
-
20
-
21
-
22
-
23
-
24
-
25
-
26
-
27
-
28
-
29
-
30
-
31
-
32
-
33
-
34
-
35
-
36
-
37
-
38
-
39
-
40
-
41
-
42
-
43
-
44
 |
 |
