Yamaha DGX-500 Owner's Manual - Page 9
Rear Panel, DC IN 12V jack - output
 |
View all Yamaha DGX-500 manuals
Add to My Manuals
Save this manual to your list of manuals |
Page 9 highlights
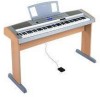
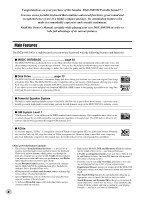
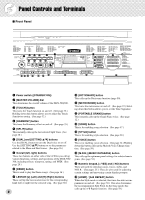
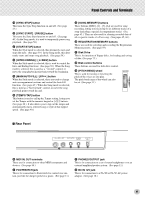
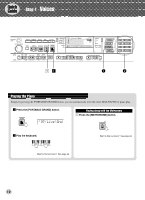
Panel Controls and Terminals !9 [SYNC STOP] button This turns the Sync Stop function on and off. (See page 43.) @0 [SYNC START] / [PAUSE] button This turns the Sync Start function on and off. (See page 40.) In the Song mode, it is used to temporarily pause song playback. (See page 59.) @1 [START/STOP] button When the Style mode is selected, this alternately starts and stops the style. (See page 39.) In the Song mode, this alternately starts and stops song playback. (See page 58.) @2 [INTRO ENDING] / [ REW] button When the Style mode is selected, this is used to control the Intro and Ending functions. (See page 39.) When the Song mode is selected, this is used as a "rewind" control, or move the song playback point back toward the beginning. @3 [MAIN/AUTO FILL] / [FF ] button When the Style mode is selected, these are used to change auto accompaniment sections and control the Auto Fill function. (See page 45.) When the Song mode is selected, this is used as a "fast forward" control, or move the song playback point toward the end. @4 [TEMPO/TAP] button This button is used to call up the Tempo setting, letting you set the Tempo with the numeric keypad or [+]/[-] buttons. (See page 22.) It also allows you to tap out the tempo and automatically start a selected song or style at that tapped speed. (See page 40.) @5 [SONG MEMORY] buttons These buttons ([REC], [1] - [5], [A]) are used for song recording, letting you record up to six different tracks of a song (including a special Accompaniment track). (See page 63.) They are also used for clearing recorded data of all or specific tracks of a User song. (See pages 65, 66.) @6 REGISTRATION MEMORY buttons These are used for selecting and recording the Registration Memory presets. (See page 55.) @7 Disk Drive This is for insertion of floppy disks, for loading and saving of data. (See page 73.) @8 Disk control buttons These buttons are used for disk drive control. @9 [PITCH BEND] wheel This is used for raising or lowering the pitch of the voices as you play. The pitch bend range of the wheel can also be set. (See page 31.) I Rear Panel #0 #1 #2 #3 #0 MIDI IN, OUT terminals These are for connection to other MIDI instruments and devices. (See page 84.) #1 FOOTSWITCH jack This is for connection to Footswitch for control over sustain, just like the damper pedal on a piano. (See page 11.) #2 PHONES/OUTPUT jack This is for connection to a set of stereo headphones or to an external amplifier/speaker system. (See page 11.) #3 DC IN 12V jack This is for connection to a PA-5D or PA-5C AC power adaptor. (See page 10.) 9
-
 1
1 -
2
-
3
-
 4
4 -
 5
5 -
 6
6 -
 7
7 -
 8
8 -
 9
9 -
 10
10 -
 11
11 -
 12
12 -
 13
13 -
 14
14 -
15
-
16
-
17
-
18
-
19
-
20
-
21
-
22
-
23
-
24
-
25
-
26
-
27
-
28
-
29
-
30
-
31
-
32
-
33
-
34
-
35
-
36
-
37
-
38
-
39
-
40
-
41
-
42
-
43
-
44
-
45
-
46
-
47
-
48
-
49
-
50
-
51
-
52
-
53
-
54
-
55
-
56
-
57
-
58
-
59
-
60
-
61
-
62
-
63
-
64
-
65
-
66
-
67
-
68
-
69
-
70
-
71
-
72
-
73
-
74
-
75
-
76
-
77
-
78
-
79
-
80
-
81
-
82
-
83
-
84
-
85
-
86
-
87
-
88
-
89
-
90
-
91
-
92
-
93
-
94
-
95
-
96
-
97
-
98
-
99
-
100
-
101
-
102
-
103
-
104
-
105
-
106
-
107
-
108
-
109
-
110
-
111
-
112
 |
 |