Yamaha PSR-2100 Owner's Manual - Page 114
Step Recording, Other Parameters in the Basic Display, I] SAVE button, buttons
 |
View all Yamaha PSR-2100 manuals
Add to My Manuals
Save this manual to your list of manuals |
Page 114 highlights
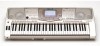
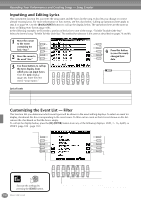
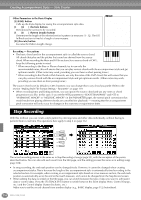
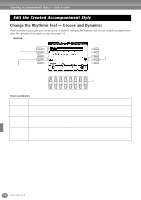
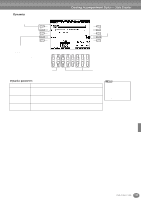
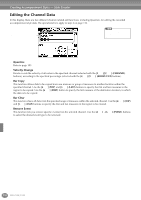
Creating Accompaniment Styles - Style Creator Other Parameters in the Basic Display [I] (SAVE) button Calls up the Style display for saving the accompaniment style data. [3▲▼][4▲▼] (Section) buttons Determines the section to be recorded. [5▲▼][6▲▼] (Pattern Length) buttons Determines the length of the selected section's pattern in measures (1 - 32). The Fill In/Break section is fixed at a length of one measure. [D] (Execute) button Executes the Pattern Length change. You can also select the desired section for recording by pressing appropriate panel button. Pressing one of the Section buttons calls up the SECTION display, from which you can change sections by using the [6▲▼]/ [7▲▼] buttons. To actually enter the change, press the [8▲] button.To select the Fill In section, press the [AUTO FILL IN] button. Recording - Precautions • The basic chord used for the accompaniment style is called the source chord. All chords that play and the pitches that sound are derived from the source chord. When recording the Main and Fill In sections (for a source chord of CM7), CRC CRC keep the following points in mind: * When recording to the Bass or Phrase channels, try to use only the C = chord note C, R = recommended note recommended notes; this will ensure that you can play various chords with the accompaniment style and get optimum results. (Other notes may work, providing you use them as short passing tones.) * When recording to the Chord or Pad channels, use only the notes of the CM7 chord; this will ensure that you can play various chords with the accompaniment style and get optimum results. (Other notes may work, providing you use them as short passing tones.) The source chord is set by default to CM7; however, you can change this to any chord you prefer. Refer to the section "Making Style File Format Settings - Parameter" on page 119. • When recording Intro and Ending sections, you can ignore the source chord and use any notes or chord progressions you like. In this case, if you set the NTR parameter to "ROOT TRANSPOSE" and NTT to "HARMONIC MINOR" or "MELODIC MINOR" (in the PARAMETER page), the normal pitch conversions that would result from playing different chords are cancelled (for playback) - meaning that the accompaniment pitch conversion will only occur for changes in the root note or major/minor shifts. Step Recording With this method, you can create a style pattern by entering notes and other data individually, without having to perform them in real time. The operations here apply to step 4 on page 112. F G H I J The actual recording process is the same as in Step Recording of songs (page 99), with the exception of the points described below. You can also edit each event from the Edit page, and the editing process the same as in editing songs (page 108). • In song recording, the end mark position can be changed freely. However, it cannot be changed when creating accompaniment styles. This is because the length of the accompaniment style is automatically fixed according to the selected section. For example, when creating an accompaniment style based on a four-measure section, the end mark position is automatically set to the end of the fourth measure, and cannot be changed from the Step Record screen. • When editing the data recorded on the Edit page, you can switch between the type of data you want to edit (event data or control data). Press the [F] (TRACK EVT) button to switch between the Event display (Note, Control Change, etc.) and the Control display (System Exclusive, etc.). Make sure to set the record channel from another display (e.g., BASIC display; page 112) beforehand. 114 PSR-2100/1100
-
 1
1 -
2
-
3
-
4
-
5
-
6
-
7
-
8
-
9
-
10
-
11
-
12
-
13
-
14
-
15
-
16
-
17
-
18
-
19
-
20
-
21
-
22
-
23
-
24
-
25
-
26
-
27
-
28
-
29
-
30
-
31
-
32
-
33
-
34
-
35
-
36
-
37
-
38
-
39
-
40
-
41
-
42
-
43
-
44
-
45
-
46
-
47
-
48
-
49
-
50
-
51
-
52
-
53
-
54
-
55
-
56
-
57
-
58
-
59
-
60
-
61
-
62
-
63
-
64
-
65
-
66
-
67
-
68
-
69
-
70
-
71
-
72
-
73
-
74
-
75
-
76
-
77
-
78
-
79
-
80
-
81
-
82
-
83
-
84
-
85
-
86
-
87
-
88
-
89
-
90
-
91
-
92
-
93
-
94
-
95
-
96
-
97
-
98
-
99
-
100
-
101
-
102
-
103
-
104
-
105
-
106
-
107
-
108
-
 109
109 -
 110
110 -
 111
111 -
 112
112 -
 113
113 -
 114
114 -
 115
115 -
 116
116 -
 117
117 -
 118
118 -
 119
119 -
120
-
121
-
122
-
123
-
124
-
125
-
126
-
127
-
128
-
129
-
130
-
131
-
132
-
133
-
134
-
135
-
136
-
137
-
138
-
139
-
140
-
141
-
142
-
143
-
144
-
145
-
146
-
147
-
148
-
149
-
150
-
151
-
152
-
153
-
154
-
155
-
156
-
157
-
158
-
159
-
160
-
161
-
162
-
163
-
164
-
165
-
166
-
167
-
168
-
169
-
170
-
171
-
172
-
173
-
174
-
175
-
176
 |
 |