Yamaha PSR-2100 Owner's Manual - Page 71
Automatically Changing One Touch Settings with the s — OTS Link
 |
View all Yamaha PSR-2100 manuals
Add to My Manuals
Save this manual to your list of manuals |
Page 71 highlights
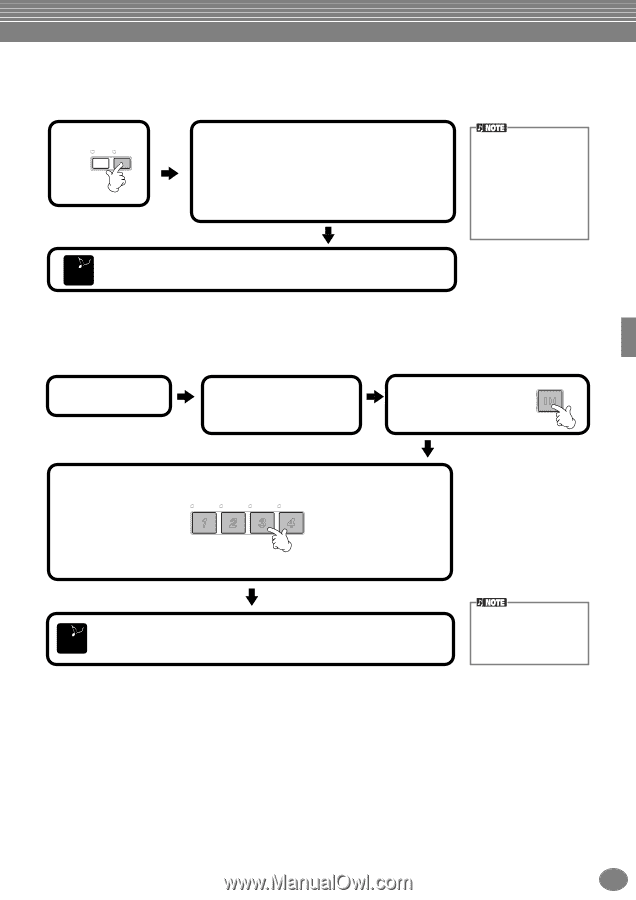
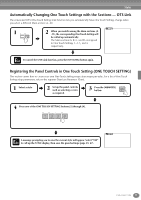
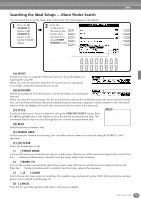
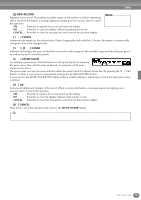
Styles Automatically Changing One Touch Settings with the Sections - OTS Link The convenient OTS (One Touch Setting) Link function lets you automatically have One Touch Settings change when you select a different Main section (A - D). 1 AUTO OTS FILL IN LINK 2 When you switch among the Main sections (A - D), the corresponding One Touch Setting will be called up automatically. The Main sections A, B, C, and D correspond to One Touch Settings 1, 2, 3, and 4, respectively. The One Touch Settings can be set to change with the sections in one of two different timings (page 141): • Immediately when you press a section button. • At the next measure (in an accompaniment style), after you press a section button. END To cancel the OTS Link function, press the [OTS LINK] button again. Registering the Panel Controls in One Touch Setting (ONE TOUCH SETTING) This section covers how to create your own One Touch Setting setups (four setups per style). For a list of One Touch Setting setup parameters, refer to the separate Data List (Parameter Chart). 1 Select a style. 2 Set up the panel controls such as selecting a voice as required. 3 Press the [MEMORY] button. MEMORY 4 Press one of the ONE TOUCH SETTING buttons:[1] through [4]. ONE TOUCH SETTING The items you can register in a One Touch Setting are Voice, Harmony, Multi Pad and Pedal E A message prompting you to save the current style will appear. Select "YES" ND to call up the STYLE display, then save the panel settings (page 39, 47). Unless you store the panel settings here, the registered settings will be deleted when you select a different accompaniment style. PSR-2100/1100 71
-
 1
1 -
2
-
3
-
4
-
5
-
6
-
7
-
8
-
9
-
10
-
11
-
12
-
13
-
14
-
15
-
16
-
17
-
18
-
19
-
20
-
21
-
22
-
23
-
24
-
25
-
26
-
27
-
28
-
29
-
30
-
31
-
32
-
33
-
34
-
35
-
36
-
37
-
38
-
39
-
40
-
41
-
42
-
43
-
44
-
45
-
46
-
47
-
48
-
49
-
50
-
51
-
52
-
53
-
54
-
55
-
56
-
57
-
58
-
59
-
60
-
61
-
62
-
63
-
64
-
65
-
 66
66 -
 67
67 -
 68
68 -
 69
69 -
 70
70 -
 71
71 -
 72
72 -
 73
73 -
 74
74 -
 75
75 -
 76
76 -
77
-
78
-
79
-
80
-
81
-
82
-
83
-
84
-
85
-
86
-
87
-
88
-
89
-
90
-
91
-
92
-
93
-
94
-
95
-
96
-
97
-
98
-
99
-
100
-
101
-
102
-
103
-
104
-
105
-
106
-
107
-
108
-
109
-
110
-
111
-
112
-
113
-
114
-
115
-
116
-
117
-
118
-
119
-
120
-
121
-
122
-
123
-
124
-
125
-
126
-
127
-
128
-
129
-
130
-
131
-
132
-
133
-
134
-
135
-
136
-
137
-
138
-
139
-
140
-
141
-
142
-
143
-
144
-
145
-
146
-
147
-
148
-
149
-
150
-
151
-
152
-
153
-
154
-
155
-
156
-
157
-
158
-
159
-
160
-
161
-
162
-
163
-
164
-
165
-
166
-
167
-
168
-
169
-
170
-
171
-
172
-
173
-
174
-
175
-
176
 |
 |