Yamaha PSR-2100 Owner's Manual - Page 7
Handling the Floppy Disk Drive (FDD) and Floppy Disk, Compatible Disk Type, Inserting/Ejecting - error
 |
View all Yamaha PSR-2100 manuals
Add to My Manuals
Save this manual to your list of manuals |
Page 7 highlights
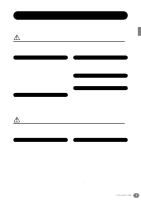
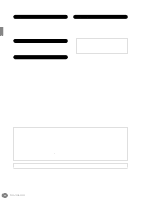
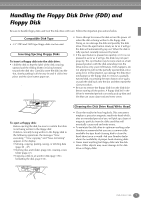
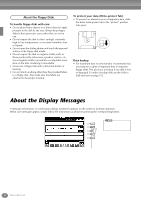
Handling the Floppy Disk Drive (FDD) and Floppy Disk Be sure to handle floppy disks and treat the disk drive with care. Follow the important precautions below. Compatible Disk Type • 3.5" 2DD and 2HD type floppy disks can be used. Inserting/Ejecting Floppy Disks To insert a floppy disk into the disk drive: • Hold the disk so that the label of the disk is facing upward and the sliding shutter is facing forward, towards the disk slot. Carefully insert the disk into the slot, slowly pushing it all the way in until it clicks into place and the eject button pops out. Drive lamp When the power is turned on, the drive lamp (at the bottom left of the drive) lights to indicate the drive can be used. • Never attempt to remove the disk or turn the power off when the data is being written to the floppy disk. Doing so can damage the disk and possibly the disk drive. Press the eject button slowly as far as it will go; the disk will automatically pop out. When the disk is fully ejected, carefully remove it by hand. • If the eject button is pressed too quickly, or if it is not pressed in as far as it will go, the disk may not eject properly. The eject button may become stuck in a halfpressed position with the disk extending from the drive slot by only a few millimeters. If this happens, do not attempt to pull out the partially ejected disk, since using force in this situation can damage the disk drive mechanism or the floppy disk. To remove a partially ejected disk, try pressing the eject button once again, or push the disk back into the slot and then repeat the eject procedure. • Be sure to remove the floppy disk from the disk drive before turning off the power. A floppy disk left in the drive for extended periods can easily pick up dust and dirt that can cause data read and write errors. To eject a floppy disk: Before ejecting the disk, be sure to confirm that data is not being written to the floppy disk. If data is currently being written to the floppy disk in the following operations, the messages "Now executing," "Now copying," and "Now formatting" appears in the display. • Moving, copying, pasting, saving, or deleting data (page 45 - 47). • Naming files and folders (page 44); creating a new folder (page 47). • Copying a disk to an another disk (page 153); formatting the disk (page 153). Cleaning the Disk Drive Read/Write Head • Clean the read/write head regularly. This instrument employs a precision magnetic read/write head which, after an extended period of use, will pick up a layer of magnetic particles from the disks used that will eventually cause read and write errors. • To maintain the disk drive in optimum working order Yamaha recommends that you use a commerciallyavailable dry-type head cleaning disk to clean the head about once a month. Ask your Yamaha dealer about the availability of proper head-cleaning disks. • Never insert anything but floppy disks into the disk drive. Other objects may cause damage to the disk drive or floppy disks. Eject button PSR-2100/1100 7
-
 1
1 -
 2
2 -
 3
3 -
 4
4 -
 5
5 -
 6
6 -
 7
7 -
 8
8 -
 9
9 -
 10
10 -
 11
11 -
 12
12 -
13
-
14
-
15
-
16
-
17
-
18
-
19
-
20
-
21
-
22
-
23
-
24
-
25
-
26
-
27
-
28
-
29
-
30
-
31
-
32
-
33
-
34
-
35
-
36
-
37
-
38
-
39
-
40
-
41
-
42
-
43
-
44
-
45
-
46
-
47
-
48
-
49
-
50
-
51
-
52
-
53
-
54
-
55
-
56
-
57
-
58
-
59
-
60
-
61
-
62
-
63
-
64
-
65
-
66
-
67
-
68
-
69
-
70
-
71
-
72
-
73
-
74
-
75
-
76
-
77
-
78
-
79
-
80
-
81
-
82
-
83
-
84
-
85
-
86
-
87
-
88
-
89
-
90
-
91
-
92
-
93
-
94
-
95
-
96
-
97
-
98
-
99
-
100
-
101
-
102
-
103
-
104
-
105
-
106
-
107
-
108
-
109
-
110
-
111
-
112
-
113
-
114
-
115
-
116
-
117
-
118
-
119
-
120
-
121
-
122
-
123
-
124
-
125
-
126
-
127
-
128
-
129
-
130
-
131
-
132
-
133
-
134
-
135
-
136
-
137
-
138
-
139
-
140
-
141
-
142
-
143
-
144
-
145
-
146
-
147
-
148
-
149
-
150
-
151
-
152
-
153
-
154
-
155
-
156
-
157
-
158
-
159
-
160
-
161
-
162
-
163
-
164
-
165
-
166
-
167
-
168
-
169
-
170
-
171
-
172
-
173
-
174
-
175
-
176
 |
 |