Yamaha PSR-2100 Owner's Manual - Page 38
Basic Operations — Organizing Your Data, Contents shown in the Main Display - value
 |
View all Yamaha PSR-2100 manuals
Add to My Manuals
Save this manual to your list of manuals |
Page 38 highlights
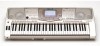
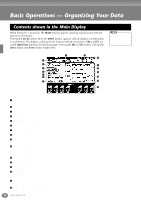
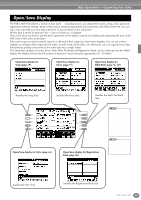
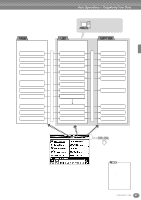
Basic Operations - Organizing Your Data Contents shown in the Main Display When the power is turned on, the MAIN Display appears, showing important and relevant operation information. Pressing the [A]-[J] buttons when the MAIN Display appears calls up displays corresponding to each button. The displays called up by the buttons (with the exception of [B] and [C]) are called Open/Save displays (see following page). Pressing the [B] and [C] buttons calls up the Lyrics display and Score display respectively. 8 9 0 1 2 A 3 B 4 C 5 6 D 7 E F If the MAIN Display is not shown, press the [DIRECT ACCESS] button followed by the [EXIT] button. 1 Transpose (page 144) The [TRANSPOSE] buttons allow the pitch of the keyboard and song to be shifted down or up in semitones. The transpose value by the semitone shifted is displayed here. 2 Song (page 78) The name of the currently selected song and other song information is displayed. 3 Playback Position of Song (page 78) or Accompaniment Style (page 62) The current position of the song or the accompaniment style being played is displayed. 4 Tempo (page 53) When a song or a accompaniment style is playing, the tempo is displayed. 5 Chord (page 65) When [ACMP] is on, the chord specified in the left hand section is displayed. 6 Accompaniment Style (page 62) The name, beat, and tempo of the accompaniment style selected currently is displayed. 7 Intro and Ending (page 69) The names of the intro and ending of the currently selected style are displayed. 8 Octave (page 61) The [UPPER OCTAVE] buttons allow the pitch of the keyboard to be shifted down or up in octave steps. The octave value shifted is displayed here. 9 Split Point (page 141) Split Points are specific positions on the keyboard that divide the keyboard into separate sections. There are two kinds of Split Points: "A", which separates the auto accompaniment from the rest of the keyboard, and "L", which divides the left-hand and right-hand sections. 0 Registration Sequence (page 145) You can save your custom panel settings as a Registration Memory preset and recall it at any time pressing the appropriate REGISTRATION MEMORY [1]-[8] button. You can also use the Registration Sequence function to program the Registration Memory presets to be selected in any specified order, and step through that order by using the [BACK]/[NEXT] buttons or the pedal. The Registration Sequence is displayed here (unless Registration Sequence mis set to OFF). A Main Part (page 57) The voice selected for the Main part is displayed. B Layer Part (page 59) The voice selected for the Layer part is displayed. C Left Part (page 60) The voice selected for the Left part is displayed. D Multi Pad Bank (page 76) The Multi Pads allow you to instantly play back special phrases (such as rhythmic fills and melodies) during your performance, by pressing the MULTI PAD [1]-[8] buttons. Multi Pad data is stored in banks (four pads to a bank), and both preset and user banks are available. The name of the currently selected Multi Pad bank is displayed here. E Registration Memory Bank (page 88) Registration Memory presets are stored in banks, eight presets to a bank. The name of the currently selected Registration Memory bank is displayed here. F Volume balance of the parts (page 64) You can change the volume balance by pressing the [1▲▼]-[8▲▼] buttons under the LCD. The volume balance of each part is displayed. 38 PSR-2100/1100
-
 1
1 -
2
-
3
-
4
-
5
-
6
-
7
-
8
-
9
-
10
-
11
-
12
-
13
-
14
-
15
-
16
-
17
-
18
-
19
-
20
-
21
-
22
-
23
-
24
-
25
-
26
-
27
-
28
-
29
-
30
-
31
-
32
-
 33
33 -
 34
34 -
 35
35 -
 36
36 -
 37
37 -
 38
38 -
 39
39 -
 40
40 -
 41
41 -
 42
42 -
 43
43 -
44
-
45
-
46
-
47
-
48
-
49
-
50
-
51
-
52
-
53
-
54
-
55
-
56
-
57
-
58
-
59
-
60
-
61
-
62
-
63
-
64
-
65
-
66
-
67
-
68
-
69
-
70
-
71
-
72
-
73
-
74
-
75
-
76
-
77
-
78
-
79
-
80
-
81
-
82
-
83
-
84
-
85
-
86
-
87
-
88
-
89
-
90
-
91
-
92
-
93
-
94
-
95
-
96
-
97
-
98
-
99
-
100
-
101
-
102
-
103
-
104
-
105
-
106
-
107
-
108
-
109
-
110
-
111
-
112
-
113
-
114
-
115
-
116
-
117
-
118
-
119
-
120
-
121
-
122
-
123
-
124
-
125
-
126
-
127
-
128
-
129
-
130
-
131
-
132
-
133
-
134
-
135
-
136
-
137
-
138
-
139
-
140
-
141
-
142
-
143
-
144
-
145
-
146
-
147
-
148
-
149
-
150
-
151
-
152
-
153
-
154
-
155
-
156
-
157
-
158
-
159
-
160
-
161
-
162
-
163
-
164
-
165
-
166
-
167
-
168
-
169
-
170
-
171
-
172
-
173
-
174
-
175
-
176
 |
 |