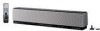
Yamaha YSP800S Owner's Manual
Yamaha YSP800S - Digital Sound Projector Five CH Speaker Manual
 |
UPC - 027108923543
View all Yamaha YSP800S manuals
Add to My Manuals
Save this manual to your list of manuals |
Yamaha YSP800S manual content summary:
- Yamaha YSP800S | Owner's Manual - Page 1
UB YSP-800 Digital Sound Projector OWNER'S MANUAL - Yamaha YSP800S | Owner's Manual - Page 2
IMPORTANT SAFETY INSTRUCTIONS IMPORTANT SAFETY INSTRUCTIONS CAUTION RISK OF ELECTRIC SHOCK DO NOT OPEN CAUTION: TO REDUCE THE RISK OF ELECTRIC SHOCK, DO NOT REMOVE COVER (OR BACK). NO USER-SERVICEABLE PARTS INSIDE. REFER SERVICING TO QUALIFIED SERVICE PERSONNEL. ■ Explanation of Graphical Symbols - Yamaha YSP800S | Owner's Manual - Page 3
product, when installed as indicated in the instructions contained in this manual, meets FCC requirements. Modifications not expressly approved by YAMAHA may void your authority, granted by the FCC, to use the product. 2. IMPORTANT: When connecting this product to accessories and/or another product - Yamaha YSP800S | Owner's Manual - Page 4
qualified YAMAHA service personnel when any service is needed. The cabinet should never be opened for any reasons. 14 When not planning to use this unit for long periods of time (i.e. vacation), disconnect the AC power plug from the wall outlet. 15 Be sure to read the "TROUBLESHOOTING" section - Yamaha YSP800S | Owner's Manual - Page 5
TV 15 Connecting a DVD player/recorder 16 Connecting a VCR 17 Connecting a digital satellite tuner or a cable TV tuner 18 Connecting other external components 19 Connecting a subwoofer 20 Connecting the power supply cable 21 SETUP GETTING STARTED 22 Installing batteries in the remote control - Yamaha YSP800S | Owner's Manual - Page 6
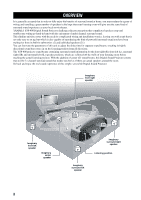
in the hope that your listening room will give you the same kind of surround sound experience as your local movie theater. YAMAHA YSP-800 Digital Sound Projector challenges this preconception that complicated speaker setup and troublesome wiring go hand-in-hand with the enjoyment of multi-channel - Yamaha YSP800S | Owner's Manual - Page 7
TV tuner and digital satellite tuner connected to this unit. In addition, the remote control is equipped with the macro capability so that you can perform a series of operations with the press of a single button. AUTO SETUP This unit employs the automatic sound beam optimization using the YAMAHA - Yamaha YSP800S | Owner's Manual - Page 8
this unit to your TV and other external components. See "CONNECTIONS" on page 14. 3 Prepare the remote control and turn on the power of this unit. See "GETTING STARTED" on page 22. 4 Run AUTO SETUP. See "AUTO SETUP" on page 26. 5 Play back a source and enjoy surround sound. See "PLAYBACK" on page - Yamaha YSP800S | Owner's Manual - Page 9
parts. Remote control (×1) Batteries (×2) (AA, R6, UM-3) Optical cable (×1) STANDBY/ON POWER POWER AV TV DVD AUX VCR INPUT1 STB TV INPUT2 TV MACRO YSP 5BEAM 1 INPUTMODE SLEEP ST+3BEAM 2 3BEAM 3 STEREO TARGET 4 5 6 MUSIC 7 MOVIE 8 VOL MODE 9 SPORTS 0 OFF +10 SURROUND - Yamaha YSP800S | Owner's Manual - Page 10
1 OPTIMIZER MIC jack Use to connect the supplied optimizer microphone to be used to run AUTO SETUP (see page 27). 2 Front panel display Shows information about the operational status of this unit. 3 Remote control sensor Receives infrared signals from the remote control. 4 INPUT Press repeatedly to - Yamaha YSP800S | Owner's Manual - Page 11
INTRODUCTION Front panel display 12 3 CONTROLS AND FUNCTIONS 4 NIGHT SLEEP PCM DIGITAL PL VOL m ft mS dB 5 1 NIGHT indicator Lights up when you select a volume mode ( adjust the brightness of the front panel display using the DISPLAY MENU parameters in MANUAL SETUP (see page 73). English 7 - Yamaha YSP800S | Owner's Manual - Page 12
a DVD player via a coaxial digital connection (see page 16). 8 SYSTEM CONNECTOR jack (U.S.A. and Canada models only) Use to connect a YAMAHA subwoofer equipped with a SYSTEM CONNECTOR jack to this unit (see page 20). 9 AC power supply cable Use to connect to the AC wall outlet (see page 21). 8 - Yamaha YSP800S | Owner's Manual - Page 13
this system. y You can also control other components using the remote control once you set the appropriate remote control codes. See "Controlling other components" on page 83 for details. 1 2 3 4 5 6 7 8 9 0 A B STANDBY/ON POWER POWER AV TV DVD AUX VCR INPUT1 STB TV INPUT2 TV MACRO YSP - Yamaha YSP800S | Owner's Manual - Page 14
to the previous SET MENU screen. Q TV VOL +/- Adjusts the volume level of the TV (see page 83). R CH +/- Switches between channels of the TV or the VCR (see pages 83 and 84). S TV MUTE, CODE SET Mutes the audio output of the TV (see page 83). Use to set up remote control codes (see page 82). 10 - Yamaha YSP800S | Owner's Manual - Page 15
wall bracket, a rack or a stand. Before installing this unit Installing this unit This unit creates surround sound by reflecting projected sound beams off the walls of your listening room. The surround sound TV screen becomes blurred or distorted, we recommend moving the speakers away from your TV - Yamaha YSP800S | Owner's Manual - Page 16
the metal apparatus (M4) in the section of "Attach the small wall mount brackets to the Sound Projector". This unit y Refer to the instructions supplied with the stand for details on how to install the stand or how to mount this unit and the TV on the stand. ■ Using a rack You can install this unit - Yamaha YSP800S | Owner's Manual - Page 17
sure you wipe the surface of the rack, etc. before securing the fasteners. Applying the tape to a dirty or wet surface will weaken the sticking power of the tape, and this unit may fall as a result. INSTALLATION PREPARATION English 13 - Yamaha YSP800S | Owner's Manual - Page 18
to this unit, see pages 15 to 20. CAUTION Do not connect this unit or other components to the main power until all connections between components are complete. Audio connection Video connection TV This unit DVD player 14 Subwoofer VCR Digital satellite tuner, cable TV tuner or game console - Yamaha YSP800S | Owner's Manual - Page 19
jacks. ■ Digital and analog audio connections ■ Video connections TV TV Analog audio Optical digital output output RL Video input Rear panel of this unit Rear panel of this unit VCR TV/STB SUBWOOFER VIDEO AUDIO INPUT OUT TV/STB AUX OPTICAL DVD COAXIAL DIGITAL INPUT SYSTEM CONNECTOR - Yamaha YSP800S | Owner's Manual - Page 20
output R L Coaxial digital output Video signal to a TV Coaxial digital output Rear panel of this unit VCR TV/STB SUBWOOFER VIDEO AUDIO INPUT OUT Cables used for connections TV/STB AUX OPTICAL DVD COAXIAL SYSTEM CONNECTOR DIGITAL INPUT (U.S.A. and Canada models) Digital audio pin cable - Yamaha YSP800S | Owner's Manual - Page 21
VCR Analog audio output R L Video signal to a TV PREPARATION Rear panel of this unit VCR TV/STB SUBWOOFER VIDEO AUDIO INPUT OUT TV/STB AUX OPTICAL DVD COAXIAL DIGITAL INPUT SYSTEM CONNECTOR (U.S.A. and Canada models) Cables used for connections (White) Audio pin cable (White) (Red - Yamaha YSP800S | Owner's Manual - Page 22
on your TV. TV Digital satellite tuner or a cable TV tuner Analog audio output R L Video signal to a TV Analog audio output R L Optical digital output Rear panel of this unit VCR TV/STB SUBWOOFER VIDEO AUDIO INPUT OUT Cables used for connections TV/STB AUX OPTICAL DVD COAXIAL SYSTEM - Yamaha YSP800S | Owner's Manual - Page 23
in a suitable position and then affix cables in the cable clamp. Rear panel of this unit VCR TV/STB SUBWOOFER VIDEO AUDIO INPUT OUT Cables used for connections TV/STB AUX OPTICAL DVD COAXIAL DIGITAL INPUT SYSTEM CONNECTOR (U.S.A. and Canada models) Optical cable (supplied) English 19 - Yamaha YSP800S | Owner's Manual - Page 24
connecting a YAMAHA subwoofer equipped with a SYSTEM CONNECTOR jack, connect it to the SYSTEM CONNECTOR jack on this unit. If the subwoofer is connected using a system type connection, changing the power mode of this unit controls the power mode of the subwoofer. Subwoofer Monaural System input - Yamaha YSP800S | Owner's Manual - Page 25
Connecting the power supply cable Once all other connections are complete, plug the power supply cable into the AC wall outlet. CONNECTIONS To the AC outlet PREPARATION English 21 - Yamaha YSP800S | Owner's Manual - Page 26
notice the following conditions; the operation range of the remote control decreases, the indicator does not blink or its light remote control codes again. Notes • Do not spill water or other liquids on the remote control. • Do not drop the remote control. • Do not leave or store the remote control - Yamaha YSP800S | Owner's Manual - Page 27
5 TEST ENTER RETURN 6 7 8 9 1 Input selector buttons 2 YSP 3 Beam mode buttons 4 Sound field program buttons 5 Cursor buttons / / / , ENTER 6 VOL MODE 7 SURROUND 8 MENU 9 RETURN Turning on the power VOLUME + STANDBY/ON STANDBY/ON POWER POWER AV TV DVD AUX VCR INPUT1 STB TV INPUT2 TV - Yamaha YSP800S | Owner's Manual - Page 28
enjoy real surround sound while watching TV in the comfort of your own home. 1 Check that the video input jack on your TV is connected to the VIDEO OUT jack of this unit to display the OSD of this unit. 2 Press STANDBY/ON on the front panel or on the remote control to turn on the power of - Yamaha YSP800S | Owner's Manual - Page 29
SETUP" on page 33 for a complete list of error messages and possible remedies. Run BASIC SETUP. See "BASIC SETUP" on page 57. If the problem and adjustments Run MANUAL SETUP. See "MANUAL SETUP" on page 63. y • If you cannot clearly hear a sound beam from a specific speaker channel, adjust - Yamaha YSP800S | Owner's Manual - Page 30
speaker setup and achieving highly accurate sound adjustments that best match your listening environment. The beam optimization is the automated feature of BASIC SETUP, which creates the best possible surround sound field without manually setting the parameters for your listening room. The YAMAHA - Yamaha YSP800S | Owner's Manual - Page 31
is not possible, you can manually fine-tune the sound beam angle and balance the sound beam output levels using MANUAL SETUP (see page 63) once the AUTO SETUP procedure is completed. • If a subwoofer with adjustable volume and crossover/high cut frequency controls is connected to this unit, set the - Yamaha YSP800S | Owner's Manual - Page 32
microphone is firmly connected to this unit and properly placed in your listening room, follow the procedure below to start the AUTO SETUP procedure. VOLUME + STANDBY/ON 1 2 STANDBY/ON POWER POWER AV TV 3 4 DVD VCR STB TV AUX INPUT1 INPUT2 MACRO YSP ( ) INPUTMODE SLEEP 5BEAM - Yamaha YSP800S | Owner's Manual - Page 33
TEST once. 4 Press / on the remote control to select AUTO SETUP and then press ENTER. The following screen appears on your TV. STANDBY/ON Front panel or Remote control ENTER ENTER 2 Press YSP on the remote control to switch to the operation mode of this unit. YSP p ;AUTO SETUP . BEAM+SOUND - Yamaha YSP800S | Owner's Manual - Page 34
only or SOUND OPTIMZ only and then press ENTER. The following screen appears on your TV. 6 Press / / / to select and configure each parameter and then press ENTER. ENTER ENTER ENTER p p PREPARATION . INSTALLING;;Parallel to Wall MOUNTING;;;;SHELF REFLECTING;;NORMAL Set MIC in front of YSP MIN - Yamaha YSP800S | Owner's Manual - Page 35
unit in your listening room. Choices: SHELF (Shelf mount), WALL (Wall mount) SHELF AUTO SETUP 8 Press ENTER to start the AUTO SETUP procedure. The following screen appears on your TV. ENVIRONMENT CHECK (Environmental noise check), SUB WOOFER CHECK (Subwoofer check) and WILL START in 10 SEC (Will - Yamaha YSP800S | Owner's Manual - Page 36
9 Check that the following screen is displayed on your TV. The results of the AUTO SETUP procedure are displayed on your TV. Example of the SHOW RESULT screen SHOW RESULT BEAM MODE: 5BEAM SUBWOOFER: NOT APPLICABLE [ENTER]:Enter [RETURN]:Cancel 10 Press ENTER to confirm the results or press RETURN - Yamaha YSP800S | Owner's Manual - Page 37
this unit because is firmly connected to this unit and the sound output level is too low. placed in a proper location. If the problem persists, contact the nearest YAMAHA service center for assistance. An internal system error occurred. Repeat the AUTO SETUP procedure. - SETUP English 33 - Yamaha YSP800S | Owner's Manual - Page 38
mode of this unit. YSP 4 Press / to select SAVE and then press ENTER. The following screen appears on your TV. p p p p 2 Press MENU on the remote control. The SET MENU screen appears on your TV. MENU SET MENU . ;MEMORY ;AUTO SETUP ;BASIC SETUP ;MANUAL SETUP [ ]/[ ]:Up/Down [ENTER]:Enter - Yamaha YSP800S | Owner's Manual - Page 39
! []:Select SET MENU . ;MEMORY ;AUTO SETUP ;BASIC SETUP ;MANUAL SETUP [ ]/[ ]:Up/Down [ENTER]:Enter p p p 2 Press MENU on the remote control. The SET MENU screen appears on your TV. MENU SET MENU . ;MEMORY ;AUTO SETUP ;BASIC SETUP ;MANUAL SETUP [ ]/[ ]:Up/Down [ENTER]:Enter y • The - Yamaha YSP800S | Owner's Manual - Page 40
SYSTEM MEMORY 3 Press / to select MEMORY and then press ENTER. The following screen appears on your TV. 5 Press / to select USER1, USER2 or USER3 and then press ENTER. The following screen appears on your TV Select SET MENU . ;MEMORY ;AUTO SETUP ;BASIC SETUP ;MANUAL SETUP [ ]/[ ]:Up/Down [ENTER]: - Yamaha YSP800S | Owner's Manual - Page 41
sound from the components connected to this unit simply by pressing INPUT on the front panel repeatedly or pressing one of the input selector buttons (TV, STB, VCR, DVD or AUX) on the remote control POWER POWER AV TV DVD AUX VCR INPUT1 STB TV INPUT2 TV MACRO Press VCR on the remote control - Yamaha YSP800S | Owner's Manual - Page 42
player you are using, refer to the owner's manual supplied with the TV and the DVD player. 1 Turn on the power of your DVD player using the remote control supplied with the DVD player. 2 Switch to the video input on your TV using the remote control supplied with the TV so that the DVD menu screen is - Yamaha YSP800S | Owner's Manual - Page 43
the sound VOLUME CH TV VOL MUTE TV INPUT TV MUTE 1 Press MUTE on the remote control to mute the sound. AUDIO MUTE ON appears in the front panel display, and the volume level indicator flashes. MUTE Flashes VOL 2 Press MUTE on the remote control again (or press VOLUME +/-) to resume the sound - Yamaha YSP800S | Owner's Manual - Page 44
the beam mode buttons on the remote control (STEREO, 3BEAM, 5BEAM, ST+3BEAM SETUP (see page 59) • If you selected ANGLE TO WALL OR CORNER for INSTALLED POSITION in MANUAL SETUP (see page 65) AUTO SETUP BASIC SETUP MANUAL SETUP Beam mode INSTALLING (see page 30) Parallel to Wall Angle to Wall - Yamaha YSP800S | Owner's Manual - Page 45
speakers. This mode is ideal for enjoying surround sound effects to the fullest when watching DVDs recorded in a multi-channel format or playing back 2-channel sources in a multi-channel format. Press 5BEAM on the remote control to select the 5 beam mode. 5BEAM 1 1 Press YSP on the remote control - Yamaha YSP800S | Owner's Manual - Page 46
quality surround sound over a wider area. Press 3BEAM on the remote control to select the 3 beam mode. Outputs sound beams from the front left and right speakers in the 2-channel stereo mode. This mode is ideal for playing back hi-fi sources, such as CDs, and can be used to replace your TV speakers - Yamaha YSP800S | Owner's Manual - Page 47
not rebounded off the walls in your listening room. • If the target mode is selected as the beam mode, the surround modes (see page 44), the CINEMA DSP programs (see page 49) and the TruBass (see page 54) become ineffective. In addition, no audio is output from the subwoofer connected to this unit - Yamaha YSP800S | Owner's Manual - Page 48
input mode (AUTO, DTS or ANALOG) by pressing INPUTMODE on the remote control repeatedly (see page 81). • Discs encoded in DTS-ES or Dolby Digital 5.1 EX will be played back in DTS or Dolby Digital. ■ Surround modes and recommended sources Surround mode Dolby Pro Logic Dolby Pro Logic II DTS Neo - Yamaha YSP800S | Owner's Manual - Page 49
CH LEVEL CINEMA DSP MENU TEST ENTER RETURN 2 Press SURROUND on the remote control repeatedly (or press SURROUND and then press / ) to switch between surround modes. SURROUND or SURROUND ENTER PRO LOGIC PLII Movie PLII Music 1 Press YSP on the remote control to switch to the operation - Yamaha YSP800S | Owner's Manual - Page 50
see page 44. SURROUND or SURROUND ENTER 1 Select the TV channel you want to watch. To select a TV channel, use the remote control supplied with your TV. 2 Press TV on the remote control. This unit outputs audio signals from your TV. TV 3 If you hear sound from your TV speakers, reduce the volume - Yamaha YSP800S | Owner's Manual - Page 51
surround sound effect. YSP 5BEAM 1 STEREO 4 INPUTMODE SLEEP ST+3BEAM 2 TARGET 5 3BEAM 3 6 MUSIC 7 MOVIE 8 VOL MODE 9 SPORTS 0 OFF +10 SURROUND CH LEVEL CINEMA DSP MENU TEST ENTER RETURN SURROUND or SURROUND ENTER PRO LOGIC PLII Movie PLII Music 1 Press YSP on the remote control - Yamaha YSP800S | Owner's Manual - Page 52
balance you desire. Control range: -3 (toward the surround direction) to +3 (toward the front direction) Default setting: STD CT WIDTH Distributes the center channel sound to the left and right. If set to 0, center channel sounds output only from the center speaker. Control range: 0 to 7 Default - Yamaha YSP800S | Owner's Manual - Page 53
y The YAMAHA CINEMA DSP modes are compatible with all Dolby Digital, DTS and Dolby Surround sources. Note Choose a sound field program a live instrument are the multiple reflections from the walls of the room. In addition to making the sound live, these reflections enable the listener to tell where - Yamaha YSP800S | Owner's Manual - Page 54
when you play movie sources, especially the ones encoded in Dolby Digital, DTS or Dolby Surround. This program clearly reproduces dialog and sound effects, thus creating a broad and expansive cinematic space amid silence. 1 Press YSP on the remote control to switch to the operation mode of this unit - Yamaha YSP800S | Owner's Manual - Page 55
FIELD PROGRAMS Turning off CINEMA DSP programs Turn off the CINEMA DSP programs if you want to enjoy the original sound without the sound field program effect. 1 Press YSP on the remote control to switch to the operation mode of this unit. Adjusting CINEMA DSP levels You can enjoy good quality - Yamaha YSP800S | Owner's Manual - Page 56
SURROUND CH LEVEL CINEMA DSP MENU 3 Press VOL MODE on the remote control repeatedly to select NIGHT:CINEMA, NIGHT:MUSIC, TV EQUAL VOL or NIGHT OFF. VOL MODE 9 TEST ENTER RETURN 1 Press YSP on the remote control for all sounds. • Select TV EQUAL VOL when watching TV programs. • Select NIGHT - Yamaha YSP800S | Owner's Manual - Page 57
4 Press / on the remote control to adjust the effect level of compression while NIGHT:CINEMA, NIGHT:MUSIC or TV EQUAL VOL is displayed. ENTER Effect front panel or on the remote control or if you disconnect the power supply cable from the AC wall outlet. USING THE VOLUME MODE BASIC OPERATION English - Yamaha YSP800S | Owner's Manual - Page 58
and provides deeper, richer bass in the presence of a subwoofer. Note The TruBass is not available when the target mode is selected as the beam mode (see page 43). STANDBY/ON POWER POWER AV TV 2 Press on the remote control repeatedly to turn on SRS TruBass. TruBass ON is shown in the - Yamaha YSP800S | Owner's Manual - Page 59
front panel display changes as shown below. YSP 5BEAM 1 STEREO 4 INPUTMODE SLEEP ST+3BEAM 2 UNIVERSAL 5 3BEAM 3 6 MUSIC 7 MOVIE 8 VOL MODE 9 SPORTS 0 OFF +10 SURROUND CH LEVEL CINEMA DSP MENU TEST ENTER RETURN 1 Press SLEEP on the remote control repeatedly to set the amount of time - Yamaha YSP800S | Owner's Manual - Page 60
is stored in the system memory and automatically restored when you make a new setting next time. y The sleep timer setting can also be deactivated if you press STANDBY/ON on the front panel or on the remote control to set this unit to the standby mode or unplug the power cable from the AC - Yamaha YSP800S | Owner's Manual - Page 61
advanced settings for speaker positions, sound beams, digital input and the OSD, see MANUAL SETUP (see page 63 TEST once. TEST RETURN ■ Displaying the SET MENU screen 3 Press / to select BASIC SETUP and then press ENTER. The following screen appears on your TV. 1 Press YSP on the remote control - Yamaha YSP800S | Owner's Manual - Page 62
■ ROOM TYPE (Room type) 4 Check that the following screen is displayed on your TV. If this screen is not displayed, repeat steps 1 to 3. ;BASIC SETUP . 1 ROOM TYPE ? 2 3 4 PUSH [ENTER] Key. y If the shape of your listening room is irregular, select the shape that most closely resembles your room - Yamaha YSP800S | Owner's Manual - Page 63
that the following screen is displayed on your TV. If this screen is not displayed, make settings for ROOM TYPE. ;BASIC SETUP LE.E* SQUARE EQ. 2 INSTALLED POSITION ? [ENTER]:Enter WIDE LEFT (Wide wall left) WIDE CENTER (Wide wall center) WIDE RIGHT (Wide wall right) CORNER RIGHT (Corner right) - Yamaha YSP800S | Owner's Manual - Page 64
(Room size) 11 Check that the following screen is displayed on your TV. If this screen is not displayed, make settings for INSTALLED POSITION. ;BASIC SETUP LE.E* SQUARE EQ.>* CENTER LE.E3 ROOM SIZE ? LE.E4 PUSH [ENTER] Key. ;BASIC SETUP LE.E* SQUARE EQ.>* CENTER LE.E3 ROOM SIZE ? LE.E4 PUSH [ENTER - Yamaha YSP800S | Owner's Manual - Page 65
Select [ENTER]:Enter 3.4 m (11 ft) SMALL (Small) 4.2 m (14 ft) 4.2 m (14 ft) MID (Medium) 5.8 m (19 ft) 5.0 m (17 ft) BASIC SETUP ■ SETUP OK (Confirming settings) 14 Check that the following screen is displayed on your TV. If this screen is not displayed, make settings for ROOM SIZE. ;BASIC - Yamaha YSP800S | Owner's Manual - Page 66
;AUTO SETUP . ;BASIC SETUP ;MANUAL SETUP [ ]/[ ]:Up/Down [ENTER]:Enter 17 Press MENU to complete the BASIC SETUP procedure. The SET MENU display disappears from your TV screen. MENU This completes the parameter settings for BASIC SETUP. To select a playback source and enjoy surround sound on this - Yamaha YSP800S | Owner's Manual - Page 67
MANUAL SETUP MANUAL SETUP To achieve the best quality surround sound, you can use MANUAL SETUP to fine-tune the listening environment parameters, as well as to make advanced settings for speaker positions, sound beams, digital input and the OSD. Change the initial settings (indicated in bold under - Yamaha YSP800S | Owner's Manual - Page 68
SPORTS 0 OFF +10 SURROUND CH LEVEL CINEMA DSP MENU TEST ENTER RETURN y You can adjust the SET MENU parameters while the unit is reproducing sound. 1 Press YSP on the remote control to switch to the operation mode of this unit. ENTER ENTER ;MANUAL SETUP . 1 SOUND MENU 2 BEAM MENU 3 INPUT - Yamaha YSP800S | Owner's Manual - Page 69
various parameters related to the sound beam output. SET MENU → MANUAL SETUP → BEAM MENU 2 BEAM MENU . A)SETTING PARAMETERS B)BEAM ADJUSTMENT C)IMAGE LOCATION [ ]/[ ]:Up/Down [SELECT]:Enter MANUAL SETUP • Select FLAT TO WALL if this unit is installed in parallel with the wall in your listening room - Yamaha YSP800S | Owner's Manual - Page 70
A test tone is automatically output. (−) (+) (+) (−) p p p p p p p Listening position from the unit and the left wall A)SETTING PARAMETERS 3/3 12.0m p p p [ ]/[ ]:Up/Down[ ]/[ ]:Sel [ENTER]:Return Note When you set the INSTALLED POSITION parameter in BASIC SETUP (see page 59) or MANUAL - Yamaha YSP800S | Owner's Manual - Page 71
Beam travel length) Use to set the distance that sound beams travel after being output and reflected off the wall until they arrive at the listening position for each speaker. The lines in the illustration below indicate the distance. MANUAL SETUP FOCAL LENGTH (Focal length) Use to set the distance - Yamaha YSP800S | Owner's Manual - Page 72
MANUAL SETUP TREBLE GAIN (Treble gain) Use to adjust the high frequency output level of each speaker. y If the reflection point of the front left and right or surround left and right sound beams is a curtain or other acoustically absorbent surface, you can achieve more effective surround sound by - Yamaha YSP800S | Owner's Manual - Page 73
dB Initial setting: 0 dB p p MANUAL SETUP ■ BEAM LEVEL (Beam level) Use to manually balance the speaker levels between the front left or surround left speakers and each speaker selected. When setting the front right, center or surround left speakers or the subwoofer, the test tone is output from - Yamaha YSP800S | Owner's Manual - Page 74
of LFE (lowfrequency effect) signals found in Dolby Digital or DTS sources. Choices: SWFR (subwoofer), FRONT • Select SWFR if you connect a subwoofer. LFE and low-frequency signals from other channels are directed to the subwoofer according to the speaker settings. • Select FRONT if you do not use - Yamaha YSP800S | Owner's Manual - Page 75
speakers. This setting is effective only when the unit is decoding Dolby Digital and DTS signals. Dynamic range is the difference between the smallest sound MANUAL SETUP INPUT MENU Use to manually adjust various parameters related to the audio and video input. SET MENU → MANUAL SETUP If you connect a - Yamaha YSP800S | Owner's Manual - Page 76
MANUAL SETUP ■ INPUT MODE (Input mode) Use to designate the input mode for the input sources connected to the DIGITAL INPUT jacks when you turn on the power of this unit. For information on the types of audio signals that can be output by this unit, see "Surround modes and recommended sources" on - Yamaha YSP800S | Owner's Manual - Page 77
previous screen. ENTER DISPLAY MENU Use to manually adjust various parameters related to the display. SET MENU → MANUAL SETUP → OPTION MENU 4 DISPLAY MENU . A)DIMMER you operate this unit by using the control buttons on the front panel or on the remote control. Choices: -2, -1, OFF AUTO DIMMER - Yamaha YSP800S | Owner's Manual - Page 78
p p p p MANUAL SETUP ■ OSD SET (OSD settings) Use to adjust the display position and the background color of the OSD. B)OSD SET . measurement. Choices: METERS, FEET C)UNIT SET )METERS FEET p [ ]/[ ]:Select [ENTER]:Retern • Select METERS to input speaker distances in meters. • Select FEET to input - Yamaha YSP800S | Owner's Manual - Page 79
panel display. STANDBY/ON POWER POWER AV TV DVD AUX VCR INPUT1 STB TV INPUT2 TV MACRO YSP INPUTMODE SLEEP 5BEAM 1 ST+3BEAM 2 3BEAM 3 STEREO TARGET 4 5 6 MUSIC 7 MOVIE 8 VOL MODE 9 SPORTS 0 OFF +10 SURROUND CH LEVEL CINEMA DSP MENU TEST ENTER RETURN INPUT STANDBY/ON - Yamaha YSP800S | Owner's Manual - Page 80
to the standby mode. 2 Press / on the remote control so that MEMORY PROTECT is shown in the front panel display. ENTER or STANDBY/ON Front panel Remote control The new setting for the maximum volume level will be activated when you turn on the power of this unit next time. VOL MEMORY PROTECT - Yamaha YSP800S | Owner's Manual - Page 81
must reset the ROOM TYPE, SP POSITION and ROOM SIZE parameters to match your surround sound environment. VOL PROTECT: ON 1 Repeat steps 1 to 3 in "Setting the maximum volume level" on page 75. 2 Press / on the remote control so that FACTORY PRESET is shown in the front panel display. VOL PROTECT - Yamaha YSP800S | Owner's Manual - Page 82
to manually balance the speaker levels. Use the test tone to set speaker levels so that the volume level of each speaker is identical when heard from your listening position. SPORTS 0 OFF +10 SURROUND CH LEVEL CINEMA DSP MENU TEST ENTER RETURN 1 Press TEST on the remote control. TEST LEFT - Yamaha YSP800S | Owner's Manual - Page 83
TEST RIGHT TEST SUR.R SPORTS 0 OFF +10 SURROUND CH LEVEL CINEMA DSP MENU TEST ENTER RETURN TEST SUR.L TEST SUBWOOFER Note TEST SUBWOOFER is only available when a subwoofer is connected to this unit and SWFR is selected for BASS OUT in SOUND MENU (see page 70). 3 Press / to adjust speaker - Yamaha YSP800S | Owner's Manual - Page 84
ADJUSTING SYSTEM PARAMETERS 2 Press / to adjust speaker volumes. ENTER Control range: -10 dB to +10 dB 3 Press CH LEVEL (or wait for a few seconds without operating this unit) when you have completed your adjustment. CH LEVEL 80 - Yamaha YSP800S | Owner's Manual - Page 85
to AUTO in most cases. STANDBY/ON POWER POWER AV TV DVD AUX YSP VCR INPUT1 STB TV INPUT2 TV MACRO ( ) INPUTMODE SLEEP 1 Press one of the input selector buttons on the remote control to select the desired input source. DVD VCR STB TV • AUTO Automatically selects audio input signals in - Yamaha YSP800S | Owner's Manual - Page 86
setting the remote control code for a DVD player made by YAMAHA. DVD AUX VCR INPUT1 STB TV INPUT2 TV MACRO YSP ( ) INPUTMODE SLEEP 5BEAM 1 ST+3BEAM 2 3BEAM 3 STEREO TARGET 4 5 6 MUSIC 7 MOVIE 8 VOL MODE 9 SPORTS 0 OFF +10 SURROUND CH LEVEL CINEMA DSP MENU TEST ENTER RETURN - Yamaha YSP800S | Owner's Manual - Page 87
8 VOL MODE 9 SPORTS 0 OFF +10 SURROUND CH LEVEL CINEMA DSP MENU 4 TEST ENTER RETURN VOLUME CH TV VOL 1 3 5 6 MUTE TV INPUT TV MUTE CODE SET 1 AV POWER Turns on or off the power of your DVD player. 2 Numeric buttons Use to enter numeric digits. 3 Operation buttons for DVD and VCR - Yamaha YSP800S | Owner's Manual - Page 88
8 VOL MODE 9 SPORTS 0 OFF +10 SURROUND CH LEVEL CINEMA DSP MENU 1 3 4 TEST ENTER RETURN VOLUME CH TV VOL MUTE TV INPUT TV MUTE CODE SET 1 AV POWER Turns on or off the power of your VCR. 2 Numeric buttons Use to enter numeric digits. 3 CH +/- Switches between the available VCR - Yamaha YSP800S | Owner's Manual - Page 89
on the remote control while holding down CODE SET. TV MUTE MACRO STANDBY/ON POWER POWER AV TV CODE SET DVD AUX VCR INPUT1 STB TV INPUT2 TV MACRO YSP 5BEAM 1 STEREO 4 MUSIC 7 INPUTMODE SLEEP ST+3BEAM 2 3BEAM 3 TARGET 5 6 MOVIE 8 VOL MODE 9 SPORTS 0 OFF +10 SURROUND CH LEVEL - Yamaha YSP800S | Owner's Manual - Page 90
to select the input source you want to cancel the macros for. Proceed to step 2 while holding down CODE SET. TV MUTE CODE SET DVD VCR STB TV AUX 4 Press CH +/- or TV INPUT on the remote control repeatedly so that the screen changes to the display of the input source selected in step 1. CH - Yamaha YSP800S | Owner's Manual - Page 91
the nearest authorized YAMAHA dealer or service center. ■ General Problem Cause Remedy This unit fails to turn on when STANDBY/ON is pressed, or enters the standby mode soon after the power has been turned on. The power supply cable is not firmly connected to the AC wall outlet. This unit - Yamaha YSP800S | Owner's Manual - Page 92
TROUBLESHOOTING Problem Cause Remedy Surround sound effects are insubstantial. The listening room is not a regular shape. Install this unit in a square or rectangular shaped room. There is no wall in the path of the sound Try placing a flat object, such as a board, beam. in the path of the - Yamaha YSP800S | Owner's Manual - Page 93
the external component you want to operate. Set the remote control code correctly or try another code for the same manufacturer using the "LIST OF REMOTE CONTROL CODES" at the end of this manual. Use the remote control supplied with the external component. Press TEST once. See page 22 - 22 37 82 - Yamaha YSP800S | Owner's Manual - Page 94
stabilizes the volume on each channel to enhance moving sound effects and directionality. ■ DTS (Digital Theater Systems) Digital Surround DTS digital surround was developed to replace the analog soundtracks of movies with a 6-channel digital sound track, and is now rapidly gaining popularity in - Yamaha YSP800S | Owner's Manual - Page 95
pin cable 15 Optical cable 15, 18, 19 P PCM 81 Power cable 21 R Remote control 9, 22 Remote control code 82 S Surround mode 44 Sleep timer 55 SET MENU 24 T Test tone 78 LFE 0.1 channel 70, 90 M MANUAL SETUP 63 MEMORY 34, 35 N Night listening modes 52 ADDITIONAL INFORMATION English - Yamaha YSP800S | Owner's Manual - Page 96
AUDIO TV/STB, AUX (Optical 2 (Digital) AUDIO DVD (Coaxial 1 (Digital) • Output Jacks SUBWOOFER OUT (1.5 V, less than 120 Hz) ...... 1 (Subwoofer) VIDEO OUT (1 Vp-p, 75 1 (OSD) • System Connector Jack OPTIMIZER MIC 1 (Microphone input) SYSTEM CONNECTOR 1 (System control) GENERAL • Power Supply - Yamaha YSP800S | Owner's Manual - Page 97
LIST OF REMOTE CONTROL CODES LISTE DES CODES DE COMMANDE LISTE DER FERNBEDIENUNGSCODES LISTA ÖVER FJÄRRSTYRNINGSKODER LISTA DEI CODICI DI TELECOMANDO LISTA DE CÓDIGOS DE MANDO A DISTANCIA LIJST MET AFSTANDSBEDIENINGSCODES TV ADMIRAL 292, 293, 216 AIWA 294, 276, 283, 284 AKAI 295, 296 ALBA - Yamaha YSP800S | Owner's Manual - Page 98
363, 396 UNITECH 363 UNIVERSUM 396, 327, 376 VIDEOSONIC 363 W.WHOUSE 396 WARDS 395, 396, 336, 362, 397, 363 YAMAHA 399, 392, 393, 394 ZERITH 344, 361, 368, 371, 379, 396, 397 CABLE TV TUNER ABC 739, 752, 753, 755, 758, 759, 762 GENERAL INSTRUMENT 722 HAMIN 723, 724, 725, 726, 727 - Yamaha YSP800S | Owner's Manual - Page 99
ELECTRONIQUE FRANCE S.A. RUE AMBROISE CROIZAT BP70 CROISSY-BEAUBOURG 77312 MARNE-LA-VALLEE CEDEX02, FRANCE YAMAHA ELECTRONICS (UK) LTD. YAMAHA HOUSE, 200 RICKMANSWORTH ROAD WATFORD, HERTS WD18 7GQ, ENGLAND YAMAHA SCANDINAVIA A.B. J A WETTERGRENS GATA 1, BOX 30053, 400 43 VÄSTRA FRÖLUNDA, SWEDEN - Yamaha YSP800S | Owner's Manual - Page 100
YSP-800 QUICK REFERENCE GUIDE This quick reference guide explains steps to connect a TV and a DVD player to this unit and achieve the surround sound effects in a quick, easy manner. Before installing this unit This unit creates surround sound by reflecting projected sound beams off the walls of - Yamaha YSP800S | Owner's Manual - Page 101
connect the supplied OSD video pin cable to the video input 2 jack of your TV, switch to video input 2 on your TV. 4 Press MENU on the remote control. The SET MENU screen appears on your TV. CH LEVEL CINEMA DSP MENU TEST ENTER RETURN SET MENU . ;MEMORY ;AUTO SETUP ;BASIC SETUP ;MANUAL SETUP
-
 1
1 -
 2
2 -
 3
3 -
 4
4 -
 5
5 -
 6
6 -
 7
7 -
8
-
9
-
10
-
11
-
12
-
13
-
14
-
15
-
16
-
17
-
18
-
19
-
20
-
21
-
22
-
23
-
24
-
25
-
26
-
27
-
28
-
29
-
30
-
31
-
32
-
33
-
34
-
35
-
36
-
37
-
38
-
39
-
40
-
41
-
42
-
43
-
44
-
45
-
46
-
47
-
48
-
49
-
50
-
51
-
52
-
53
-
54
-
55
-
56
-
57
-
58
-
59
-
60
-
61
-
62
-
63
-
64
-
65
-
66
-
67
-
68
-
69
-
70
-
71
-
72
-
73
-
74
-
75
-
76
-
77
-
78
-
79
-
80
-
81
-
82
-
83
-
84
-
85
-
86
-
87
-
88
-
89
-
90
-
91
-
92
-
93
-
94
-
95
-
96
-
97
-
98
-
99
-
100
-
101
 |
 |

YSP-800
Digital Sound Projector
OWNER’S MANUAL
UB