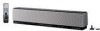
Yamaha YSP800S Owner's Manual - Page 101
Automatically setting up the listening environment, Enjoying surround sound
 |
UPC - 027108923543
View all Yamaha YSP800S manuals
Add to My Manuals
Save this manual to your list of manuals |
Page 101 highlights
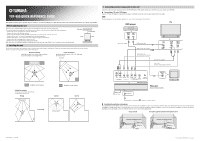
3. Automatically setting up the listening environment This unit employs the beam optimization feature and the YAMAHA Parametric Room Acoustic Optimizer (YPAO) technology with the aid of the supplied optimizer microphone, allowing you to avoid troublesome listening-based speaker setup and achieve highly accurate sound adjustments that best match your listening environment. Notes • Be advised that it is normal for loud test tones to be output during the AUTO SETUP procedure. Make sure that there are no children around in the listening room while the AUTO SETUP procedure is in progress. • Make sure that your listening room is as quiet as possible while the AUTO SETUP procedure is in progress. • Once the AUTO SETUP procedure has started, position yourself beside or behind this unit so that you may not obstruct the path of sound beams. To achieve the best results possible, however, it is strongly recommended that you should evacuate yourself from your listening room until the AUTO SETUP procedure is completed. • Once the AUTO SETUP procedure has completed, be sure to disconnect the optimizer microphone and keep it in a safe place for future usage. • The optimizer microphone is sensitive to heat. Keep it away from direct sunlight and do not place it on top of this unit or other A/V components. 1 Press STANDBY/ON on the remote control to turn on the power of this unit. If a subwoofer with adjustable volume and crossover/high cut frequency controls is connected to this unit, set the volume between 9 and 12 o'clock as viewed on a conventional clockface and set the crossover/high cut frequency to the maximum. STANDBY/ON POWER POWER AV TV DVD VCR STB TV 2 Turn on the power of your TV. 3 Switch to the video input on your TV using the remote control supplied with the TV. For example, if you connect the supplied OSD video pin cable to the video input 2 jack of your TV, switch to video input 2 on your TV. 4 Press MENU on the remote control. The SET MENU screen appears on your TV. CH LEVEL CINEMA DSP MENU TEST ENTER RETURN SET MENU . ;MEMORY ;AUTO SETUP ;BASIC SETUP ;MANUAL SETUP [ ]/[ ]:Up/Down [ENTER]:Enter 5 Press / on the remote control to select AUTO SETUP and then press ENTER. The following screen appears on your TV. CH LEVEL CINEMA DSP MENU TEST ENTER RETURN ;AUTO SETUP . BEAM+SOUND OPTIMZ BEAM OPTIMZ only SOUND OPTIMZ only [ ]/[ ]:Up/Down [ENTER]:Enter p p p p p p 6 Press / to select BEAM OPT+SOUND OPTIMZ and then press ENTER. The following screen appears on your TV. CH LEVEL CINEMA DSP MENU TEST ENTER RETURN PREPARATION . INSTALLING;;Parallel to Wall MOUNTING;;;;SHELF REFLECTING;;NORMAL Set MIC in front of YSP MIN 2m/6.5ft [ ]/[ ]:Up/Down/[p]/[ ]:Sel [ENTER]:Start p 7 Press / / / to select and configure each parameter and then press ENTER. CH LEVEL CINEMA DSP MENU TEST ENTER RETURN INSTALLING (Installing) Use to select the installed position of the unit in your listening room. Choices: Parallel to Wall (Parallel with wall installation), Angle to Wall or corner (Corner installation) • Select Angle to Wall or corner if the unit is installed in the corner. • Select Parallel to Wall if the unit is installed in parallel with the wall. MOUNTING (Mounting) Use to select the mounted position of the unit in your listening room. Choices: SHELF (Shelf mount), WALL (Wall mount) • Select WALL if the unit is mounted on the wall. • Select SHELF if the unit is mounted on the shelf. REFLECTING (Reflecting) Use to select the reflectivity of your listening room. Choices: NORMAL (Normal), HI ECHO (High echo) • Select NORMAL if your listening room has a normal reflectivity. • Select HI ECHO if your listening room has highly reflective surfaces such as concrete walls. 8 Check the following points once again before starting the AUTO SETUP procedure. • Is the optimizer microphone firmly connected to this unit? • Is the optimizer microphone placed in a proper location? • Are there any large obstacles in between the optimizer microphone and the walls in your listening room? 9 Press ENTER to start the AUTO SETUP procedure. The following screen appears on your TV. ENVIRONMENT CHECK (Environmental noise check), SUB WOOFER CHECK (Subwoofer check) and WILL START in 10 SEC (Will start in 10 sec) are displayed in order as the PREPARATION procedure is in progress. CH LEVEL CINEMA DSP MENU TEST ENTER RETURN PREPARATION . ENVIRONMENT CHECK ;;;[OK] SUB WOOFER CHECK ;;;[NOT IN USE] WILL START in 10 SEC Move aside or behind YSP *****----- y If an error occurs, an error message is displayed. See "Error messages for AUTO SETUP" on page 33 in the Owner's Manual for a complete list of error messages and their proper remedies. Follow the instructions and perform the AUTO SETUP procedure again. 10 Check that the following screen is displayed on your TV. The results of the AUTO SETUP procedure are displayed on your TV. Example of the SHOW RESULT screen SHOW RESULT BEAM MODE: 5BEAM SUBWOOFER: NOT APPLICABLE [ENTER]:Enter [RETURN]:Cancel 11 Press ENTER to confirm the results. The following screen is displayed temporarily for a few seconds and then disappear from your TV. CH LEVEL CINEMA DSP MENU TEST ENTER RETURN AUTO SETTING COMPLETED 4. Enjoying surround sound ■ Enjoying TV in surround sound You can enjoy audio signals output from your TV in real surround sound. y Before performing the steps below, set the volume of this unit to -40 dB. If necessary, adjust the volume level in step 4 below. 1 Select the TV channel you want to watch using the remote control supplied with your TV. 2 Press TV on the remote control to select TV as the input source. STANDBY/ON POWER POWER AV TV DVD AUX VCR STB TV INPUT1 INPUT2 MACRO 3 If you hear sound output from your TV speakers, turn down the volume level using the remote control supplied with your TV until you cannot hear any sound. 4 Press VOLUME +/- on the remote control to adjust the volume level. VOLUME CH TV VOL 5 Press YSP on the remote control to switch to the operation mode of this unit. AUX YSP INPUT1 INPUT2 MACRO INPUTMODE SLEEP 6 Press one of the beam mode buttons on the remote control to select the desired beam mode. Select one of the five beam modes that best matches the current input source of this unit. For further details about the beam modes, see page 40 in the supplied Owner's Manual. 5BEAM 1 STEREO 4 ST+3BEAM 2 TARGET 5 3BEAM 3 6 y The target mode outputs sound beams in a single channel and is ideal if you do not want the sound beams to be reflected on the walls in your listening room or if you do not disturb others asleep while enjoying music or movies at night. In addition, you can adjust the horizontal angle of the sound beams so that you can hear dialogues clearly even from a distant location such as the kitchen area in your listening room. 7 Press VOL MODE on the remote control repeatedly to select the desired volume mode. The volume modes are designed to improve listenability at lower volumes and limit the volume level of the TV so that it will not vary suddenly to a great extent. For further details about the volume modes, see page 52 in the supplied Owner's Manual. MUSIC 7 SPORTS 0 MOVIE 8 OFF +10 VOL MODE 9 SURROUND ■ Enjoying DVDs in surround sound You can enjoy audio signals output from your DVD player in real surround sound. y Before performing the steps below, set the volume of this unit to -40 dB. If necessary, adjust the volume level in step 4 below. 1 Switch to the video input on your TV using the remote control supplied with your TV so that the DVD menu screen is displayed. 2 Press DVD on the remote control to select DVD as the input source and then start playback on the DVD player. STANDBY/ON POWER POWER AV TV DVD AUX VCR STB TV INPUT1 INPUT2 MACRO 3 If you hear sound output from your TV speakers, turn down the volume level using the remote control supplied with your TV until you cannot hear any sound. 4 Press VOLUME +/- on the remote control to adjust the volume level. VOLUME CH TV VOL 5 Press YSP on the remote control to switch to the operation mode of this unit. AUX YSP INPUT1 INPUT2 MACRO INPUTMODE SLEEP 6 Press one of the beam mode buttons on the remote control to select the desired beam mode. Select one of the five beam modes that best matches the current input source of this unit. For further details about the beam modes, see page 40 in the supplied Owner's Manual. 5BEAM 1 STEREO 4 ST+3BEAM 2 TARGET 5 3BEAM 3 6
-
 1
1 -
2
-
3
-
4
-
5
-
6
-
7
-
8
-
9
-
10
-
11
-
12
-
13
-
14
-
15
-
16
-
17
-
18
-
19
-
20
-
21
-
22
-
23
-
24
-
25
-
26
-
27
-
28
-
29
-
30
-
31
-
32
-
33
-
34
-
35
-
36
-
37
-
38
-
39
-
40
-
41
-
42
-
43
-
44
-
45
-
46
-
47
-
48
-
49
-
50
-
51
-
52
-
53
-
54
-
55
-
56
-
57
-
58
-
59
-
60
-
61
-
62
-
63
-
64
-
65
-
66
-
67
-
68
-
69
-
70
-
71
-
72
-
73
-
74
-
75
-
76
-
77
-
78
-
79
-
80
-
81
-
82
-
83
-
84
-
85
-
86
-
87
-
88
-
89
-
90
-
91
-
92
-
93
-
94
-
95
-
 96
96 -
 97
97 -
 98
98 -
 99
99 -
 100
100 -
 101
101
 |
 |
