Yamaha YSP800S Owner's Manual - Page 67
Manual Setup
 |
UPC - 027108923543
View all Yamaha YSP800S manuals
Add to My Manuals
Save this manual to your list of manuals |
Page 67 highlights
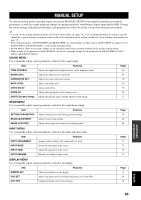
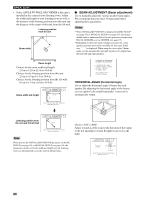
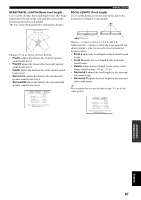
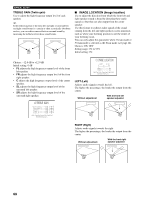
MANUAL SETUP MANUAL SETUP To achieve the best quality surround sound, you can use MANUAL SETUP to fine-tune the listening environment parameters, as well as to make advanced settings for speaker positions, sound beams, digital input and the OSD. Change the initial settings (indicated in bold under each parameter) to reflect the needs of your own listening environment. y • You can save the settings optimized by the AUTO SETUP procedure (see page 34). A set of settings optimized according to specific conditions of your listening environment can be recalled later depending on the varying conditions of your listening environment (see page 35). • Most of the parameters in SOUND MENU and BEAM MENU are automatically set when you run AUTO SETUP (see page 26). Use SOUND MENU and BEAM MENU to make additional adjustments. • BEAM MENU allows you to make settings for the surround sound effects normally available in the speaker settings menu. • Make settings for the parameters in BEAM MENU first before you make settings for the parameters in SOUND MENU, INPUT MENU and DISPLAY MENU. SOUND MENU Use to manually adjust various parameters related to the sound output. Item Features Page TONE CONTROL Adjusts the output level of high-frequency or low-frequency sound. 69 BEAM LEVEL Adjusts the output level of each beam. 69 SUBWOOFER SET Adjusts the various subwoofer settings. 70 MUTE LEVEL Adjusts the muting level. 70 AUDIO DELAY Adjusts audio delay. 70 ROOM EQ Adjusts the tonal quality of the listening room. 70 DD/DTS Dynamic Range Adjusts the dynamic range of Dolby Digital or DTS signals. 71 BEAM MENU Use to manually adjust various parameters related to the sound beam output. Item SETTING PARAMETERS BEAM ADJUSTMENT IMAGE LOCATION Features Adjusts listening room and listening position settings. Adjusts various beam settings. Adjusts the position of the front left and right speakers. INPUT MENU Use to manually adjust various parameters related to the audio and video input. Item INPUT ASSIGNMENT INPUT MODE INPUT TRIM INPUT RENAME Features Assigns jacks according to the component to be used. Selects the initial input of the source. Adjusts the input level of the source. Renames the displayed input source. Page 65 66 68 Page 71 72 72 72 DISPLAY MENU Use to manually adjust various parameters related to the display. Item Features DIMMER SET Adjusts the brightness of the display. OSD SET Adjusts the display position and the background color of the OSD. UNIT SET Changes the display unit of measurement. Page 73 74 74 ADVANCED OPERATION English 63
-
 1
1 -
2
-
3
-
4
-
5
-
6
-
7
-
8
-
9
-
10
-
11
-
12
-
13
-
14
-
15
-
16
-
17
-
18
-
19
-
20
-
21
-
22
-
23
-
24
-
25
-
26
-
27
-
28
-
29
-
30
-
31
-
32
-
33
-
34
-
35
-
36
-
37
-
38
-
39
-
40
-
41
-
42
-
43
-
44
-
45
-
46
-
47
-
48
-
49
-
50
-
51
-
52
-
53
-
54
-
55
-
56
-
57
-
58
-
59
-
60
-
61
-
 62
62 -
 63
63 -
 64
64 -
 65
65 -
 66
66 -
 67
67 -
 68
68 -
 69
69 -
 70
70 -
 71
71 -
 72
72 -
73
-
74
-
75
-
76
-
77
-
78
-
79
-
80
-
81
-
82
-
83
-
84
-
85
-
86
-
87
-
88
-
89
-
90
-
91
-
92
-
93
-
94
-
95
-
96
-
97
-
98
-
99
-
100
-
101
 |
 |