Asus M8 M8000 English - Page 39
Inserting a CD, Using a CD, Removing a CD
 |
View all Asus M8 manuals
Add to My Manuals
Save this manual to your list of manuals |
Page 39 highlights
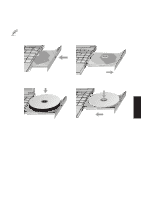
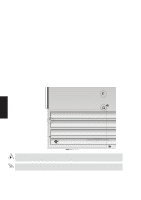
NOTE: The CD drive eject button is electronic and requires that the Notebook PC be powered ON in order to eject the CD drive tray. Only one CD may be used at one time on this CD drive. Inserting a CD Front Panel 1. Press the CD drive eject button and the CD 2. Hold the CD drive's front panel and slide the CD drive tray will eject out partially. drive tray completely out. 4. Using 3. Place a CD with the printed side facing up. 4. Snap the CD onto the hub by pressing on both sides of the CD's center. The hub should be higher than the CD when correctly mounted. Slowly push the CD drive tray back into the Notebook PC. Using a CD A CD drive letter should be present after bootup regardless of a CD has been inserted. After the CD is properly inserted, data can be accessed just like with hard disk drives; except that nothing can be written to or changed on the CD. Removing a CD Remove the CD by slowly lifting the CD off the tray by holding the edge of the CD. Do not touch the bottom-side of the CD where data is read. 39
-
 1
1 -
2
-
3
-
4
-
5
-
6
-
7
-
8
-
9
-
10
-
11
-
12
-
13
-
14
-
15
-
16
-
17
-
18
-
19
-
20
-
21
-
22
-
23
-
24
-
25
-
26
-
27
-
28
-
29
-
30
-
31
-
32
-
33
-
 34
34 -
 35
35 -
 36
36 -
 37
37 -
 38
38 -
 39
39 -
 40
40 -
 41
41 -
 42
42 -
 43
43 -
 44
44 -
45
-
46
-
47
-
48
-
49
-
50
-
51
-
52
-
53
-
54
-
55
-
56
-
57
-
58
-
59
-
60
-
61
-
62
-
63
-
64
-
65
-
66
-
67
-
68
-
69
-
70
-
71
-
72
-
73
-
74
-
75
-
76
-
77
-
78
-
79
-
80
-
81
-
82
-
83
-
84
-
85
-
86
-
87
-
88
-
89
-
90
-
91
-
92
-
93
-
94
-
95
-
96
-
97
-
98
-
99
-
100
-
101
-
102
 |
 |
