Asus M8 M8000 English - Page 40
Inserting and Removing Drive Modules
 |
View all Asus M8 manuals
Add to My Manuals
Save this manual to your list of manuals |
Page 40 highlights
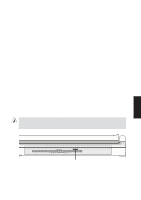
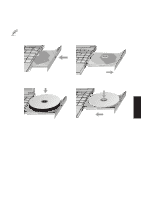
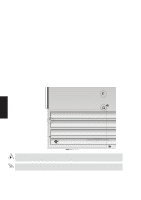
Inserting and Removing Drive Modules To remove a drive module: 1. Unlock the drive module by sliding the drive lock 2 located on the battery pack towards the front of the Notebook PC from Lock to Unlock in the direction of the arrow as shown in the illustration. 2. Slide the drive lock 1 towards the rear of the Notebook PC (in the direction of the "Release" arrow as shown in the illustration) and while holding the release latch, push the eject latch towards the drive module in the direction of the "Eject" arrow as shown in the illustration. 3. Relock the drive lock 2 so that the battery pack is secured. To insert a drive module: 1. Unlock the drive lock 2 before inserting a drive module. 2. Insert the drive module with the connector first. 3. With the drive module flush with the Notebook PC's side, slide the drive lock 2 towards the rear from Unlock to Lock in the opposite direction of the arrow as shown in the illustration. Drive Module Release Drive Lock 1 Drive Lock 2 Lock Eject 4. Using Unlock WARNING! To prevent damage to the BIOS and circuits, Power OFF before removing or inserting the drive module. IMPORTANT: The drive module must be properly secured and locked (drive lock 1) before transporting or using the Notebook PC. 40
-
 1
1 -
2
-
3
-
4
-
5
-
6
-
7
-
8
-
9
-
10
-
11
-
12
-
13
-
14
-
15
-
16
-
17
-
18
-
19
-
20
-
21
-
22
-
23
-
24
-
25
-
26
-
27
-
28
-
29
-
30
-
31
-
32
-
33
-
34
-
 35
35 -
 36
36 -
 37
37 -
 38
38 -
 39
39 -
 40
40 -
 41
41 -
 42
42 -
 43
43 -
 44
44 -
 45
45 -
46
-
47
-
48
-
49
-
50
-
51
-
52
-
53
-
54
-
55
-
56
-
57
-
58
-
59
-
60
-
61
-
62
-
63
-
64
-
65
-
66
-
67
-
68
-
69
-
70
-
71
-
72
-
73
-
74
-
75
-
76
-
77
-
78
-
79
-
80
-
81
-
82
-
83
-
84
-
85
-
86
-
87
-
88
-
89
-
90
-
91
-
92
-
93
-
94
-
95
-
96
-
97
-
98
-
99
-
100
-
101
-
102
 |
 |
