Asus P I-P55TP4N User Manual - Page 17
P/I-P55TP4N User's Manual, PS/2 Mouse on IRQ12 Setting JP7, Selections, CMOS RAM, Make sure,
 |
View all Asus P I-P55TP4N manuals
Add to My Manuals
Save this manual to your list of manuals |
Page 17 highlights
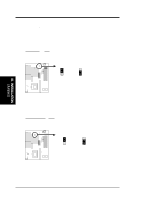
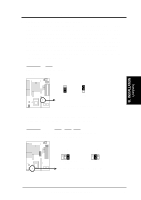
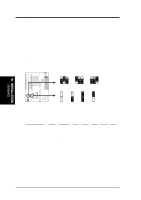
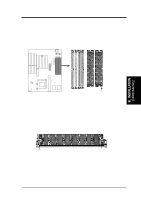
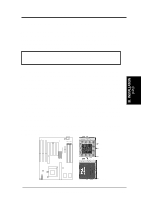
III. INSTALLATION 7. PS/2 Mouse on IRQ12 Setting (JP7) This jumper enables or disables the onboard PS/2 mouse lead connector. When Enabled, the port becomes active and uses IRQ12. When Disabled, IRQ12 will be freed for use by a PCI or ISA expansion card. See Page 19 for the "PS/2 Mouse connector." Selections JP7 Disable [2-3] (Default) Enable [1-2] JP7 123 Disabled (Default) JP7 123 Enabled PS/2 Mouse on IRQ 12 (Disable / Enable) 8. CMOS RAM (JP13) This clears the user-entered information stored in the Dallas DS12887A Chip such as hard disk information and passwords. Simply connect a jumper cap over this jumper for a few seconds then remove. Make sure that your computer is turned off. You must enter the BIOS setup (by holding down during power-up) after this is done to re-enter BIOS information (see BIOS SETUP). Selections JP13 Operation [open] (Default) Clear CMOS Data [short] (momentarily) III. INSTALLATION (Jumpers) JP13 JP13 Operation (Default) Clear CMOS Data CMOS RAM (Operation / Clear CMOS Data) Note: Dallas DS12B887 chips and Benchmarq BQ3287A chips require that you power on with the jumper shorted as in the following procedures: (1) Short Jumper (while the computer is off), (2) Power on, (3) Power off, (4) Open Jumper, (5) Power on, (6) Setup BIOS (hold down ) P/I-P55TP4N User's Manual 11
-
 1
1 -
2
-
3
-
4
-
5
-
6
-
7
-
8
-
9
-
10
-
11
-
 12
12 -
 13
13 -
 14
14 -
 15
15 -
 16
16 -
 17
17 -
 18
18 -
 19
19 -
 20
20 -
 21
21 -
 22
22 -
23
-
24
-
25
-
26
-
27
-
28
-
29
-
30
-
31
-
32
-
33
-
34
-
35
-
36
-
37
-
38
-
39
-
40
-
41
-
42
-
43
-
44
-
45
-
46
-
47
-
48
-
49
-
50
-
51
-
52
-
53
-
54
-
55
-
56
-
57
-
58
-
59
-
60
-
61
-
62
-
63
-
64
 |
 |
