Asus Z87M-PLUS Z87M-PLUS User's Manual - Page 152
Intel, Smart Connect Technology
 |
View all Asus Z87M-PLUS manuals
Add to My Manuals
Save this manual to your list of manuals |
Page 152 highlights
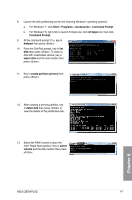
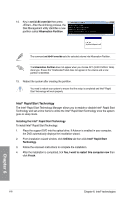
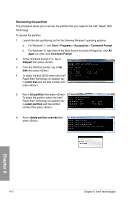
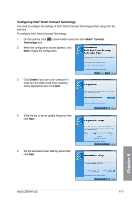
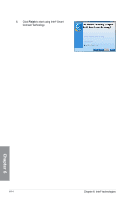
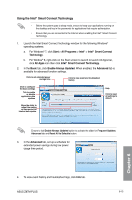
14. To remove the Intel® Rapid Start Manager from the following Windows® operating systems: a. For Windows 7, click Start > Control Panel > Programs > Programs and Features. Click Intel® Rapid Start Technology then click Uninstall. b. For Window® 8, right-click on the Start screen to launch to launch All Apps bar, click All Apps icon then click Control Panel Programs > Programs and Features. Click Intel® Rapid Start Technology then click Uninstall. 15. Reboot your system. 6.3 Intel® Smart Connect Technology Intel® Smart Connect Technology allows your system to automatically connect and update your cloud-based programs and applications by waking up your computer to a low power state. After the updates are done, your system goes back to sleep mode, thus helps reduce power consumption. • Intel® Smart Connect Technology supports Windows® Live Mail, Microsoft Outlook and Seesmic applications. • Ensure to enable Intel® Rapid Smart Connect Technology in BIOS before installing Intel® Smart Connect Technology. To do this from the BIOS, go to Advanced Mode > Advanced > PCH Configuration > Intel(R) Smart Connect Technology then set ISCT Support to [Enabled]. Installing the Intel® Smart Connect Technology To install the Intel® Smart Connect Technology: 1. Place the support DVD to the optical drive. If Autorun is enabled in your computer, the DVD automatically displays the installation wizard. 2. Click Utilities then click Intel® Smart Connect Technology. 3. When the setup wizard appears, click Next to begin the setup. 4. Tick I accept the terms in the License Agreement then click Next. 5. In Custom Setup, select all features then click Next. 6. Click Install to start the installation. 7. Click Yes to restart your system. Chapter 6 6-12 Chapter 6: Intel® technologies
-
 1
1 -
2
-
3
-
4
-
5
-
6
-
7
-
8
-
9
-
10
-
11
-
12
-
13
-
14
-
15
-
16
-
17
-
18
-
19
-
20
-
21
-
22
-
23
-
24
-
25
-
26
-
27
-
28
-
29
-
30
-
31
-
32
-
33
-
34
-
35
-
36
-
37
-
38
-
39
-
40
-
41
-
42
-
43
-
44
-
45
-
46
-
47
-
48
-
49
-
50
-
51
-
52
-
53
-
54
-
55
-
56
-
57
-
58
-
59
-
60
-
61
-
62
-
63
-
64
-
65
-
66
-
67
-
68
-
69
-
70
-
71
-
72
-
73
-
74
-
75
-
76
-
77
-
78
-
79
-
80
-
81
-
82
-
83
-
84
-
85
-
86
-
87
-
88
-
89
-
90
-
91
-
92
-
93
-
94
-
95
-
96
-
97
-
98
-
99
-
100
-
101
-
102
-
103
-
104
-
105
-
106
-
107
-
108
-
109
-
110
-
111
-
112
-
113
-
114
-
115
-
116
-
117
-
118
-
119
-
120
-
121
-
122
-
123
-
124
-
125
-
126
-
127
-
128
-
129
-
130
-
131
-
132
-
133
-
134
-
135
-
136
-
137
-
138
-
139
-
140
-
141
-
142
-
143
-
144
-
145
-
146
-
 147
147 -
 148
148 -
 149
149 -
 150
150 -
 151
151 -
 152
152 -
 153
153 -
 154
154 -
 155
155 -
 156
156 -
 157
157 -
158
-
159
-
160
-
161
-
162
-
163
-
164
 |
 |