Asus Z87M-PLUS Z87M-PLUS User's Manual - Page 155
Using the Intel, Smart Connect Technology
 |
View all Asus Z87M-PLUS manuals
Add to My Manuals
Save this manual to your list of manuals |
Page 155 highlights
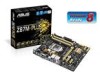
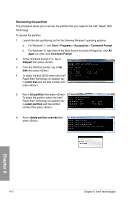
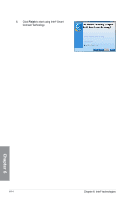
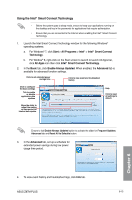
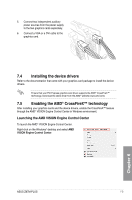
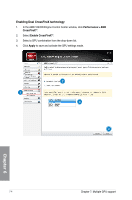
Using the Intel® Smart Connect Technology • Before the system goes to sleep mode, ensure to keep your applications running on the desktop and key in the passwords for applications that require authorization. • Ensure that you are connected to the Internet when enabling the Intel® Smart Connect Technology. 1. Launch the Intel Smart Connect Technology window for the following Windows® operating systems: a. For Windows® 7, click Start > All Programs > Intel® > Intel® Smart Connect Technology. b. For Window® 8, right-click on the Start screen to launch to launch All Apps bar, click All Apps icon then click Intel® Smart Connect Technology. 2. In the Basic tab, click Enable Always Updated. When enabled, the Advanced tab is available for advanced function settings. Click to set extended power savings time Click to view event and troubleshoot history Click to configure the basic settings Tick to enable or disable application data updates Help Click to reset all settings to default. Move the slider to adjust the waking up time period for Internet data update. Ensure to tick Enable Always Updated option to activate the slider for Frequent Updates, Advanced tab and Reset All to Defaults button. 3. In the Advanced tab, set up a schedule for extended power savings during low power usage time period. Chapter 6 4. To view event history and troubleshoot logs, click Info tab. ASUS Z87M-PLUS 6-15
-
 1
1 -
2
-
3
-
4
-
5
-
6
-
7
-
8
-
9
-
10
-
11
-
12
-
13
-
14
-
15
-
16
-
17
-
18
-
19
-
20
-
21
-
22
-
23
-
24
-
25
-
26
-
27
-
28
-
29
-
30
-
31
-
32
-
33
-
34
-
35
-
36
-
37
-
38
-
39
-
40
-
41
-
42
-
43
-
44
-
45
-
46
-
47
-
48
-
49
-
50
-
51
-
52
-
53
-
54
-
55
-
56
-
57
-
58
-
59
-
60
-
61
-
62
-
63
-
64
-
65
-
66
-
67
-
68
-
69
-
70
-
71
-
72
-
73
-
74
-
75
-
76
-
77
-
78
-
79
-
80
-
81
-
82
-
83
-
84
-
85
-
86
-
87
-
88
-
89
-
90
-
91
-
92
-
93
-
94
-
95
-
96
-
97
-
98
-
99
-
100
-
101
-
102
-
103
-
104
-
105
-
106
-
107
-
108
-
109
-
110
-
111
-
112
-
113
-
114
-
115
-
116
-
117
-
118
-
119
-
120
-
121
-
122
-
123
-
124
-
125
-
126
-
127
-
128
-
129
-
130
-
131
-
132
-
133
-
134
-
135
-
136
-
137
-
138
-
139
-
140
-
141
-
142
-
143
-
144
-
145
-
146
-
147
-
148
-
149
-
 150
150 -
 151
151 -
 152
152 -
 153
153 -
 154
154 -
 155
155 -
 156
156 -
 157
157 -
 158
158 -
 159
159 -
 160
160 -
161
-
162
-
163
-
164
 |
 |