Bowflex Power Pro Assembly Manual - Page 11
Step 1, Step 2, Step 3, Step 4, Installing the Leg Extension Attachment - leg attachment
 |
View all Bowflex Power Pro manuals
Add to My Manuals
Save this manual to your list of manuals |
Page 11 highlights
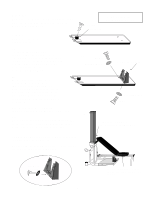
Installing the Leg Extension Attachment Components for this assembly are in a box labeled Leg Extension Attachment Step 1: Rotate Pivot Arm Bracket as indicated. Step 2: Secure Pivot Arm Bracket by inserting one 5/16" x 2" Hex Head Bolt through indicated hole on Bracket and tighten with one 5/16" Lock Nut. Check pre-placed bolt, tighten if necessary. Insert Leg Extension Foot into Leg Extension Main Frame as indicated. Insert one 5/16" x 2" Hex Head Bolt through hole and tighten with one 5/16" Lock Nut. Pre-placed Bolt Leg Extension Foot 5/16" x 2" Hex Head Bolt Step 3: Locate Seat. Align "L" brackets on bottom of Seat with holes located on Leg Extension Main Frame as indicated. Use two 5/16" x 2" Hex Head Bolts to secure Seat to Main Frame. Insert and tighten with two 5/16" Lock Nuts. 5/16" x 2" Hex Head Bolt Step 4: Locate Pivot Arm. Insert metal tubes through large holes at each end of Pivot Arm. IMPORTANT! Tighten pre-placed 1/4" x 3/4" Machine Screw into nut underneath top of Pivot Arm. BUT DO NOT OVERTIGHTEN! Pivot Arm Top Rubber Bumper w/ Bolt. Tighten pre-placed 1/4" x 3/4" Machine Screw. Bottom 12
-
 1
1 -
2
-
3
-
4
-
5
-
 6
6 -
 7
7 -
 8
8 -
 9
9 -
 10
10 -
 11
11 -
 12
12 -
 13
13 -
 14
14 -
 15
15 -
 16
16 -
17
-
18
-
19
-
20
-
21
-
22
-
23
-
24
-
25
-
26
-
27
 |
 |
