Bowflex Power Pro Assembly Manual - Page 12
Step 6, Step 5 - leg extension attachment
 |
View all Bowflex Power Pro manuals
Add to My Manuals
Save this manual to your list of manuals |
Page 12 highlights
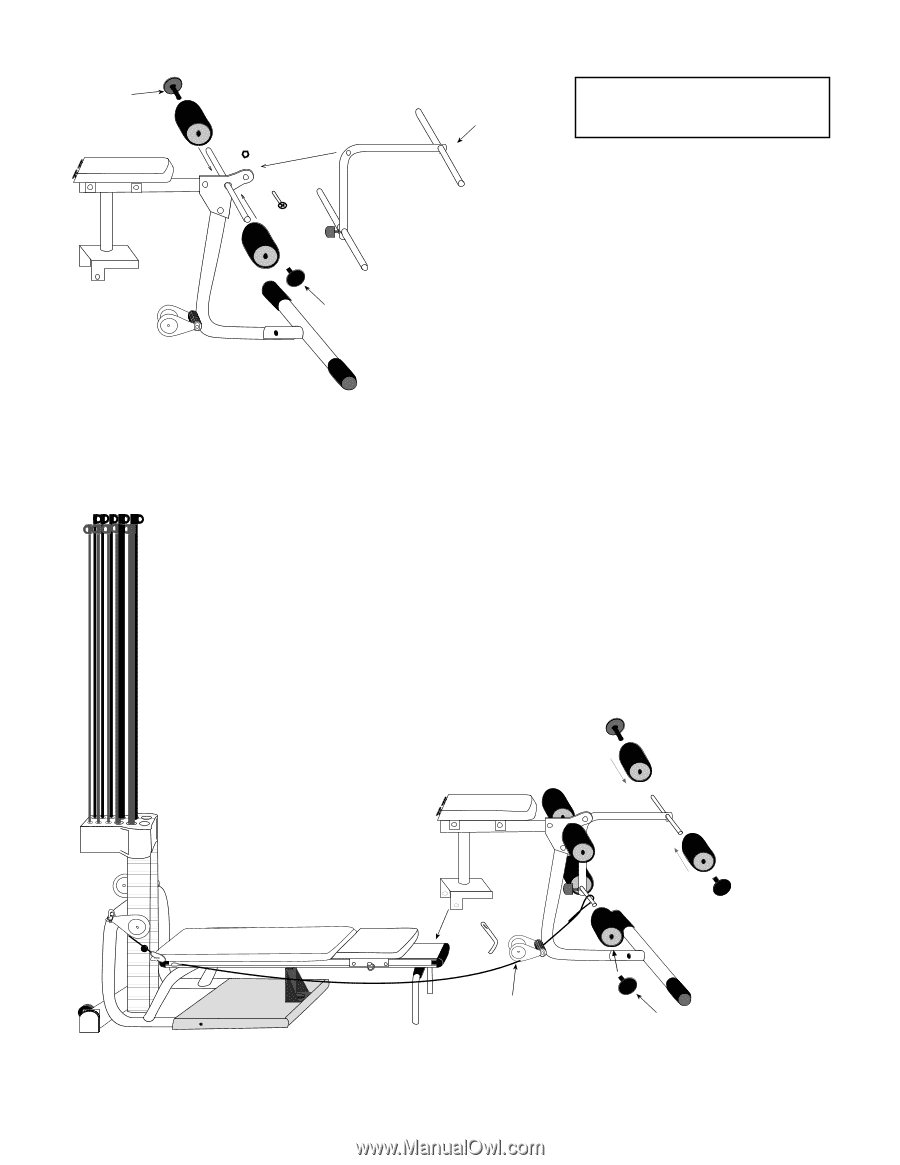
End Cap End Cap Pivot Arm Components for this assembly are in a box labeled Leg Extension Attachment Step 5: Insert metal tube through large holes on Pivot Arm Bracket. Slide on Foam Pads and secure with End Caps as indicated. Attach Pivot Arm Assembly to Pivot Arm Bracket with one M10 Allen Head Bolt. (Tighten with an allen wrench). Secure with M10 lock nut. Important! Do not overtighten. Tighten so that Pivot Arm Assembly does not have excessive side to side movement, but still pivots smoothly. Step 6: Attach Leg Extension to Bowflex by sliding Bench forward, then placing Leg Extension Bracket onto end of Seat Rail. Secure by inserting the "L" Pin through the two holes on Leg Extension Bracket. Make sure Pulleys are facing as shown. Thread cable through Pulley and Hook Loop around metal tube on each side as indicated below. Slide Foam Pads onto metal tube and insert End Caps. Use Snap Hook to fasten Leg Extension Cables to Bowflex Cables. "L" Pin Pulleys End Cap To leave Leg Extension on machine when not in use, unhook Leg Extension Cables from Bowflex Cables. 13
-
 1
1 -
2
-
3
-
4
-
5
-
6
-
 7
7 -
 8
8 -
 9
9 -
 10
10 -
 11
11 -
 12
12 -
 13
13 -
 14
14 -
 15
15 -
 16
16 -
 17
17 -
18
-
19
-
20
-
21
-
22
-
23
-
24
-
25
-
26
-
27
 |
 |