Bowflex Power Pro Assembly Manual - Page 5
Step 1, Assembling the Power Pro - attachments
 |
View all Bowflex Power Pro manuals
Add to My Manuals
Save this manual to your list of manuals |
Page 5 highlights
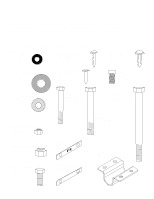
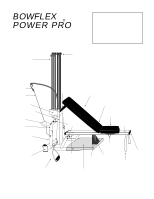
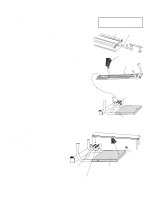
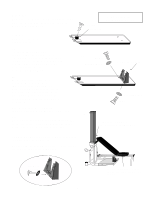
Step 1: Locate the Rear Leg and Seat Rail. 1a. Take two 3/8" x 3/4" square head bolts and place them through holes on the Rear Leg Bolt Keeper. Take that assembly and slide it into the Seat Rail channel, starting on the end closest to the warning label. Make sure to line up the end of the bolt keeper with the end of the rail. Repeat for the other bolt keeper. Assembling the Power Pro Components for this assembly are in Boxes 2 and 3 Seat Rail Channel 1a. Rear Leg Bolt Keeper (marked with an R) Once you have both bolt keepers in place, install the Rear Leg - place four 3/8" washers and tighten a 3/8" nylon locknut on to each of the bolts. Riser Bracket Please use caution when inserting the bolt keeper. Edges may be sharp. 1b. Next, take two 3/8" x 3/4" square head bolts and slide one into each side of the Seat Rail channel from the opposite end. Locate the Riser Bracket and attach it to the Seat Rail with the two square head bolts. Wait to tighten bolts with a wrench until after Step 1c. 1c. Now, locate the bolt keeper for the pivot bracket and two 3/8" x 3/4" square head bolts. Install the bolts into the bolt keeper. Slide them into the Seat Rail Channel making sure the keeper is flush with the end of the Seat Rail. Repeat for the other bolt keeper. Connect to Pivot Bracket Seat Rail Seat Rail Channel Make flush with the end of rail 1b. Pivot Bracket Locate the Pivot Bracket and Pulley Frame. Snap the Pivot Bracket between the screw heads on the Pulley Frame. Pulley Frame Install the rail so the four bolts at the front of the rail slide through the four holes in the pivot bracket. 1c. Edge of Seat Rail MUST be flush with edge of Pivot Bracket. Use 3/8" washers and 3/8" nylon lock nuts to Place four bolts secure the rail. in Pivot Bracket. IMPORTANT: Place Seat Rail so that the end of the rail is flush with the edge of the Pivot Bracket. Connect the bottom of the Riser Bracket to the standing platform with the 1" Knob. See example 1c. NOTE: You may need to pull up on the standing platform, near the hole, in order to get the screw to thread into the hole. Pivot Bracket Standing Platform IMPORTANT: Make sure the Pivot Bracket is between the two screws under the main frame before tightening Seat Rail to Pivot Bracket. 1" Knob NOTE: Each time you remove and reinstall the knob make sure it is completely fastened. 6
-
 1
1 -
 2
2 -
 3
3 -
 4
4 -
 5
5 -
 6
6 -
 7
7 -
 8
8 -
 9
9 -
 10
10 -
 11
11 -
12
-
13
-
14
-
15
-
16
-
17
-
18
-
19
-
20
-
21
-
22
-
23
-
24
-
25
-
26
-
27
 |
 |
