Bowflex Power Pro Assembly Manual - Page 7
Step 5, Step 4 - assembly
 |
View all Bowflex Power Pro manuals
Add to My Manuals
Save this manual to your list of manuals |
Page 7 highlights
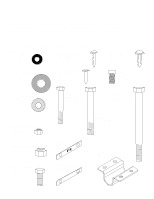
Step 4: Locate the Vertical Mainframe. Attach U-Bar portion of Pulley Frame to the Vertical Main Frame with the 3/8" x 2 1/2" Hex Head Bolt. Use the 3/8" x 4" Hex Head Bolt to secure the lower portion of the Pulley Frame. Tighten securely. 3/8" x 2 1/2" Tighten U-Bar securely. Hex Head Screw Note: It is best to tighten both top & bottom bolts at the same time evenly. Do not overtighten. 3/8" x 4" Hex Head Screw Components for this assembly are in Box 2 Vertical Main Frame Step 5: Locate the Power Rod Pack. Slide Power Rod Pack onto top of Vertical Main Frame. For easy installment, use a rubber mallet to tap rod box securely into Vertical Main Frame. Be sure that holes on each side line up. Secure the two parts together by tightening four of the #12 Screws through the four holes (two on each side) of the Power Rod Pack. Note: If the screws do not go in easily, use soap or other lubricant in screw threads. 5a. Power Rod Pack Components for this assembly are in Box 1 Vertical Main Frame #12 Screw 8
-
 1
1 -
 2
2 -
 3
3 -
 4
4 -
 5
5 -
 6
6 -
 7
7 -
 8
8 -
 9
9 -
 10
10 -
 11
11 -
 12
12 -
13
-
14
-
15
-
16
-
17
-
18
-
19
-
20
-
21
-
22
-
23
-
24
-
25
-
26
-
27
 |
 |
